thesarvo

Flowstone Wall

15 Routes0510<1616-1920-2425+TradSport
  • Walk1-2 hours
  • SunMorning sun
  • RockSlabby pink and grey granite up to 300m, mostly pretty run-out.

Introduction

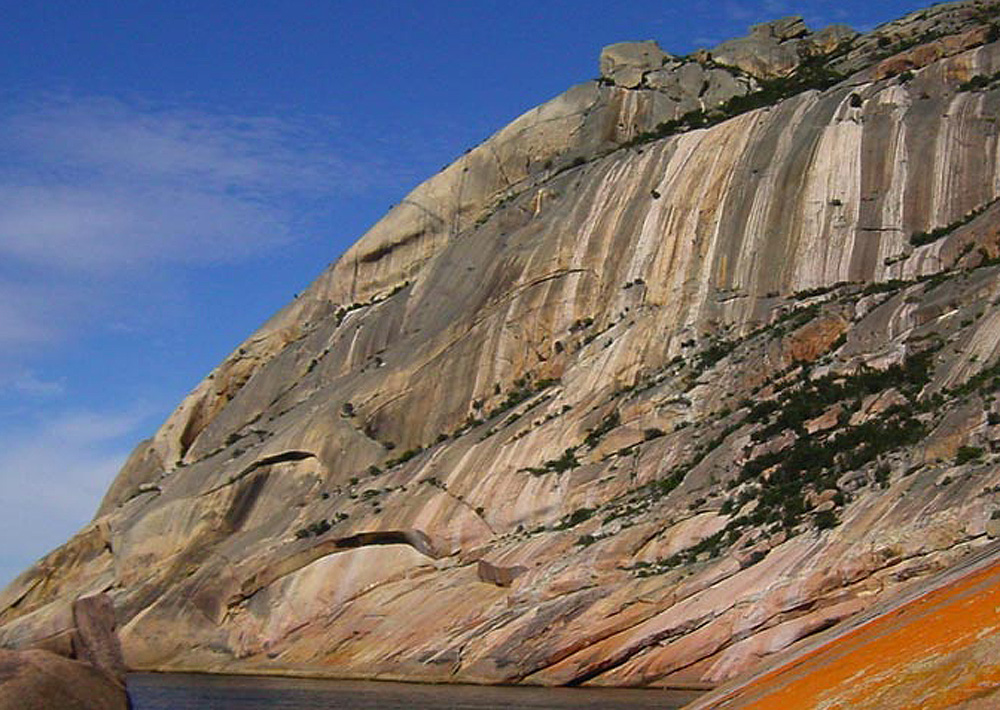
A remote and dangerous cliff, it is a huge, compact, east facing wall of water worn grey granite up to 200m in height, about halfway along the Sealevel Traverse. There are few routes on it due to inaccessibility, lack of obvious lines and poor protection.The climbing is mostly poorly protected slab climbing, although Arocknaphobia is a well protected classic.

Access

Located ~500m south of Mt.Parsons summit, just before the swim on the Sealevel Traverse. It can be reached by following the Skyline Traverse to the saddle between Mt. Parsons and Mt. Baudin and then heading down the gully to the foot of the cliff (over an hour). Alternatively if the swell is gentle it doesn't take much longer to follow the Sealevel Traverse, which is more pleasant.

Flowstone East Face
1.

Dance Of The Sugar Plum Fairy (Direct Start)

50m15
Start at the swim on the Sealevel Traverse.1. 50mGo up the slab, no runners.2.Continue as for original route.

Garn Cooper, Tim Chappell, A.Ross, L.Bottomley, Sep 1991

2.

Dance of the Sugar Plum Fairy

315m16
Dick Hain Memorial Route. This climb takes the huge arête on the left hand edge of Flowstone Wall. It starts 30m before the swim on the Sealevel Traverse, beneath a leftwards rising traverse under roofs. Something approximating the top half of the Dance was climbed by Ian Brown and Chris Fergusson in December 1974, by abseiling to where the huge flake/chimney drops over the edge into the sea.1. 40mClimb short wall of 7m then layback up corner to roof. Traverse left then up overlap to nut belay.2. 40mTraverse easily left on slab until scrubby corner is reached.3. 45mStraight up corner past overhangs on top to belay in large chimney on slab.4. 50mStraight up chimney to bush belay.5. 45mContinue up slab to bush belay.6. 50mUp slab.7. 45mUp slab.

P.Cullen, B.Kennedy, Jan 1977.

3.

Undyturd

190m17
The name tells. Approximately 50m right of Dance of the Sugar Plum Fairy at a small headwall.1. 40mUp the headwall then up tending left to small ledge.2. 40mUp tending slightly right to horizontal bushy break. Belay on left hand end of this.3. 45mStep up left then up the slab above passing bush on left to belay in groove below steepening. Move belay 7m left to first line encountered.4. 65mUp the chimney and groove above to make an awkward step left and traverse to line just right of bushy gully. Up this to bush belay. Traverse off right then up.

K.Lindorff, K.Roseberry, Jan 1977.

4.

Arocknaphobia

★★★160m22
One of the best routes at Coles Bay. Good protection, excellent climbing and excellent rock should make this route popular. Although graded 22, the climb may be better described as 19A0. The hard moves at the overlap can be aided on bolts to give a fun outing to the 19 leader. The first two pitches follow the huge right trending arc overlap on the left of flowstone wall. This obvious feature can be seen from the top of Mt. Parsons on the walk in. The view of the wall is gained from the summit of Mt Parsons, which is about 50m south of the skyline traverse track.It's best to abseil in from above - walk to the top of the first peak of Mt. Baudin (as viewed from Sleepy Bay) by following the skyline traverse track, which is marked by fading stripes of white paint. Avoid descending to the Mt Dove saddle directly from the Mt Parsons summit look out, and instead re find the skyline traverse track 50m north of the Mt Parsons look out. This is directly above the climb and the next hill up from the gully leading down to the wall. Walk down easy angled slabs to the rap station at the top of pitch 4.Two raps (Pitches 4 and 3) will put you at the top of pitch 2, from here rap down to a ledge (Do not use the DBB on this ledge, its is for accessing High Anxiety ?) Once at the base of the last abseil, scramble down and left then up to the base of the arc on the left side.It's possible to access the climb via the Sealevel Traverse, but this is not the best way to go.1. 25m 22(19A0)(Gear and 2 bolts) Follow the short overlap until it ends. Climb over it just left of the bolt and up to belay at the base of the main overlap.2. 25m 18(4 bolts and gear) A great pitch. Undercling and jam the overlap until a bolted belay is reached where an obvious dyke crosses it.3. 45m 16(6 bolts) Follow the dyke through the overlap, then up easily to belay below a short steep wall.4. 20m 17(3 bolts) Follow the juggy intrusion up the wall, then easily to a large ledge. This is where you rapped from when accessing the route.5. 25m 16(6 bolts) An excellent feature up the final headwall. This pitch start on a ledge 10m about where you rapped from when accessing the route.Rack: 8 quickdraws, full set of BD cams from #0.3 to #4, double ropes for abseiling. All belays except the first are bolted.NOTE: Some of the U bolts have been glued in too far which can make them impossible to clip with quickdraws with wide noses (like the Wild Country Helium's)

Sam Edwards, Rolan Eberhard, alt. Jan 1996.

5.

High Anxiety

225m21
Again the name tells. A strong contender for the waddiest climb on the peninsula. Could be significantly easier with sticky boots, however these can't eliminate the 20m runout. Down ramp left of Crystal Voyager.1. 45mUp obvious wall slab moving left to right trending corner, up slab following edge of overlap (thin unprotected) until mantle over overlap is possible (waddy). Belay at crack.2. 40mUp right along overlap (~3m) then move left up on to slab. Up slab (run out) to hold at about 20m (crux just before hold). Very thin.3. 50mUp ramp, and overlap. Move left then up line of holds through right hand end of major arch. Straight up to belay.4. 50mStraight up slab to belay.5. 40mStraight up slab to finish.

Adrian Herrington, B.Kennedy, May 1983. (One piece of aid on pitch 3, freed on second ascent).

6.

Free Ride

150m17
Pleasant. Involves climbing the prominent 5m corner near the base of the cliff about 30m left of Crystal Voyager.1. 45mClimb to bottom of corner, climb it and belay on top.2. 40mStraight up wall and slab above trending slightly right to belay.3. 65mStraight on to top.

P Cullen, Adrian Herington, Dec 1982.

7.

Spasm In The Outback

100m18
Created accidentally as an attempt to climb Crystal Voyager, it is possibly just a more direct version of this route. Climbs on the prominent brown streak just near Crystal Voyager. Sparse protection. Start below brown streak.1. 50mClimb to tree at base of streak. Up 1m right of streak, following line of least resistance to poor belay in hollow scoop ~5m below a bolt.2. 50mOn via bolt to top.

G.Cooper, D.Humphries, Feb 1987.

8.

Crystal Voyager

160m18
The classic of the cliff if you can navigate successfully. Directly up RHS of water streak nearest to prominent brown streak on lower part of wall, to RHS of major vertical flake system. Take care with the old bolts.1. 40mStraight up RHS of water streak to belay at small cluster of flakes, half hanging.2. 40mUp trending left to a bolt at 15m. From here straight up (sustained) to next bolt at 23m from the last, climbing eases a bit after about 15m, belay in crack 3m up and right of second bolt. Hanging belay.3. 50mStraight up slab, belay where possible.4. 30mOn to top.

Adrian Herington, B.Kennedy, Dec 1982.

9.

Prenatal Therapy

135m16
It is two water streaks right of Crystal Voyager and below the right hand end of a bracket-shaped - "{" - flake.1. 40mStraight up water streak to belay in horizontal break.2. 45mContinue up, moving left when the slab steepens, belay where possible.3. 50mStraight up to belay in a corner.4.Easily onwards.

Adrian Herington, Evan Peacock, Jun 1982.

10.

Roll Your Own

50m14

At the far right hand end of the wall at the easiest place to get onto it as you go right from Prenatal Therapy. About 5 or 6 water streaks to the right of Prenatal Therapy past a very steep section. Climb the water streak.

Evan Peacock, Garn Cooper, May 1983.

Flowstone South Face

To the left (South) of all the other climbs on Flowstone Wall and above the swim on the Sea Level Traverse is a steeper wall. This wall can not easily be accessed from the sea level traverse as the rockface left of DOSPF is quite blank. The left most route on this wall (as of 2013, TJMR), starts on the rocky shoreline that marks to end of swim on the sea level traverse and was originally accessed by kayaking in from Sleepy Bay for a ground up ascent. The Hancock/Fisher routes were approached by abseil from the south side of the big block above the top pitch of Arocknophobia. An alternative approach to TJMR would also be to abseil from above about ~40m left of the abseil to OOW (the first ascent team of TJMR descended to their boats by abseil in this fashion).

11.

The Jackson McQueen route

★★150m20
In celebration of brotherhood adventures. Start: on the rocky shoreline at the back of the bay, this climb starts up the right most accessible crack line above dry land, a few metres back from high water line.1.20m 20 Climb the left curving crack for 5m until it is possible to span right (crux, 1.7m span) to weakness. Up and right to semi-hanging belay on small ledges.2.45m 18 Up face and thin cracks past mantel crux (slightly runout) then easiest route to large sloping ledge below and left of overhanging corner.3.40m 18 Up overhanging corner on good holds, then up lovely thin seem on the hanging slab. Belay before gear gets too thin.4.40+m 17 Up last few metres of seem (small wires) then up and left (bold, thin) to bushy runnel and then climb easier slab left of this to finish. An alternative final pitch going up right via steep slabs from the end of the seam (needs a bolt or would be very bold) would make this a classic climb.Descend via abseil from natural features (just west of finish of climb).

K McQueen and H Jackson alt. 2005

12.

Ocean of Wisdom

★★★270m20
1. 30m 20Climb a left facing flake then step left and climb the beautiful dyke past 6 bolts to a DBB.2. 60m 16Continue up the dyke with spaced protection to a flake belay.3. 60m 12Climb the corner and move right to a spike belay.4. 60m 14Climb the slab with minimal gear past a 5 Friend to a ledge.5. 60m 10Climb the slab.

Nick Hancock & John Fischer (alt) Sep 2008.

13.

Permanent Residency

★★270m23
1. 40m 17Climb the crack leading to the big roof and belay at a foothold 5 metres below.2. 50m 23Tackle the daunting wide roof crack on jams and a crazy kneebar, to belay in the trench above.3. 60m 12Climb up the corner and continue as for Ocean of Wisdom pitches 4 & 5.

Nick Hancock & John Fischer (alt) Sep 2008.

Flowstone Boulder

These climbs are on the huge boulder above and to the left of the top of Arocknophobia and above the finishes of Ocean of Wisdom, Permanent Residency and Sugar Plum Fairy.

14.

Worth Killing a Friend For

★20m23

Climb the very thin crack in a shallow left facing corner to move left and climb the dyke on the left side of the block via 2 bolts.

John Fischer Sep 2008.

15.

Atonement

★★★20m25

Climb the stunning flake via 6 bolts to a thread and 3.5 Friend belay.

Nick Hancock Jan 2009.