
Whitewater Wall
 5 min
 Morning sun
 White granite, 10-50m
Access
The base of Whitewater Wall can be reached by following a rough track which begins where the old road first meets the top of the cliff. From the cliff top, head north (along the top of the cliff) to follow an indistinct pad to a rock cairn that marks the start of the descent (100m or so from where you first get the cliff top). The descent can be tricky in parts. Head down via a series of steps to a big terrace which is directly north of Whitewater Wall (above Light Fingered Madison Buttress). Walk right to the southern end of the terrace, scramble behind the notch and down-climb (grade 2) a short corner to the base of the wall. The large aplite dyke which crosses the wall from left to right is Apline. Again, the climbs are described left to right, but you'll encounter them right to left.
Caution: Be mindful of loose rock and dead vegetation that exists at the top of the wall, particularly above the popular routes in the middle of the wall. It is also advisable to check the forecast swell levels and monitor the wave action while belaying. Rogue waves can and do hit the wall, with wash-over usually occurring at the start of Apline.
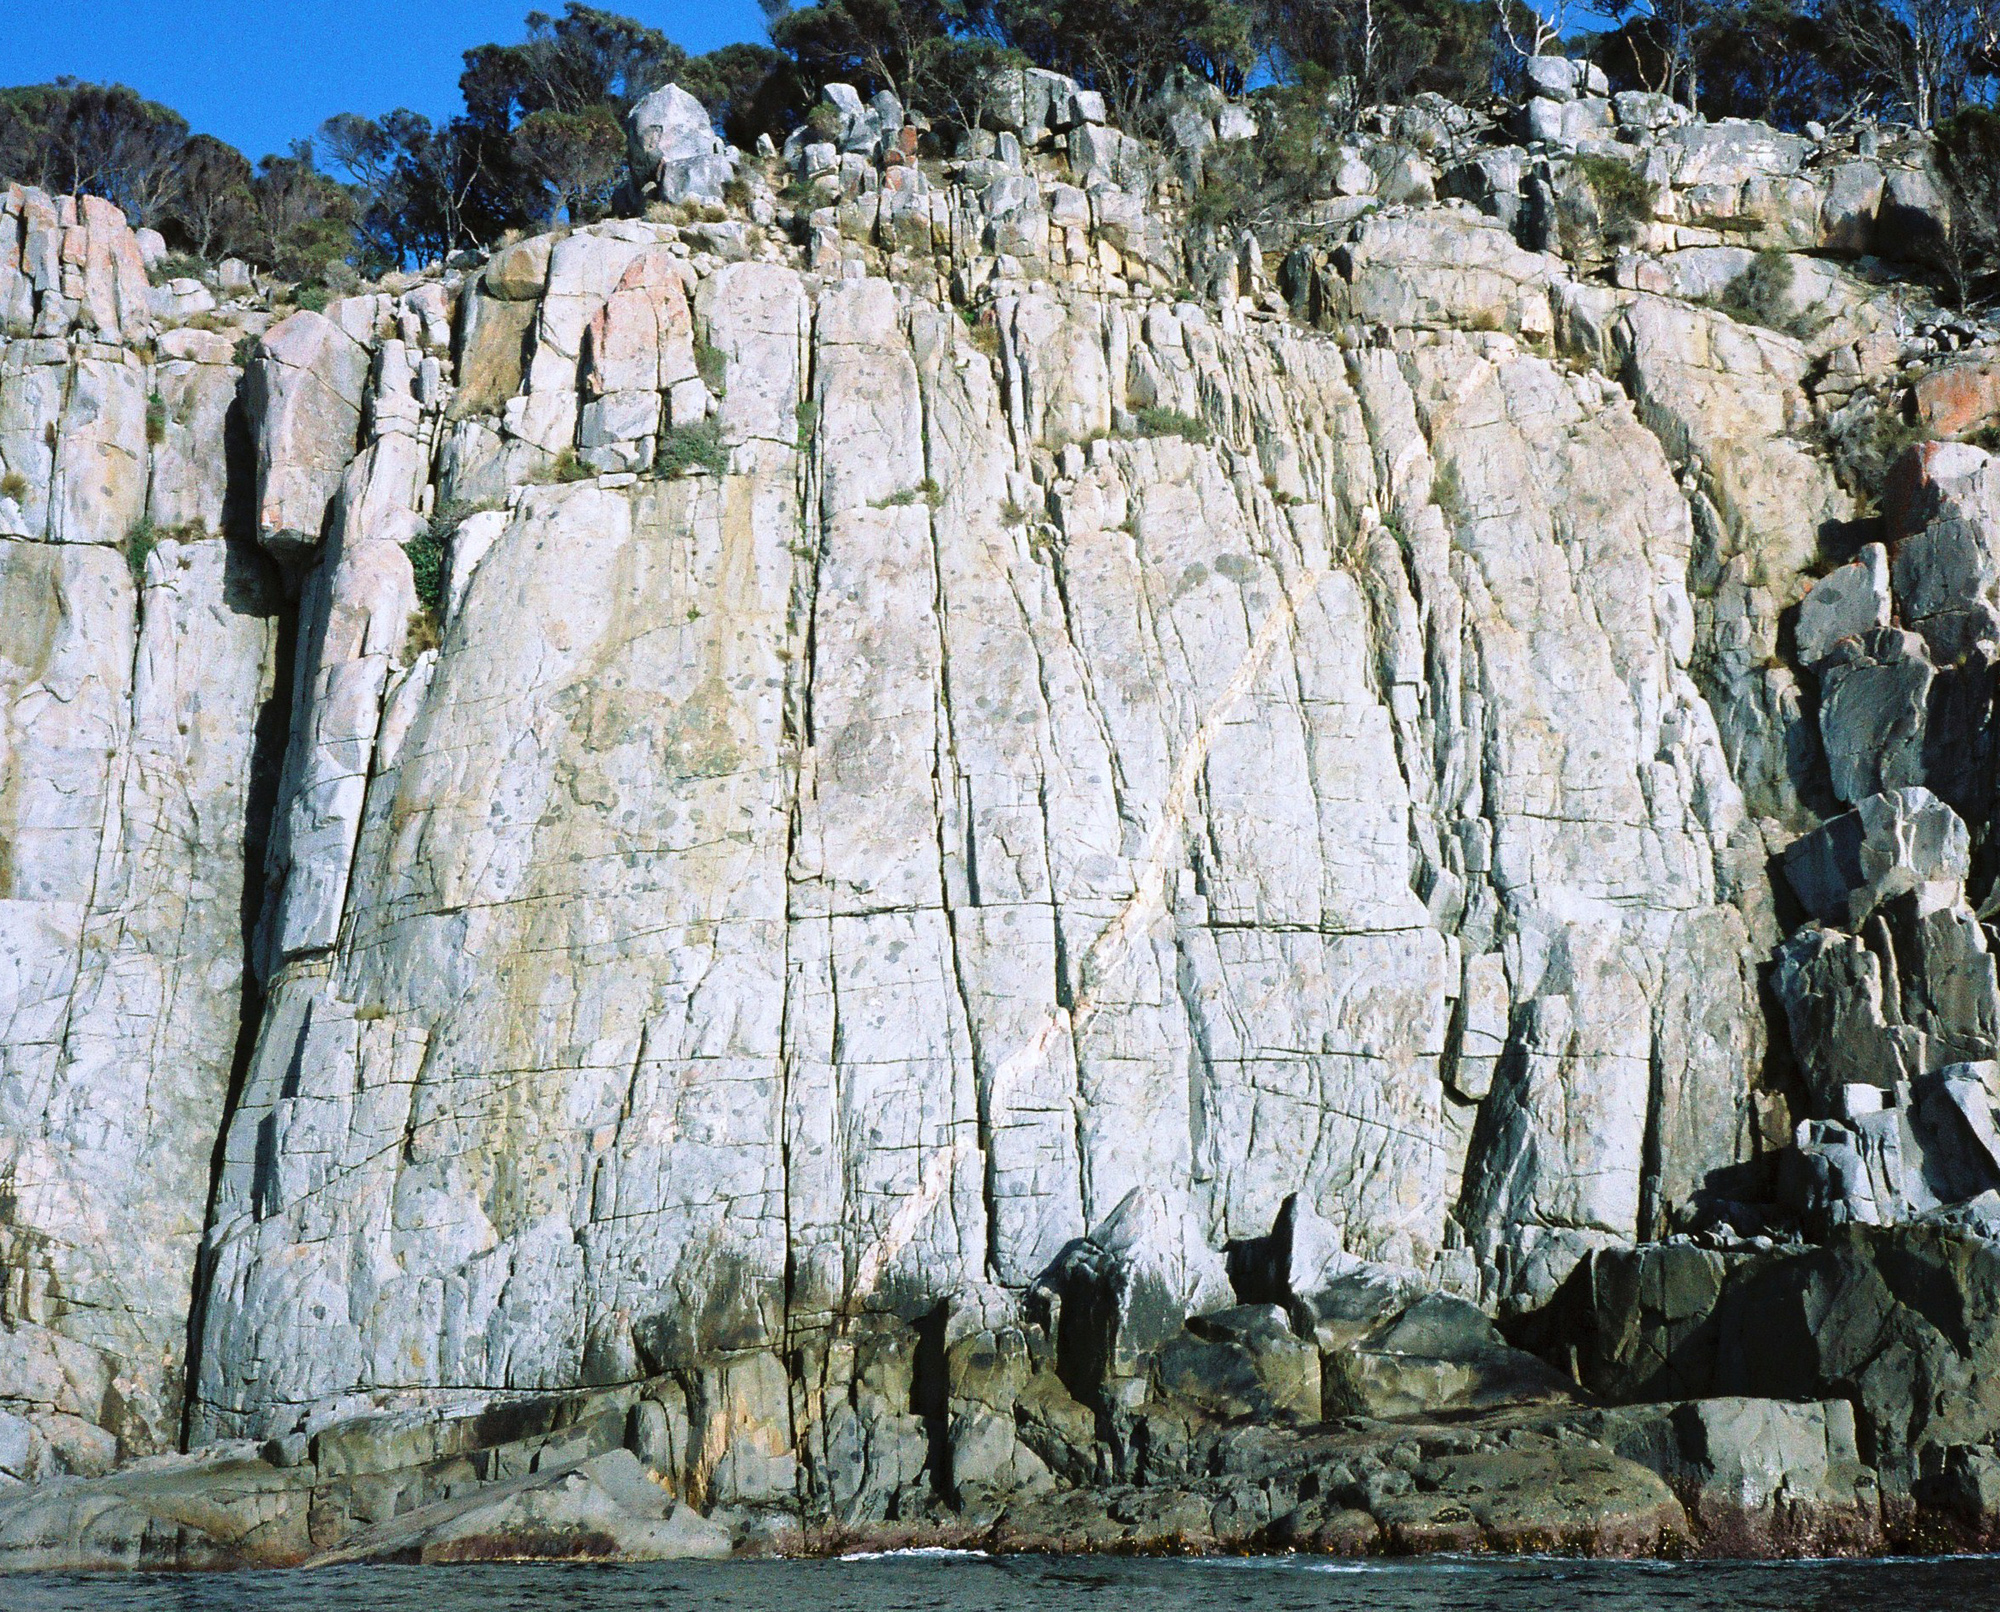
Whitewater Wall
- 1.The Inevitable Destruction11
- 2.Leilani11
- ★★3.Slaughterhouse Five16
- ★★4.Stretcher O'Neil20
- 5.Resolution17
- ★★★6.After the Goldrush19
- ★★7.Lost Boys Variant19
- ★★★8.No Turn Unstoned19
- ★★9.Baystone Blues17
- 10.Earthly Dilemma14
- ★★★11.Apline12
- ★★12.Beyond Blue14
- 13.Out of the Blue15
- ★14.Ultimate Conception10
- 15.Lace Thunder12
- 16.Fashionista15
- ★★17.Unnamed15
- ★★18.The Corner15
- ★★19.The Far Right14
- 20.Prancing in Pink19
This goes up the easy angled rock left of Leilani.
B.Kennedy, D.Hain, Mar 1975.
The corner below Slaughterhouse Five.
T.Last, S.Anderson, Mar 1975.
D.Hain, B.Kennedy, Mar 1975. Alt Finish: Bill Baxter and Will Van Den Bosch, 17 Mar 2008 (although may be the line climbed previously by Dave James).
Start as for Slaughterhouse Five. After climbing the crack for a few meters cross After the Goldrush, stepping right onto a knob on the face. Move up and slightly right with a couple of long reaches to gain a good ledge. Move up the face above on good holds and then right to a ledge. Above, trend left up to the ledge at the top of Slaughterhouse Five. There is also a 22 variant up the face further right by D. Stephenson.
N.Deka, A.Adams, D.Stephenson, Nov 1990.
The obvious off-width crack above the first belay on After the Goldrush. Needs no more description.
R.Thompson, R.Mansfield, Jan 1978.
Kim Carrigan, Ian Lewis, Jan 1975.
Start as for No Turn Left Unstoned, past bolt. At rock scab head left over runout slab up to small ledge on left side of red-coloured block. Climb left trending flake with just sufficient crack to house gear and fingers to small ledge and over seemingly blank bulge to tree belay. (seems to have been a couple of previously drilled bolt holes without bolts on slab section).
Josh Mackenzie, Stephanie Hart, December 2016
Starts a few metres right of Resolution, it has a bolt at about 18m. Climb straight to the bolt, passing through a short, shallow corner. Straight up past the bolt, then slightly right and up over top scab to the finish. Considered poorly protected by some, despite the bolt at the crux, it is nevertheless a great climb.
P.Cullen, W.Anderson, Jul 1982.
Excellent climbing with good, but spaced protection. Begin just right of the start of No Turn Unstoned (easily locatable because of its bolt). Climb up with a slight right trend to directly below left hand big scab. Straight up over this to a break below steeper rock at top. Up crack in steep pillar.
B.Kennedy, R.Muehlin, I.Lewis, D.Bowman, L.Closs, Jan 1977.
The first obvious crack line on the left hand side of Whitewater Wall proper. A few metres right of Baystone Blues. Climb the crack. Top half now extra gritty with tussock grass clumps and unrewarding.
P.Robinson, G.Holloway, Feb 1976.
K.Carrigan, S.Karpiniec (alt.), Jan 1975.
Getting depressed about your climbing? This integral route should bring the smile back... An eliminate that picks up some terrific climbing along the way.
Climb the juggy face just to the L of Out of the Blue and at the large recessed ledge, just below the sticking out flake/chockstone, step boldly out L under the scabs. Straight up over the scabs on immaculate holds until a balancy and unprotected traverse L crosses over Earth Dilemma. Climb up and L to the large bush, and finish up the final crack of Baystone Blues.
B. Baxter, concocted this back when Adam was a lad...
Climb the next crack right of Earthy Dilemma. Despite a pleasant start, it becomes awkward around a bush at 30m. Not the best climb on the wall.
L.Closs, I.Lewis, May 1974.
Good beginners climb. This is the left line opposite the detached knob. It crosses Apline at about 8m. Climb the crack. Best done in more than one pitch.
I.Lewis, L.Closs, May 1974.
The right hand line of the two near the separate knob. Climb to the big cave type hollow and out the top right of this then straight to the top.
L.Closs, I.Lewis, May 1974.
The part of the wall right of Lace Thunder has been climbed on in every possible spot. There is little harder than grade 14 and it is probably the best climbing of this grade in the state. Four immaculate lines have been picked out as they are just so good - as for the rest, go for your lives.
A sleek line to press all your fashion buttons! Start 2m right of Lace Thunder, left of the deep chimney and directly in front of the right hand detached knob at the base. The route follows a distinct line, best viewed from a seated position on top of this knob. Climb the line direct to the Apline dyke and then follow the dyke right to finish over the final bulge above Bill's Route. Alternatively, continue on straight up above the dyke to a bushy ledge at the base of a short corner. Up the corner for 1.5m before stepping out right. Continue up for 4m to belay on the large ledge. A 12m roped scramble leads to the top.
Unknown
Known as unnamed by generations of aspiring climbers. 10m to the right of Lace Thunder is a square cave-like chimney - about 2m further right, just left of a short left-facing corner, the wall is split by a steep finger crack. Climb the crack and then straight up the wall above on smaller and smaller holds. For full value, stay out of the gritty crack on the left and finish over the final bulge. The protection towards the top, where the climbing gets harder, is sparse but adequate.
Unknown
Up the left-facing corner and directly up the wall above where pro is sparse, joining Apline at the top.
Unknown
An excellent and popular route at the extreme right hand end of the Wall. Start at a short steep wall a couple of metres to the left of the end of the main wall itself. Climb up to a break and then follow the left trending crack line to the final bulge crossing Apline at the top. Finish over the bulge or walk off left.
Unknown
N.Duhig, G.Jordan, late, 1988.
Light Fingered Maddison Buttress
The Light Fingered Maddison Buttress is the compact wall rising out of the sea to the north of Whitewater Wall. Routes here are condition dependent, but the rock quality here is excellent. Best accessed by walking about 50m at sea-level to the north of Whitewater Wall. Routes from Rent a Rocket onwards are best via abseil, although Rent a Rocket itself can be accessed via a short traverse from the left.
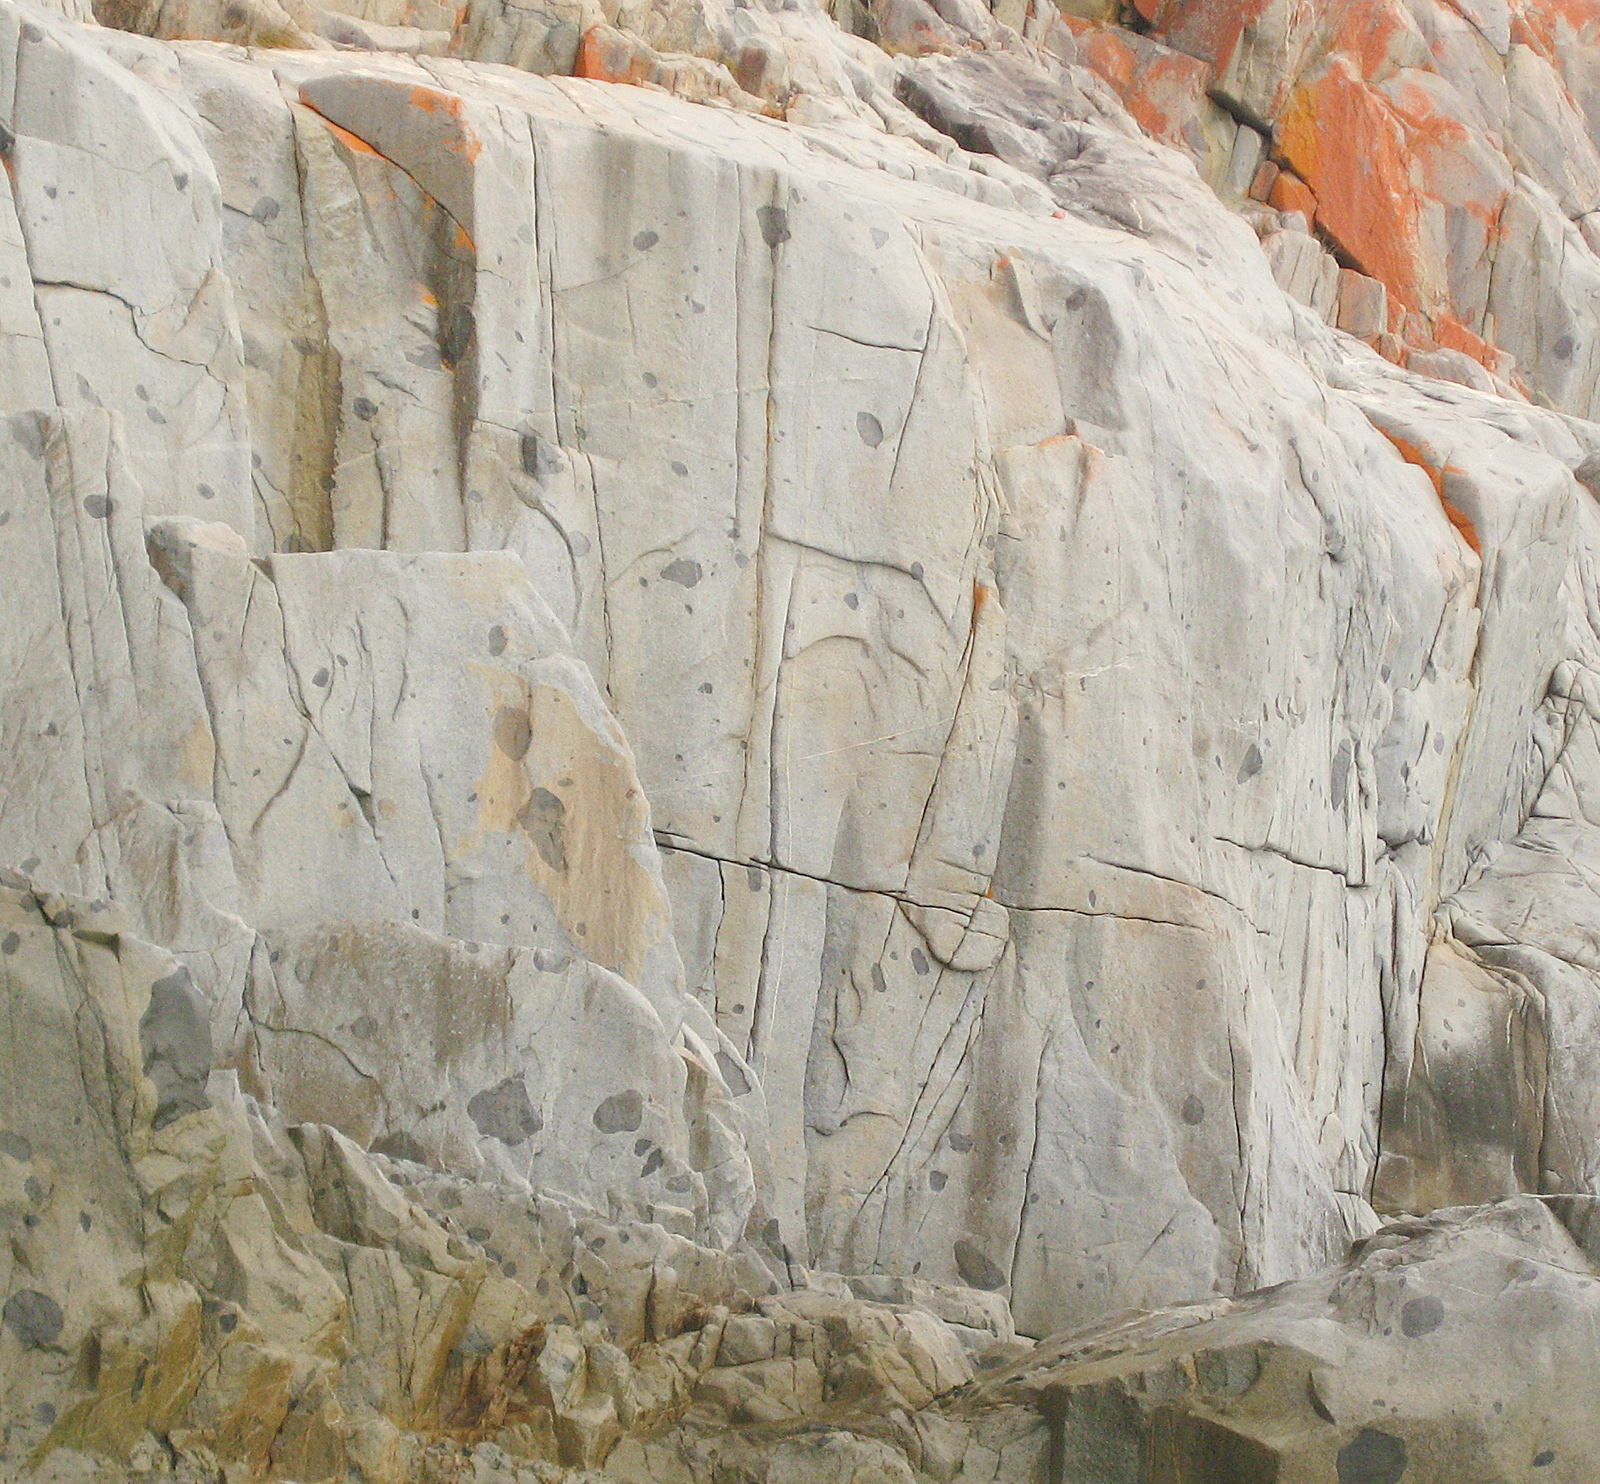
Light Fingered Maddison
The name tells all. Very good climbing. Start at Snotty Snake and follow the horizontal all the way past Light Fingered Maddison and Rent a Rocket. Continue across the final horizontal to finish.
R.Clune, G.Tempest, Mar 1983.
The line with 1 BR, on the left of the buttress. A pre-placed first runner and long sling on the bolt were used on the first ascent. Reputedly easier if you're a bit taller, but damn hard if you're not.
E. Peacock, Oct 1995.
One of the best and hardest trad routes around. When the original route traverses right, head direct up the flaring cracks above.
G. Phillips, S.Young, 2007.
The crack 3m left of Light Fingered Maddison. Follow this until it ends, then move right to the undercling (crux) and straight up.
S.Parsons, 1987.
Pure class and one of the classics in the area. Climb the diagonal twin finger cracks into the groove, then straight to the top. Well protected, excellent climbing.
N.Smith, N.Deka, F.Moon, R.McMahon, 1981.
Start up rent a rocket to gain horizontal crack. A selection of bomber cams can be placed, offset cams are useful but not entirely essential. Move straight up from the break following a subtle line on good side pulls and crimps. Make a committing move left, mantle and continue easily to the top. A top rope was used to prior to the lead. Protection is just sufficient to keep the climber off the ground if they fall from the crux.
Simon Bischoff March 23
Out of the water just right of Light Fingered Maddison (judge the tide and waves carefully). Lurch out of the sea and up the rib to gain the crack. Continue up the diagonal then the vertical shallow seam crack above to the top. Offset gear is beneficial.
Glen Tempest, R.Clune, Mar 1983.
Start from a stance L of Spray. Tricky move up crack to horizontal, then up and L to nice layback flake system (small cams). Bomber gear after this leads to a thought-provoking finish.
Squib, Ben Maddison, Ingrid Crossland. Nov, 2017.
Start as for In the Company of Thieves, but head directly up from horizontal. Steal a hold from Spray and finish straight up.
Squib, Ben Maddison, Ingrid Crossland. Nov, 2017.
The large groove L of Knocked in Rock.
N.Deka, R.Hamilton, 1981.
Starts on the yellow stained rock at the right hand end of the Light Fingered Maddison wall. Rap to a small ledge near sea level 3m to the right of the large groove. Up the flake crack to the large ramp, then climb the overhanging yellow wall on jugs to finish up a shallow corner on the slab.
J.Lamb, Pete Steane, Oct 1982.
Above the Light Fingered Maddison Buttress is a short bolted climb. It doesn't look very good, but in this case looks are deceiving. To find the climb look at the cliffs above Light Fingered Maddison and spot the u-bolts.
Climb past the three bolts to the no-hand rest on the ledge above. Either finish direct or bail left and up. It's not that difficult direct (19), but you do risk a ground fall. There's a tree at the top to belay or rap off, or you can scamper off to the north.
Nick Hancock, Apr 2002.
The short crack line to the right of Dislocator Beta is about grade 16 and is pretty cruisy apart from a strenuous top out. Descend/belay as for Dislocator Beta.
The Prow
These routes are described in relation to the Prow, the prominent orange buttress on the point about 100m north of the Light Fingered Maddison wall. It is clearly visible from the top of Whitewater Wall. Approached by walking across to its top from the Whitewater Wall descent and then abseiling, or alternatively walking down a gully just north of the Prow and then walking back along the shelves. There is now a double bolt belay on top of the Prow buttress.
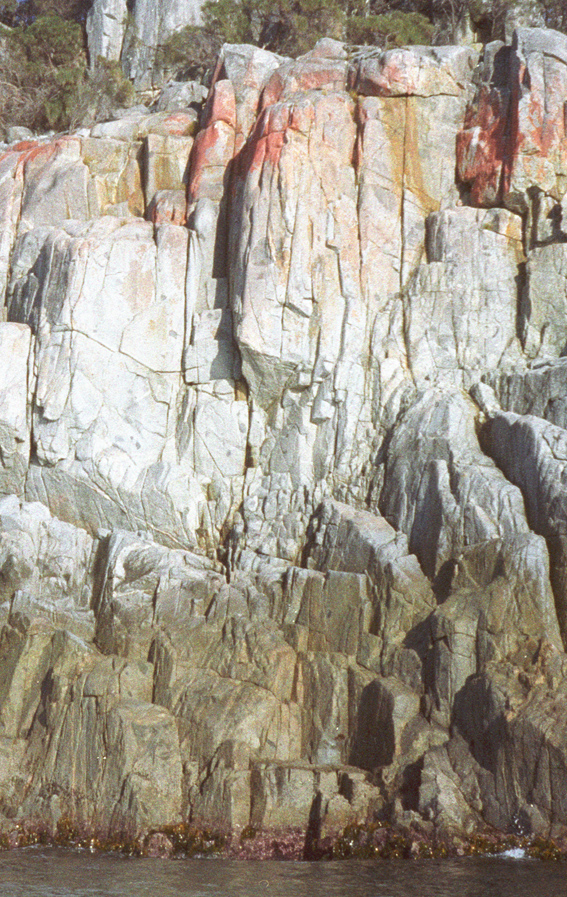
The Prow
The crack on the arête, gained by climbing into the overhanging slot left of the arête and then stepping right onto the nose and up the arête.
D, L.Stephenson, J, Marg Otlowski, Dec 1990.
Just right of the arête. Bouldery start and up the right diagonal crack. Back left to the horizontal break and up the seam just right of the arête. It's a bit contrived avoiding the easy crack on the left, but fun off the ground.
D.Stephenson, J.Otlowski, Dec 1990.
The slab right of the arête. Pull up on to the slab, climb to the horizontal break and head right up the ramp.
D, L.Stephenson, J, Marg Otlowski, Dec 1990.
Start as for the Prow. Once established on the nose follow thin seam L then straight up past gear and two bolts to finish on top of the Prow.
Alex and Bob Wilson, July 2012.
The prominent orange capped arête, overhanging at base. Climb a crack up to the left side of the buttress. An exciting step off right and up the steep flake leads to a stance on the nose. Start up the left hand seam, step right across the slab, and follow the thin crack on the arête to the top.
D.Stephenson, J & M. Otlowski, Dec 1990.
Climb slightly to the right of the overhanging roof at the base of the orange capped arête on good hand jams. Pull around the roof (more good jams) and continue up stepping slightly left to join original line of The Prow. A bit thuggish and not as classy as the original start.
Rob Hardy Sep 2017
The wall right of The Prow. Climb a pillar and cracks to finish up thin cracks just right of The Prow arête.
D.Stephenson, J & M.Otlowski, Dec 1990.
Climb the easiest to access, slightly undervert crack that widens to towards the top. Good hand/foot jamming, great gear.
Chris Lang, Oct 2020
Morning Glory Rocks
Morning Glory Rocks (which get the early rising sun) are situated above The Prow. Access is down the Whitewater Wall track to the point where it leaves the she-oaks but before descending the wide rock gully. At this point go north for 20 meters.
Up the center of the first Rock. The thin crack with an overhanging start.
R. McMahon.
On the Second Rock, the thin crack a meter to the right of the off-width.
Bill Baxter, Dennis Kearnes and Alan Williams, Oct 2003.
At the right hand end of the Second Rock is a cosmetic RP crack. Up to this, then jugs at the top.
Dennis Kearnes and half of Launceston, Oct 2003.
Tango Towers
To find the following climbs head north downhill from the highest tent site in the campsite - near where the main track to white water wall starts. Stay on a ridge feature down past small boulders and walk to the bright orange blocks that are Tango tower. Go down between the blocks and turn right, walking around the base, to end up by a small zawn. Tango Towers is predominantly in the shade.
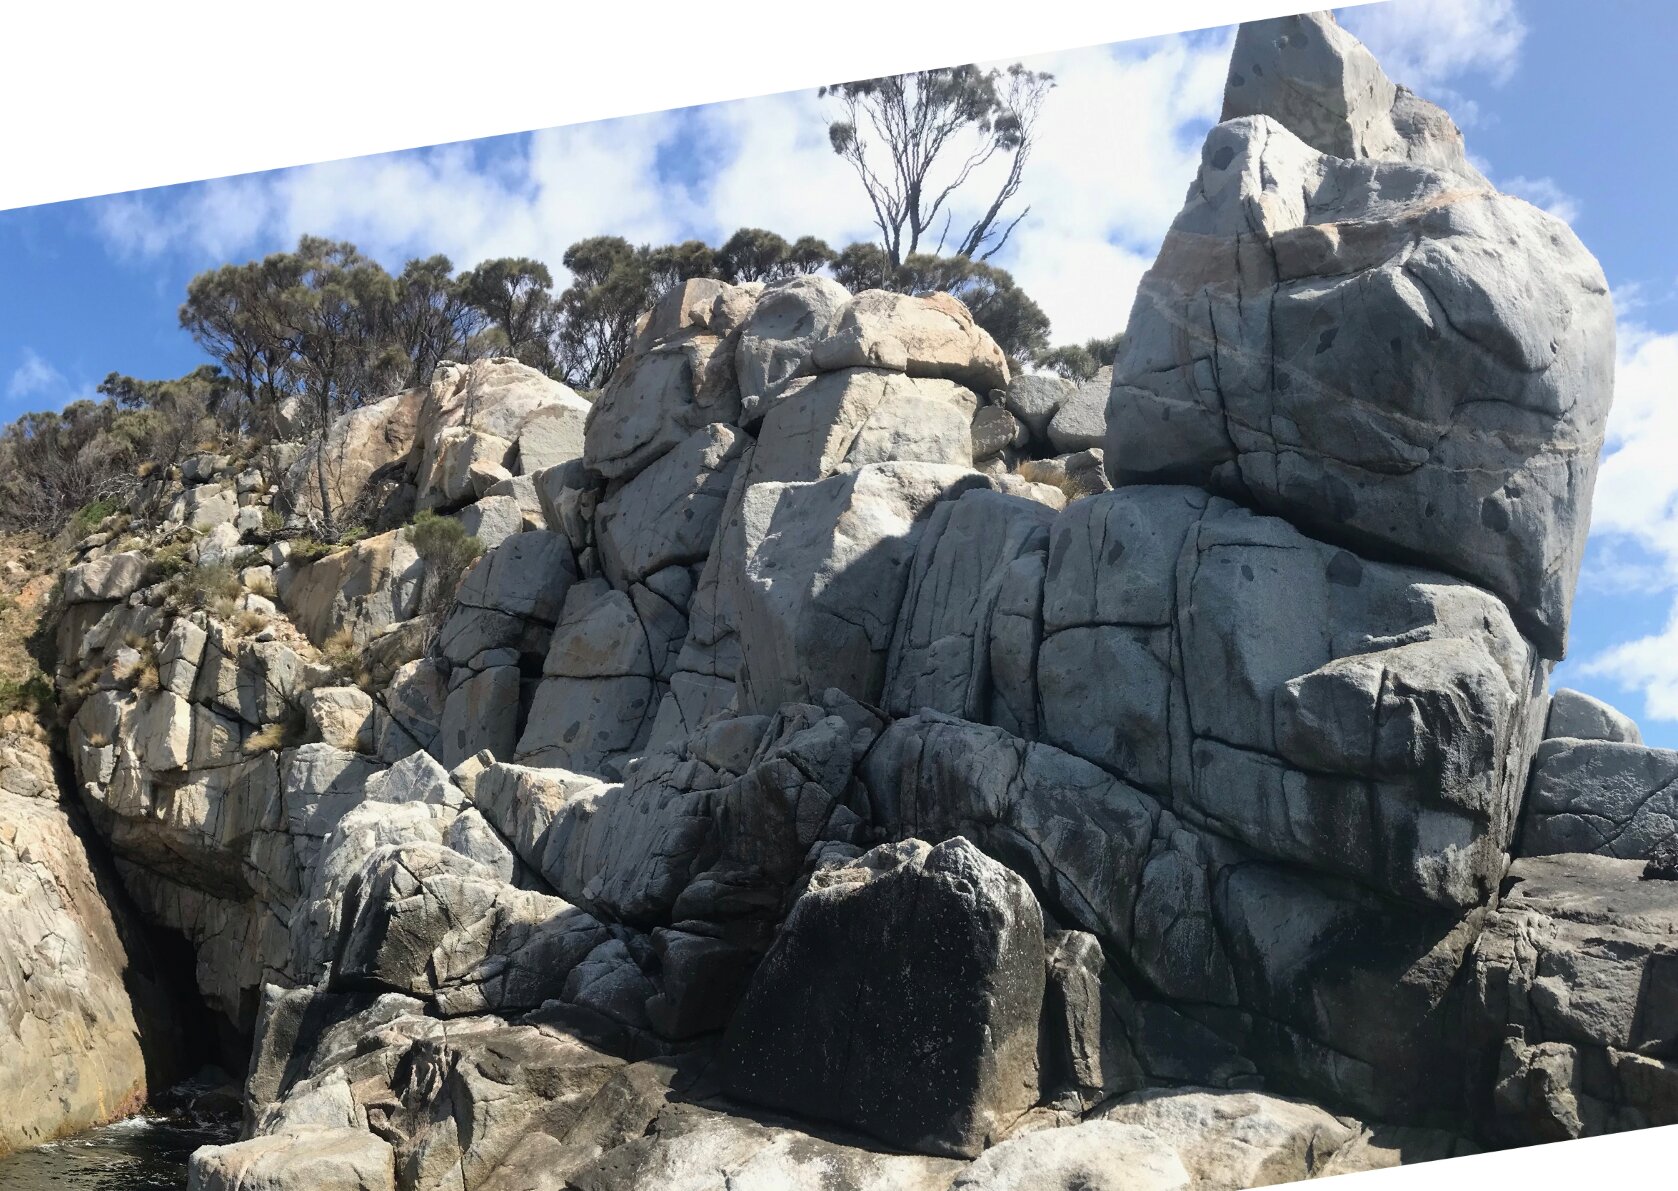
Deep in the zawn is a roof with an obvious horizontal line below it. This route is a hand traverse of this line, from right to left. The first pitch is fun, the second is crap and loose, I've included it only as a deterrent to any would-be suitors keen to get their name in the book - don't go near it, it's worthless and been done. 1) Follow the horizontal line from right to left, finishing on the slab. Gear and rock are good. 2) Grab the jug, chin up to the layaway and head on up. Gear and rock are crap.
Nick Hancock, Andrew Bissett, Apr 2001.
On the next pinnacle right. Start at the groove on the right of the face. A few tricky moves up left (crux) lead to the horizontal. Easier climbing leads to the top.
Nick Hancock, Oct 2000.
On the next pinnacle to the right. Start on the left of the face. Head up for a few meters and work right to the arête at the horizontal. Follow the arête and face to the next horizontal, and then the line to the top. Protection is not great, but a sneakily slung spike edge may ease the tension for a while (until it falls off when you're in the middle of the crux).
Nick Hancock, Aug 2000.
The thin left trending seam 3m left of Up the Ante. Up past an undercling flake, to follow the seam left to the arête. A tricky mantle leads to the top. The gear on this route is not great (small hard to arrange RP's), but the climbing is good.
Nick Hancock, Carol Hurst, Aug 2000.
Approximately 14m left of All Hands to the Pump. The right hand arête of the next pinnacle. The crux is off the ground and the gear after this is good.
N.Hancock, C.Hurst, Oct 2000.
Clip the bolt and climb the face to another via the tricky start. Follow the holds up and left, crossing the wide diagonal crack ( 4 camalot) to gain a third bolt. Head past this up the orange face to the top (mid-sized cams to belay).
R.Parkyn, A.Bissett, N.Hancock, Aug 2002.
On the orange topped pinnacle, follows the groves right of Orange Crush. Start up the crack on the east to gain a ledge. Continue steeply through the bulge and on to the top via the open groove (protect with a well placed nut).
N.Hancock, C.Hurst, Aug 2000.
Tango Towers - Right Side
If you are looking at the Tango Towers from the sea, around on the RHS towards Bluestone Bay is a 6m high, gently overhanging wall with a striking crack spliting in the middle. It is about 2 minutes' walk from the Tango Towers main area. These four climbs are on this wall.
On the left hand side on the wall there is a thrutchy pink band. Up this. Move right to top out.
Will Bartlett and Alex Lewis, Sep 2009
The thin, striking crack. Quite a nice bouldery sequence straight off the ground with some dynamic moves. Once the juggy horizontal break is reached, top out straight up. Red and Green C3's protect the lower moves.
Alex Lewis and Will Bartlett, Sep 2009
Beginning on the lower RHS of the wall is a juggy horizontal break that moves left and up. Follow this to join Generation O.
Alex Lewis and Will Bartlett, Sep 2009
The RHS of the wall culminates in an overhanging prow. Climb this without going too far left or right. Might be a boulder problem, unsure of this as it could easily be done with mats.
A.Lewis and W.Bartlett, Sep 2009