
Hazards Main Wall
 30 - 50 minutes
 Morning sun
 Pink, slabby granite, up to 300m high
Acknowledgement
The initial content for this guide was sourced from Freycinet Peninsula: A climber's guide. University of Tasmania Climbers Club and the Climbers Club of Tasmania, 1995.
Introduction
The Hazards Main Wall sits in a truly spectacular location. The climbing here is serious and the potential for character forming experiences is high. The longest routes in Freycinet are found here.
The Main Wall is subdivided into Main Wall Left, Centre and Right to match corresponding topos. Routes such as Pneisses, Japhlion and Trusting Rust that are around 250m in length are located on Main Wall Left. Routes on Main Wall Left are not particularly well defined, making them tricky to follow. However as a general rule they tend to follow the cleanest slabs in amongst the confusion.
Routes on Main Wall Centre are shorter and generally less than 150m in length. Routes on Main Wall Right taper down into single pitch climbs. Route finding for both these areas is more straightforward, with most routes following strong natural lines.
To enable route familiarisation, identifying the routes Japhlion, Lucky Streak, Winning Streaks, Stud City, Touch and Go and Full Sail to use as way points is helpful. The Main Wall Overview topo further aids the identification process.
The initial section of the Skyline Traverse from Sleepy Bay carpark to Mt Parsons is the principle approach route for the Main Wall and adjacent crags. Equally important approach routes are two other traverse lines; the Sea Level Traverse and the Mid Level Traverse that branch off the Skyline Traverse.
For climbs that finish short of the top of the cliff, a scramble is required to reach the crest. Allow enough time for route finding and remember descents from this crag can be epic in the dark.
A number of expansion bolts and mild steel carrots placed in the 1980s and 1990s have been flagged by the Climbers Club of Tasmania for replacement. Where encountered, these should be treated judiciously.
In October 2024 the Main Wall routes were reordered left to right and new topos added in line with established convention.
Access
Access to the Hazards Main Wall starts from the Sleepy Bay car park. From the car park follow the trail down to Little Gravelly Beach and continue further around the coast to a boot cleaning station.
At the bottom of the hill 300m further on, there is a fork in the track. The Sea Level Traverse leaves the Skyline Traverse at this point, branching left to head along the coast adjacent to the waterline. The Sea Level Traverse provides access for routes on Main Wall Left when sea and swell conditions are favourable.
The Skyline Traverse follows the right hand fork which also marks the start of the climb up Mt Parsons. As you ascend following the cairned route, the Main Wall is visible to your left.
About halfway up the hill a prominent line of scrub appears on the left of the track. This marks where the Mid Level Traverse branches off to the left. Following the Mid Level Traverse is the approach for bottom up routes on Main Wall Left, Centre and Right.
Continuing further up the Skyline Traverse towards Mt Parsons, the Suzuki Complex is reached just before the track flattens out. This small crag is situated 10m left of the trail. This crag is close to where routes on Main Wall Centre top out. This point provides egress for routes such as Fiancetto, Kids on Skids, Lubricity and Stud City. It is also the approach via abseil for the top down route, Winning Streaks.
The Skyline Traverse relents above the Suzuki Complex and flattens out for 200m. At this point you are close to where the longer routes on Main Wall Left, such as Pooch Slab, Pneisses and Japhlion, top out. This is the egress point is also the approach via abseil for top down routes such as Serial Streaker and Lucky Streak.
GPS
Main Wall Overview
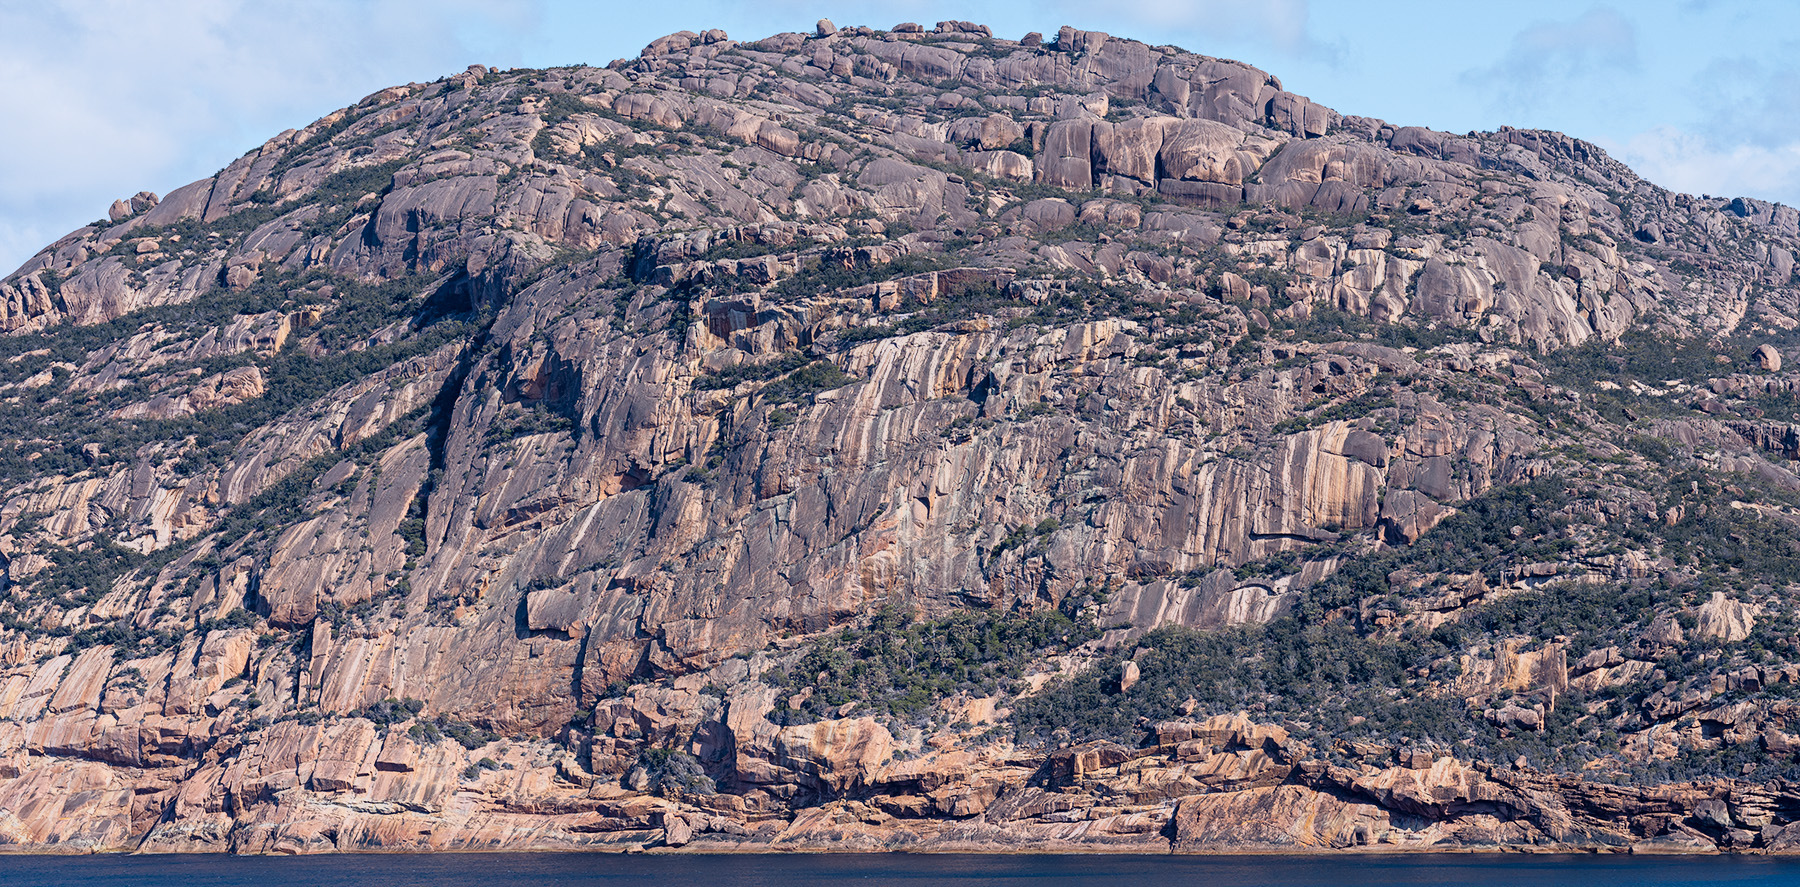
Main Wall Overview
Main Wall Approach Routes
If you are comfortable soloing granite slabs, then other than food and water, no gear is required. One fixed abseil point exists along the way but this can be bypassed with a down climb. The Skyline Traverse involves steep technical scrambling, advanced navigation skills and can be done in either direction though most people start from Sleepy Bay. The polished sections of granite are very slippery after rain, but when dry the friction is optimal.
Start at the Sleepy Bay car park and follow the track which heads south along the coast past Little Gravelly Beach. After the boot cleaning station, follow the trail for 300m to the junction with the Sea Level Traverse. Take the right fork and follow a cairned route which heads steeply up the hill before the remnants of a white dotted line begins. This section to the top of Mt Parsons is used as both approach and egress for a number of Main Wall climbs. It is also used to approach Suzuki Complex and Wombat Crag.
Continue following the faint dotted line over Mt Parsons, past a massive bivvy cave, until it ceases on Mt Baudin.
Navigation becomes more difficult as the obvious way to Mt Dove is blocked by deep ravines and massive boulders. Either rap in from the fixed abseil point or down climb a gully to the right (west) until you can traverse back south. Find your way through the scrub and boulders back onto the skyline. Continue south down to the col between Mt Baudin and Mt Dove and then steeply up to the summit of Dove. The difficulties are not over yet, as the steep scramble down the slabs and corners to the col before Mt Amos still requires care.
Most climbers finish on top of Mt Amos and walk down the tourist track. It is possible to make your way down through the scrub and over the boulders to the saddle between Mt Amos and Mt Mayson, and then on down to the Wineglass Bay track on the west side of the peninsula and back to the trailhead car park. Allow at least a couple of hours extra for this section.
First Ascent Unknown
Despite its name, the Sea Level Traverse at times detours some distance from the sea. If you are intending to do the entire traverse, be prepared for a swim. Take food, water, dry bag and at least a small rack and rope. Requires a still day that is not threatened by swell. It is slippery after rain and high wave action.
The first section of the Sea Level Traverse is an alternative approach for routes on Main Wall Left. Negotiating the Horizontal Chimney, usually requires the need to rope up and place gear and is the principle reason the Mid Level Traverse has gained popularity as a faster and more dependable alternative for approaching Main Wall Left.
Start at Sleepy Bay car park and walk down the trail to Little Gravelly Beach. Follow the coast around to the boot cleaning station and beyond for another 300m. Here the route diverges from the Skyline Traverse and goes down towards sea level involving some thoughtful scrambling and a watchful eye on the swell. Continue traversing until a gulch is reached. This is the Horizontal Chimney and using a rope and gear to climb it is at your discretion.
To reach the base of routes on Main Wall Left veer right shortly after the Horizontal Chimney and climb the slabs to intersect with the Mid Level Traverse on a prominent scrubby terrace.
To continue the Sea Level Traverse, pad easily along the slabs near the waterline. After 2km of traversing the slabs and climbing over short steps, you round a corner and see Flowstone Wall. At this point you are at The Gonk. Just after passing below Flowstone Wall you must swim about 50m. Scramble and walk more easily along the coast line, finishing at the north end of Wineglass Bay Beach. Return over the Wineglass Bay track to the trailhead car park.
R. Williams, L. Closs, summer 1970.
The Mid Level Traverse is less of a route climbed in its own right, than a means to approach the base of routes on Main Wall Left, Centre and Right.
From the Sleepy Bay carpark follow the track down to Little Gravelly Beach. Follow the Skyline Traverse along the coast past the boot cleaning station, past the Sea Level Traverse turn off to head up hill towards Mt Parsons. Follow the cairned route until halfway up the hill at the point where a prominent line of scrub branches out left. This is the start of the Mid Level Traverse. It is cairned, and branches off left from the Skyline traverse at this point.
Follow a rough pad and cairns left and traverse round and down under the cliffs. There are two variant traverse lines. Main Wall Right routes between The Axiom and the Reprieve are accessed from a higher level traverse that branches off before the large slab. For routes on Main Wall Left and Centre take the lower level variant which traverses under the base of the large slab past the bolted routes Slippery Slope and Touch and Go. Follow a rising traverse to rejoin the crag at Stud City. From here the traversing gets more technical and exposed where it passes under Epaminondas. Beyond here the traverse descends and downclimbs a short chimney to gain the slabs. Follow the traverse line straight across to the scrubby terrace and base of Japhlion.
It takes about 40 minutes of careful soloing to reach the base of Japhlion from where the Mid Level Traverse leaves the Skyline Traverse. While the Mid Level Traverse is quite exposed in places, it usually does not require roping up. The Mid Level Traverse has gained popularity over the Sea Level Traverse as an approach route for Main Wall Left.
First Ascent Unknown
Main Wall Left
All routes on Main Wall Left start from the Mid Level Traverse with the exception of See Eagle Streak, Lucky Streak and Serial Streaker which use a top down approach.
Pooch Slab, Pneisses and Japhlion are the farthest left routes on Main Wall Left. To reach these routes follow the Mid Level Traverse to reach the scrubby terrace near its very end. About 15m before you reach Pneisses, drop down into a patch of scrub then continue along the traverse line to reach its start. Before the drop down 25m before Pneisses, you pass the base of Japhlion. It starts off the terrace where a patch of scrub has grown up against the slab just left of a small vegetated corner.
The Sea Level Traverse can be used to approach Main Wall Left if sea and swell conditions permit. However, the Mid Level Traverse is the faster and more reliable option of the two.
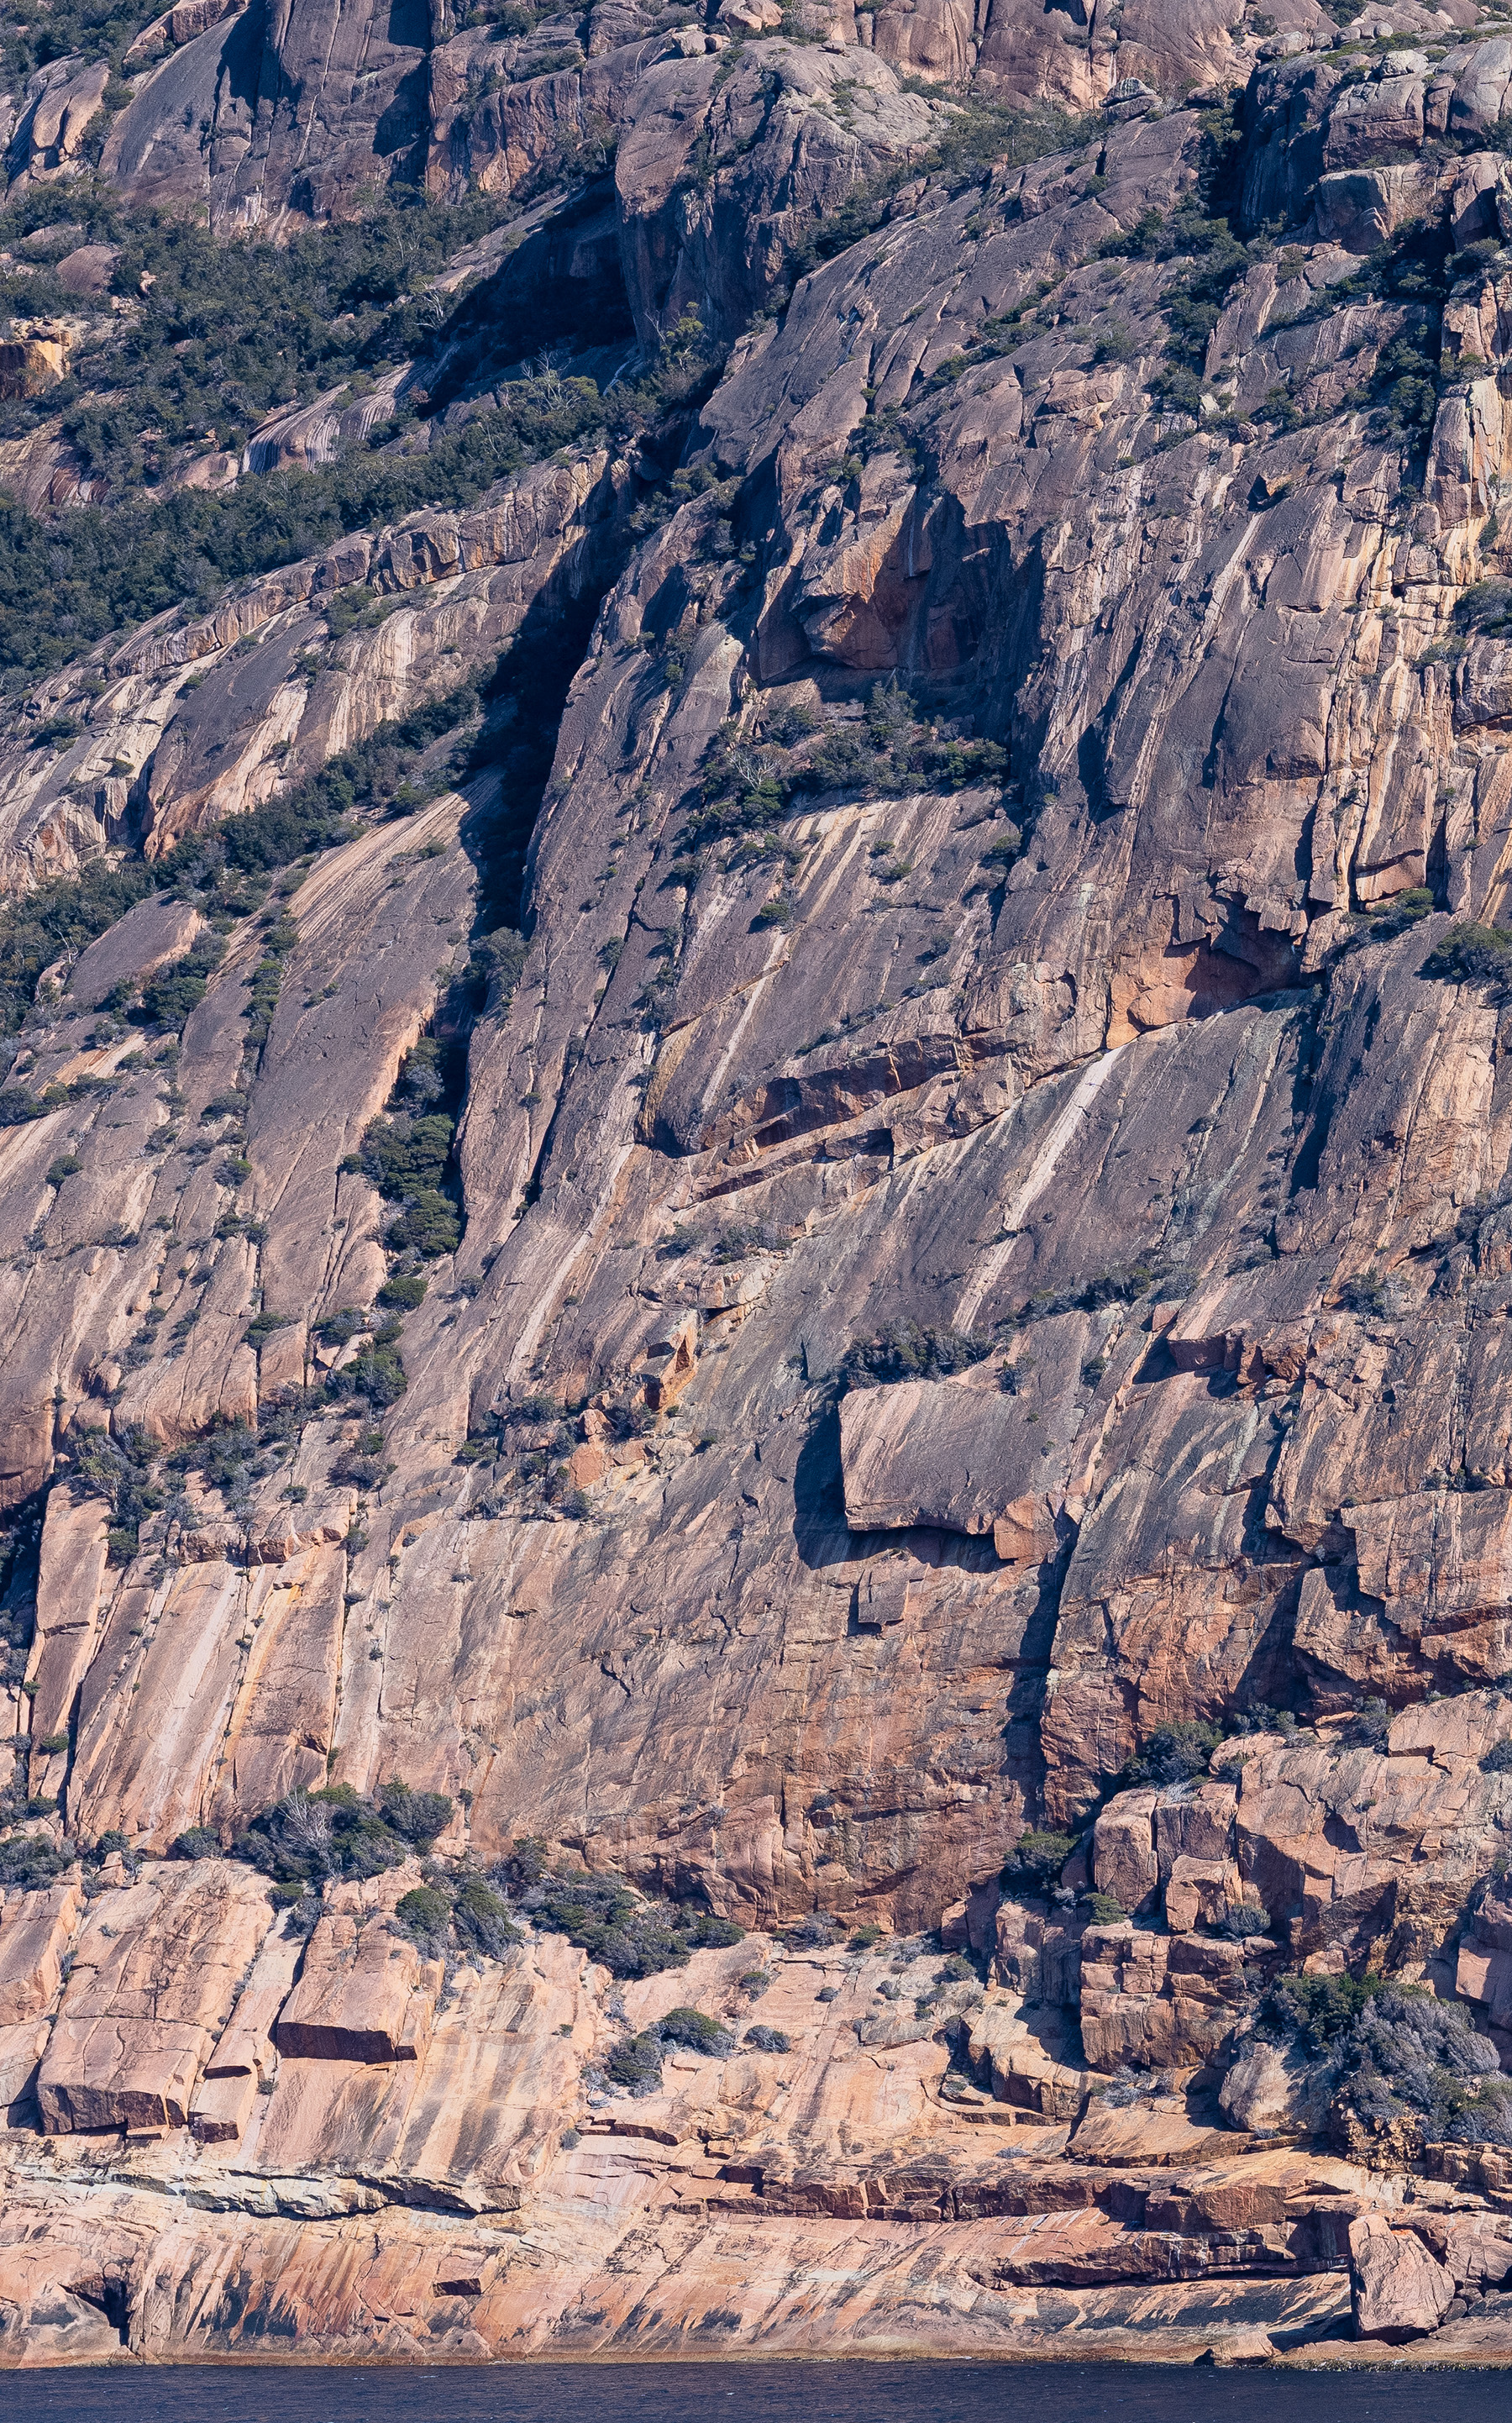
Main Wall Left
- ★★1.Skyline Traverse2-3
- ★★2.Sea Level Traverse16
- 3.Mid Level Traverse6
- 4.Pooch Slab9
- ★★★5.Pneisses15
- 6.Pneisses (Direct Start)19
- ★★7.Japhlion16
- ★★14.See Eagle Streak20
- ★★15.Serial Streaker18
- ★★★16.Lucky Streak22
- 9.Trusting Rust18
- ★10.Trusting Rust Direct Start18
- ★11.What a Crafty Snail17
- 12.The Artistic Fibber20
- 13.The Laughing Jackass19
- ★17.Epaminondas17
- 18.Fianchetto18
- 19.Auntie Helen, There's Something Furry In Your Fridge18
J. Foden, S. Karpiniec Jan 1974
B. Kennedy, D. Hain, Jan 1975.
A. Herington, B. Kennedy Jun 1984.
B. Kennedy, D. Hain, Jan 1974
D. Hain, B. Kennedy, Dec 1975.
E. Peacock, J. Kennedy, Jun 1984
A single pitch climb in its own right. Up Japhlion for 5m, then traverse right past one bolt runner to a second bolt. Up and left slightly then straight up passing two further bolts, a cam pocket and a good wire placement to the top. Abseil off the tea tree.
G. Cooper, A. Adams, July 1991
G. Cooper, A. Adams, July 1991
A. Adams, G. Cooper, 13 Dec 1991.
G. Cooper, R. Sellers, Jan 1990
David Stephenson, Mel Sheppherd, May 2025
David Stephenson, Mel Sheppherd, Sept 2024
Pitches 3-5 David Stephenson, Justin Otlowski, Mar 2023, pitches 1-2 David Stephenson, Mel Shepperd, November 2025
Pitches 1-4: Garn Cooper, Al Adams, Jan 1990. Fat Boy variant (pitches 4a & 5): Dave Gardner, Garn Cooper, Fat Boy Buckley, Mar 1993
Main Wall Centre
All the routes on Main Wall Centre except for the Winning Streaks area start from the Mid Level Traverse. For all routes from Stud City left, take the lower level variant under the base of the prominent slab, passing the starts of Touch and Go and Slippery Slope. The lower variant climbs back up to regain the traverse line at Stud City. Routes are described from Left to Right and follow on from the Laughing Jackass on Main Wall Left Hand Side.
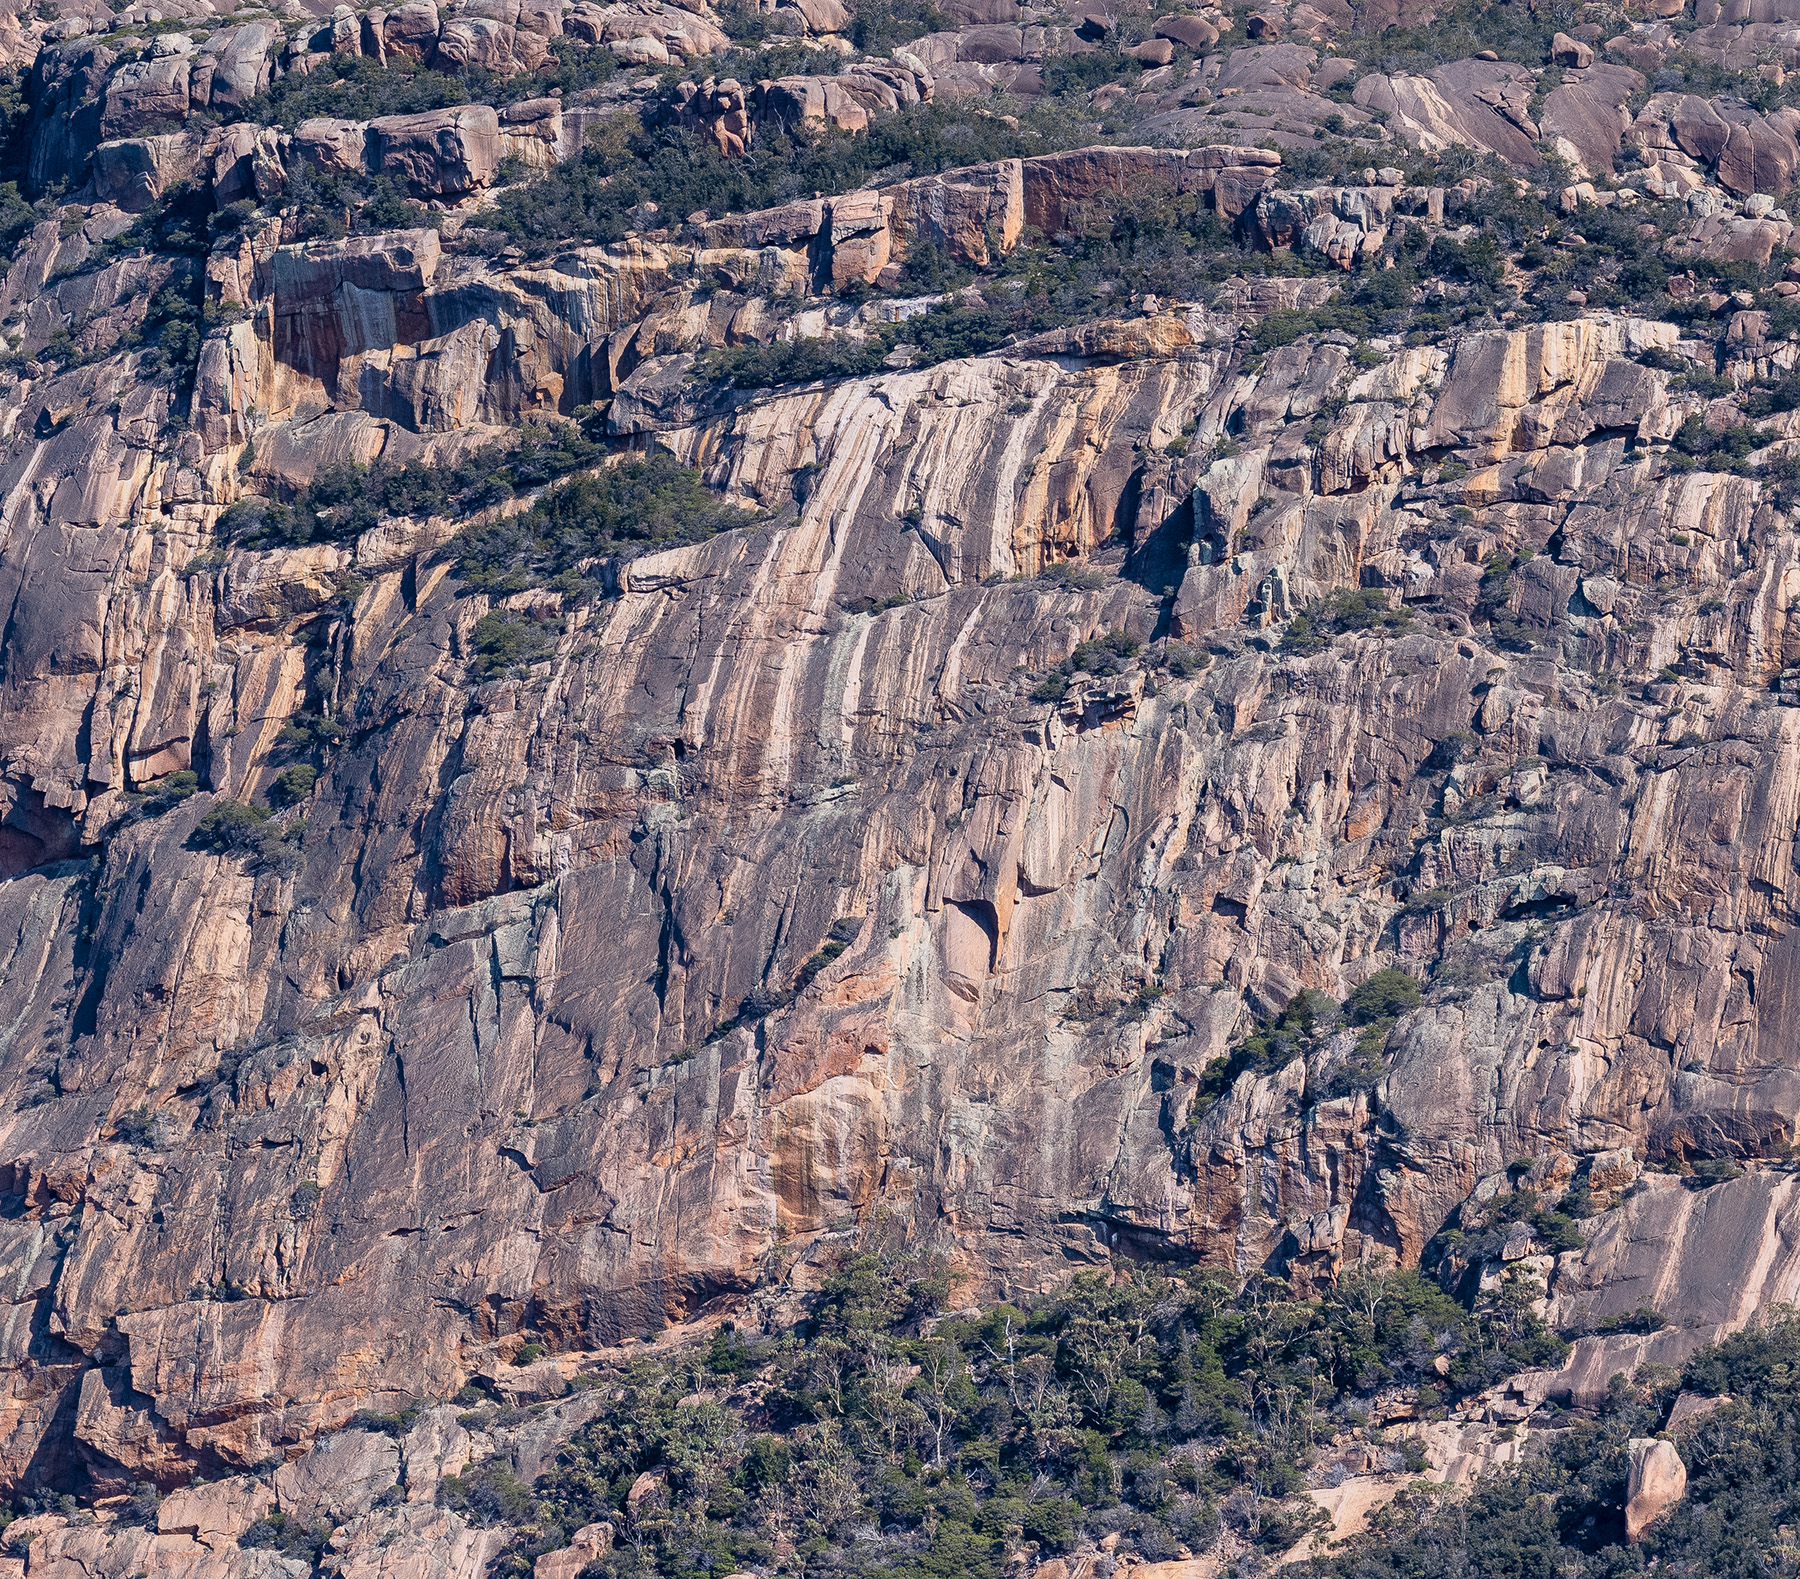
Main Wall Centre
- ★★1.Skyline Traverse2-3
- 3.Mid Level Traverse6
- ★17.Epaminondas17
- 18.Fianchetto18
- 19.Auntie Helen, There's Something Furry In Your Fridge18
- 20.Cosmic City Flameout19
- ★★21.Don't Land On The Lunch20
- ★★22.Kids On Skids17
- 23.Tic Tac Toe25
- 24.Lubricity22
- ★★★25.Winning Streaks18
- 26.Hootin And Jivin22
- ★★27.Streak Seeker19
- 28.Torstein And Back19
- ★29.RP Freedomseeker17
- 30.Hard Very Mossy (HVM)10
- ★★31.Well Hung Left19
- 32.Well Hung Right18
- ★★★33.Stud City20
- ★★34.Continuum17
- 35.Trouble In Paradise21
- 37.The Reprieve18
- ★★38.Touch and Go21
- 49.Luxury Leather Goods19
- 50.The Bullshit Factor20
- 51.Osmotic Tension21
G. Cooper, B. Kennedy, Feb 1988.
G. Cooper, P. Cullen, Feb 1988.
B. Kennedy, P. Cullen, Jan 1977.
Al Adams, Garn Cooper, Pete Steane, Jan 1990. Direct finish Matt Perchard, J.Keane, Dec 1990.
Garn Cooper, Al Adams, alt, Jan 1988.
Climbs the overhanging crack between Lubricity and Kids on Skids. Head right to Lubricity once topped out over lip.
Kim Robinson 12 Aug 2001.
Pitch 1: A. Potito, R. Eccleston Jul 1993. Pitch 2-3: A. Hasan, G. Cooper, A. Herington, M.Sands, Jun 1992.
Dave Stephenson and Stu Scott, October 2018
Garn Cooper, B. Kennedy, Feb 1988.
David Stephenson and Stuart Ferguson, December 2024
How can you ignore a line like this? Approx. 4m above the first belay on Hootin and Jivin (belay there). Traverse along the flake to the right. Continue up RP Freedom Seeker, or Stud City, or whatever.
G.Cooper, M.Sands, Nov 1991.
The descent for the next few climbs is serviced by either abseil or by continuing upward to meet the Skyline Traverse.
Abseil routes:
1) From the top of Stud City scramble (roped up) up a bit and then left across ledges for 35m to the middle DBB of Streak Seeker. Rap 45m to the next DBB and then 55m to the ground.
2) From the top of Stud City scramble (roped up) right for 30m to a bigger ledge where on the edge of the slab you will see a tree with a sling on it. Rap 50m from here to a huge ledge covered in trees. From this ledge walk down about 10m towards the next drop off where you will see a tree beside a small gully. Rap 30m from here to the ground.
Skyline Traverse Exit: From the top of Stud City you can climb up to a tree-filled corner above (you might want to stay roped up) and continue scrambling upwards till you intersect with the Skyline Traverse before descending it.
Garn Cooper, Al Adams, B. Kennedy, Mar 1991.
Not so much a climb as a traverse across easy ground to reach the bolt belays on Streak Seeker and Winning Streaks. From the top belay of Well Hung Left, head direct up the pillar/flake for 4m onto the slab, then head off left along the easy but mossy slabs and ledge system.
M. Johnston, C. Movita Nov. 2022
H Jackson and S Joseph March 2021
Exciting stuff following a direct continuation of Stud City's big corner. Start up S.C.'s second pitch, but instead of going right across the under-cling flake, take the cracks straight up through the roof/overlap and ultimately take the RH crack (crux, crack currently full of dirt and grass making it impossible to climb without rap cleaning it first) to the top of the slabs. Passing the overlap turns out to be relatively easy, but pretty exposed.
Hamish and Marcel Jackson Feb 1999.
B.Kennedy, T.Beaman, R.Muehlin, Jan 1977. FFA: H (A. Herington), Rock Daddy (B. Kennedy), Noel Baby (N. Ward).
Hamish and Marcel Jackson Feb 1999.
A first rate but solid link up (grade 22,19,18,19) would be to climb the first pitch of Hootin and Jivin, followed by Torstein and Back, then reverse the traverse of RP Freedomseeker to finish up the last two pitches of Stud City.
Not particularly appealing, this bolted route is 20m right of Stud City, just left of a corner. The first two bolts are missing hangers, but take wires to slide over them. There is a single bolt belay and lower off.
R. Parkyn, C. Bye, Nov 1992.
C. Rathbone, G. Kowalik, P. Robinson, Nov 1976.
Main Wall Right
With the exception of the lower slab routes Touch and Go and Slippery Slope, all the routes on Main Wall Right start from the Mid Level Traverse upper variant, which scrambles up and above the lower slab on a sketchy ledge system to access the routes between the Reprieve and Gunboat Diplomacy.
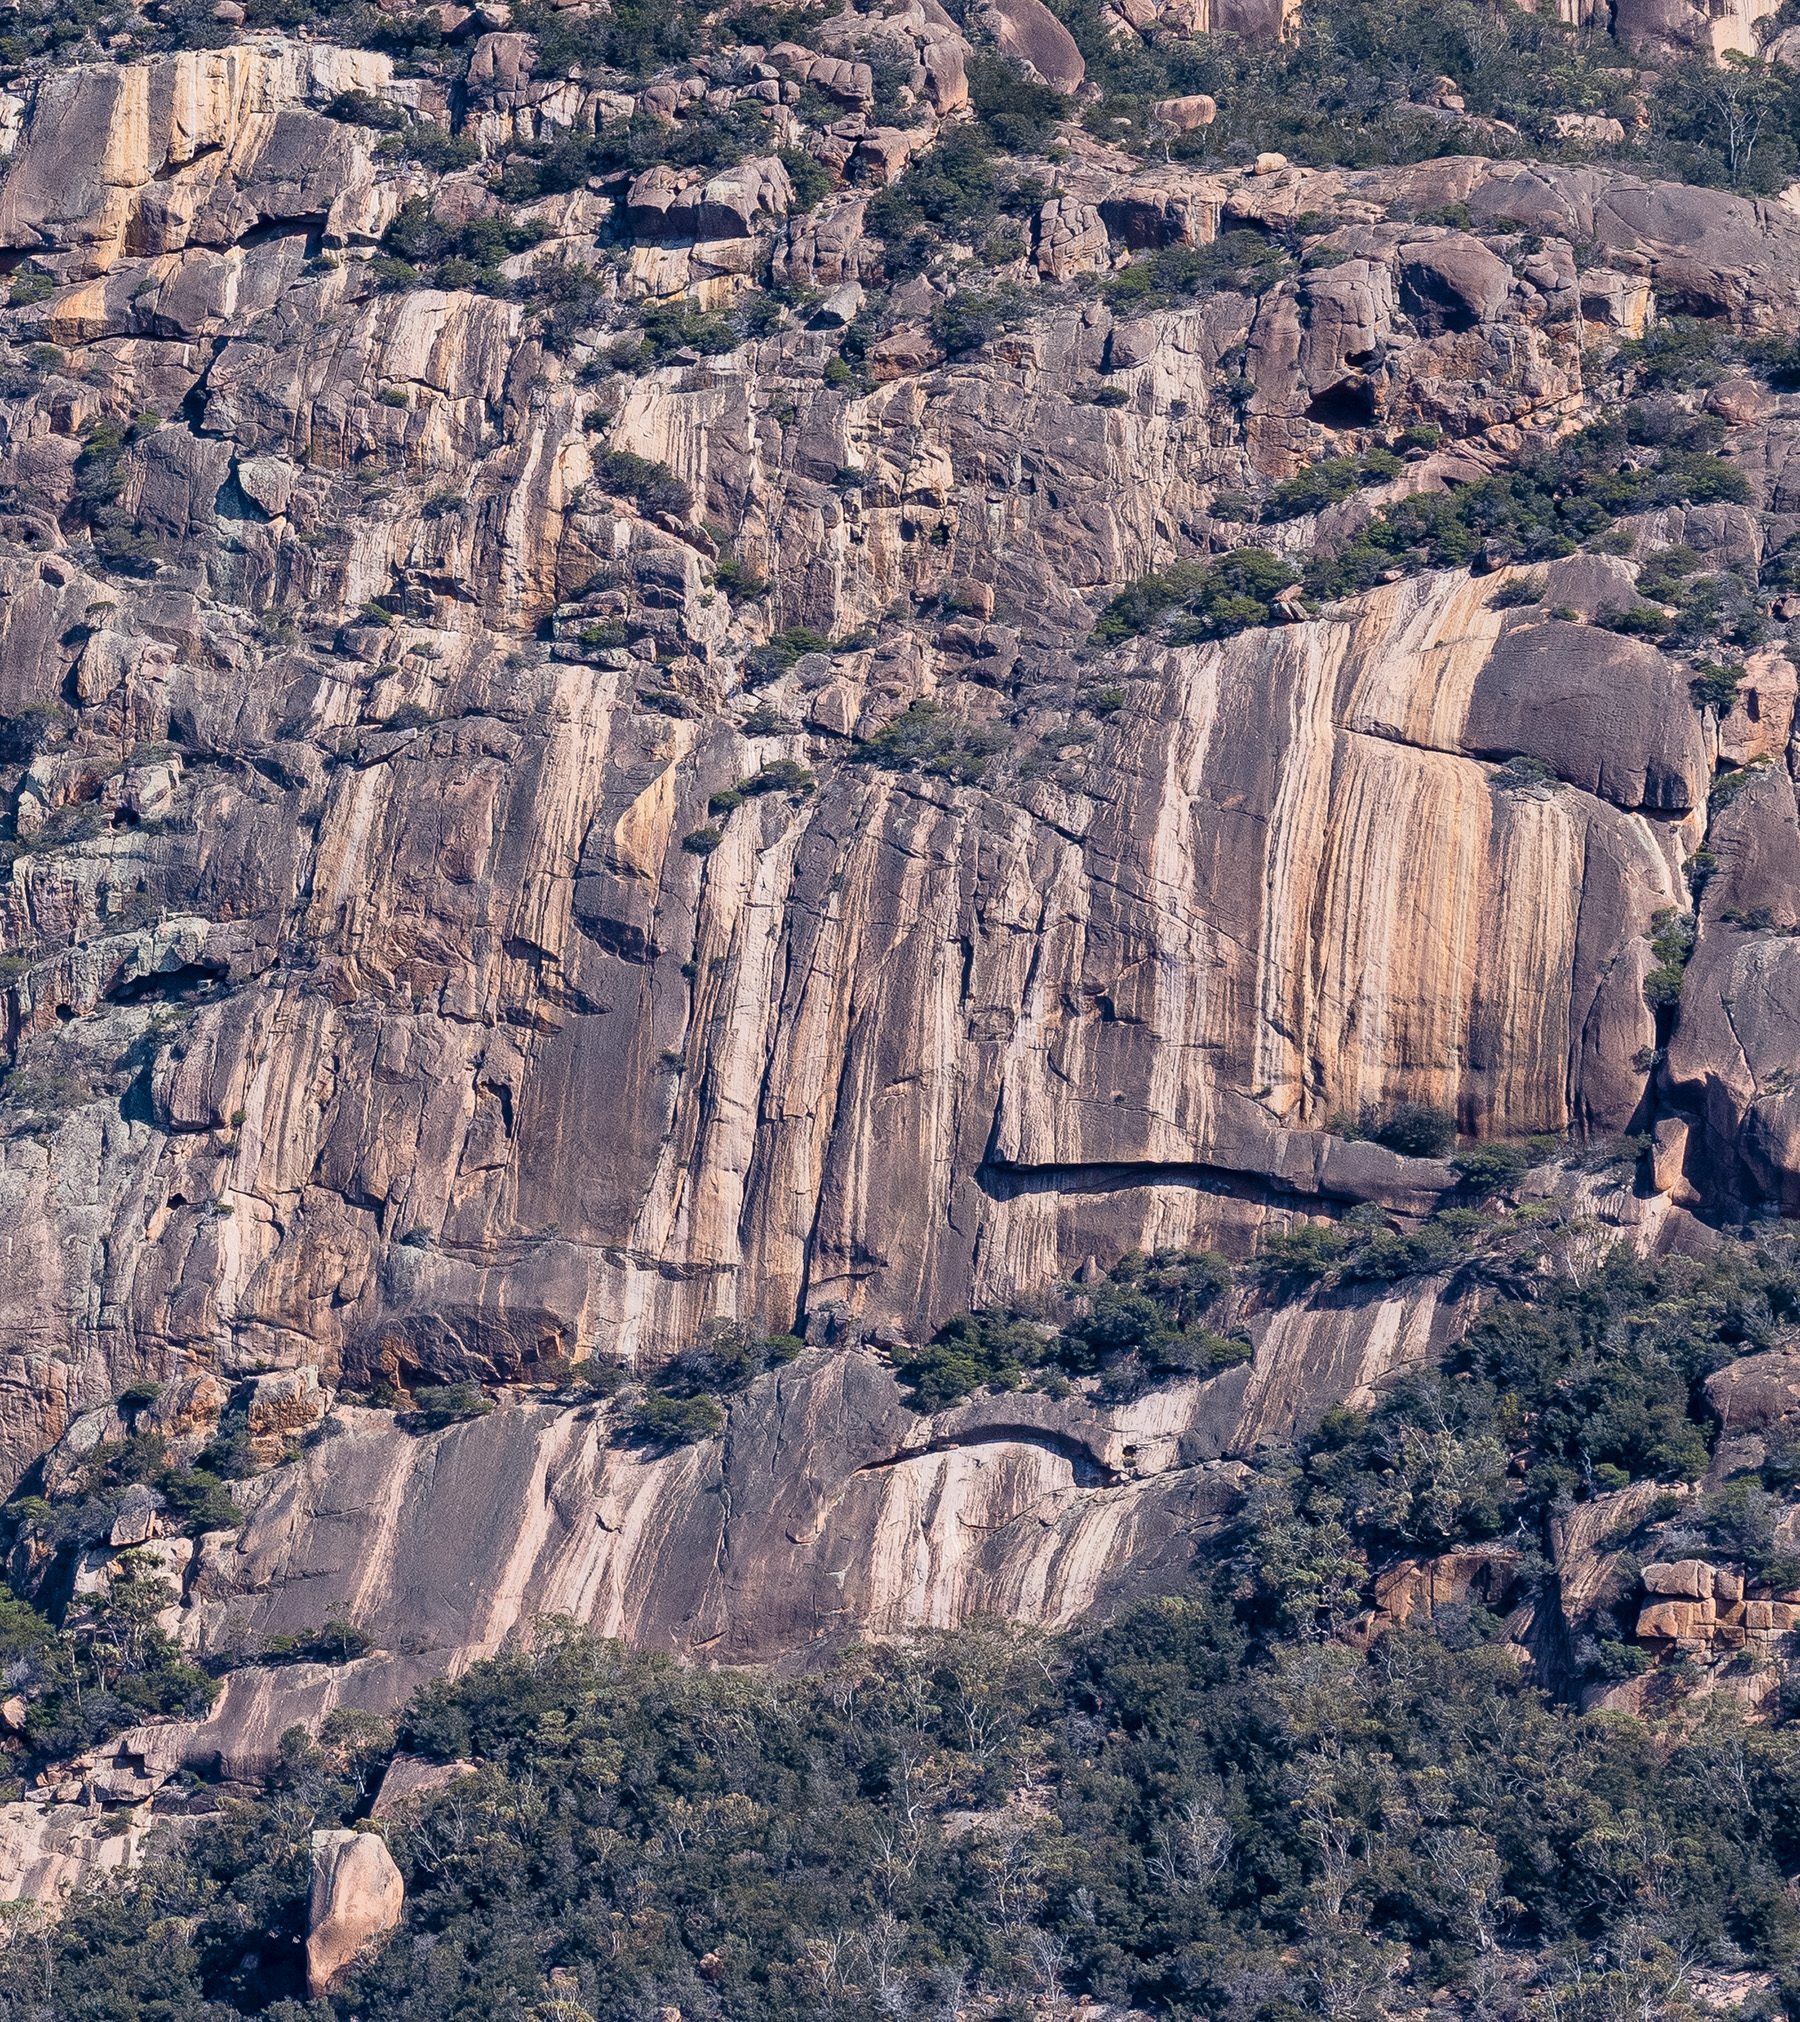
Main Wall Right
B. Kennedy, D. Bowman, Dec 1976.
Touch and Go and Slippery Slope are located on the the polished slabs directly below Jack Shit and Trucks Have Wings. Start from the Mid Level Traverse lower variant.
Lovely. The bolted polished water streak 6m left of Slippery Slope. The crux comes in the first 10m. DBB at top.
David Stephenson and Stu Scott, August 2019
Delicate climbing up the bolted left leaning seam on the polished slabs below Trucks Have Wings. The difficulties ease considerably after the first 3 bolts. DBB at top. The smooth slab between Slippery Slope and Touch and Go goes at grade 22/23 and can be top roped from either set of anchors - a decision was made to not bolt it due to proximity to the other routes.
David Stephenson and Ben Maddison, August 2020
A dirty adventure, which with a good cleaning effort or much traffic might become a good climb. Start as for Trucks Have Wings, clipping it's first two bolts before traversing left past the first crack to climb the second one. The direct start was done on top-rope by the second.
Garn Cooper, P.Sullivan, Adam Potito, Mar 1993.
A good climb following the first crack left of Havahorror. Climb the slab past two spaced bolts replaced 2023 (crux, with groundfall potential if you don't stick clip the first bolt or come off before clipping the second bolts), move right and up into the crack. Up this and the grooved slab above. A short and easy traverse right gets you to the Full Sail Rap Anchor (stay roped up).
A.Hasan, Garn Cooper, Jun 1992.
The first line left of Full Sail, often a bit dirty, but cleaning it is easy if you do one of the other routes first. Up the fine left facing corner.
Doug Fife, L.Minami, Dec 1982.
Rap anchors exist to service the next few climbs can be found at the top of Full Sail.
A few metres left of Full Sail below a bolt at 5m. Climb via the bolt into Full Sail and up this line to the top.
Doug Fife, L.Minami, Dec 1982.
Easily recognised, Full Sail is a good waypoint to locate other routes nearby. Located on the right hand end of the Main Wall on a compact wall about 100m above sea level. At the right hand end of the wall and running to the right, a prominent roof splits the wall at about 15m height. Full Sail takes the line on the left hand end of this roof. Climb the line up to the corner of the roof (easy but sparsely protected for first 6m), step left when in line with the roof, then continue up the twin crack system to a large columnar feature. Follow this on its right side and over a bulge to a DBB above when the angle eases. Alternatively, instead of stepping left at the roof it is possible to continue up the crack through the roof and traverse left at the next blank wall. This makes the climb more sustained but still 19.
K. Lindorff, K. Roseberry, Jan 1977.
Runout climbing up a nice line on great rock. The second half is very poorly protected and higher up falling does not become an option, hence the single star. Could be top-roped from the Full Sail anchors. Start as for Full Sail. Climb the straight line of Full Sail without deviating left at any point. Difficult moves over the bulge with poor pro leads to a delicate, un-protectable corner. Tip toe your way up this with increasing trepidation until your first gear just below the anchors.
Andrew [Squib] Cubbon & Isaac Lethborg, Oct 2017
A (barely) worthwhile outing and a mega single pitch that will fulfill your narcissistic desires. The hardest moves are at the start but the top is enticingly bold. Start up Full Sail Direct until 3m above roof, then traverse R into corner/ledge system and up right to arching overlap. Along this to its R end, up and over, step right to a good cam in a horizontal. Blast up the slab aiming for the anchors on The Axiom (FA went up black streak but follow your nose).
Alex Lewis and Kate Tasker Aug 2015
Start at the base of the waterwashed groove 30m right of Full Sail. Follow 9 bolts up the polished groove to a large ledge and rap anchors. The crux is overcoming the two inital bulges and is technical but not strenuous.
Sam Edwards, Garry Phillips, Roger Parkyn, Sep 1994.
Shares the first two bolts with The Axiom before heading off right. Eleven fixed hangers and finishes at same anchor as Axiom. Crux passing the fourth bolt then sustained 24 to the top.
Maddie Johnston, Nov. 2022
The Suzuki Complex
The Suzuki Complex is a small crag situated directly above where routes on Main Wall Centre culminate. The crag is 10m left of the Skyline Traverse below Mt Parsons and 30 minutes walk from Sleepy Bay carpark. The cliff faces towards the sea. Consult the Main Wall Centre topo to view the climbs on this crag.
Ascends the steep curving crack initally on fingers then widening to hands. The route is 2m left of the arete that is left of The Bullshit Factor.
Roger Parkyn Jan 1991.
The uncompromising dihedral whose left wall is slightly overhanging. Sustained.
Jack Keane Jan 1991
Take the crack straight above the base of the leaning gum tree, 20m right of The Bullshit Factor. Good wires protect the face above.
Roger Parkyn Jan 1991
Sea level Traverse Horizontal Chimney Area
Follow the sea level traverse past the horizontal chimney to a massive boulder just above the sea. Up right is a long steep L facing corner. Climb up to a belay below it . Varied technical climbing leads to a frantic bridging and laybacking section past 2 bolts, to a dbb on the slab above. Good small and medium gear.
Nick & Heather Hancock Oct 2021
The Underworld
This crag is found by heading down towards the water where the Skyline Traverse leaves the Sea-level Traverse. There is an ampitheatre of steep pink granite undercut by a large cave.
As you traverse down the southern side of the crag you pass a series of short easy corners. This is the closest to the sea with a small roof at the top, starts off a terrace 12m above the ocean.
Roxanne Wells, Pete Steane, Apr 1994.
The arête just right of Corner Part-2 (with rusty carrots).
Gordon Poultney, Donna Bridge 1997.
Steep, strenuous and well protected. Starts left of the caves entrance. Step R then steeply to horizontal, left 3m to flake, up this to thinner flake above.
Pete Steane, Roxanne Wells, Apr 1994.
First half as for Jabberwock, but rather than traversing left to flake, traverse right 2m past a hole to another crack, follow this through overlap with good pro.
Pete Steane, Roxanne Wells, Apr 1994. FFA R. Parkyn 1997.
Out the left side of the cave past many bits of glue and metal.
John Fisher, Mar 1995.
Right of the cave. Follow the line of bolts from the hanging belay.
Dave Jones, Gordon Poultney, 22 Feb 1995.
The wall with 4 bolts right of Travels by Dragonfly. A boulder problem start out of a slot and exit right avoiding the final wall at the top. No anchor. Superb.
John Fisher Mar 1995
The sculpted arête on the right edge of the Underworld provides a struggle, with a final harder move well left of the arête. The rock and the climbing aren't that good. Originally climbed with a long sling protecting the hard upper moves, the first ascentionist planned to return and place a bolt. He never did, but feel free.
John Fisher Mar 1995.
A wonderful deep-water solo, on the seaward side of the huge fish shaped boulder, at the northern entrance to the Underworld. Abseil to a stance on a ledge below the mouth and get a friend to pull up the rope. Climb small pockets to a L leading traverse. Follow this and finish straight up to the ridge.
Nick Hancock Feb 2003.
Insomnia Wall
At the last gulch on the track to Sleepy Bay, descend to the very steep north facing wall by the sea.
Left-hand line with a sloper start. Lower off.
Nick Hancock Apr 2004.
From cairn climb right then up to lower off.
Doug McConnell Apr 2004.