
South Esk
 5-20 mins
 Afternoon sun
 Vertical dolerite buttresses, up to 25m high
Acknowledgement
by Michael Fox, originally published in Craglets.
Introduction
This section of the guide covers routes on the South Esk from the First Basin, up to the Trevallyn Dam. The areas are described from downstream to upstream.
Access
For access/general details, see the section on the Cataract Gorge - Sunny Side. Drive from town to Corin Street and then walk down to the Power House Museum or walk for 20 minutes upstream from the First Basin to this fantastic area. If you have a look at the map you'll see that there are crags that are marked that are not described in this guide. It's not because there aren't any climbs on them. They could well be fantastic. It's just that I don't know anything about them. So if you feel like a bit of an adventure head on up or check out Gerry's Guide to the South Esk.
Crag Steward
Rock climbers please contact the Cliff Steward (eskriver@climbersclubtas.org.au) if you have any queries or concerns regarding social or environmental impacts of rock climbing at this crag. Do not email regarding general travel, seasonal advice, or lost property - this is not the Steward’s role. If you have important safety information to communicate (e.g. risks due to recent and large rock falls) please also consider updates on thesarvo forum, facebook group and/or online guidebooks as appropriate. Please copy in cct@climbersclubtas.org.au if you feel you have a high level concern which may imminently impact the crag or climbing community.
Non-climbers, other users, land managers: please also contact cct@climbersclubtas.org.au if you have important climbing related queries at this location.
Above the Suspension Bridge
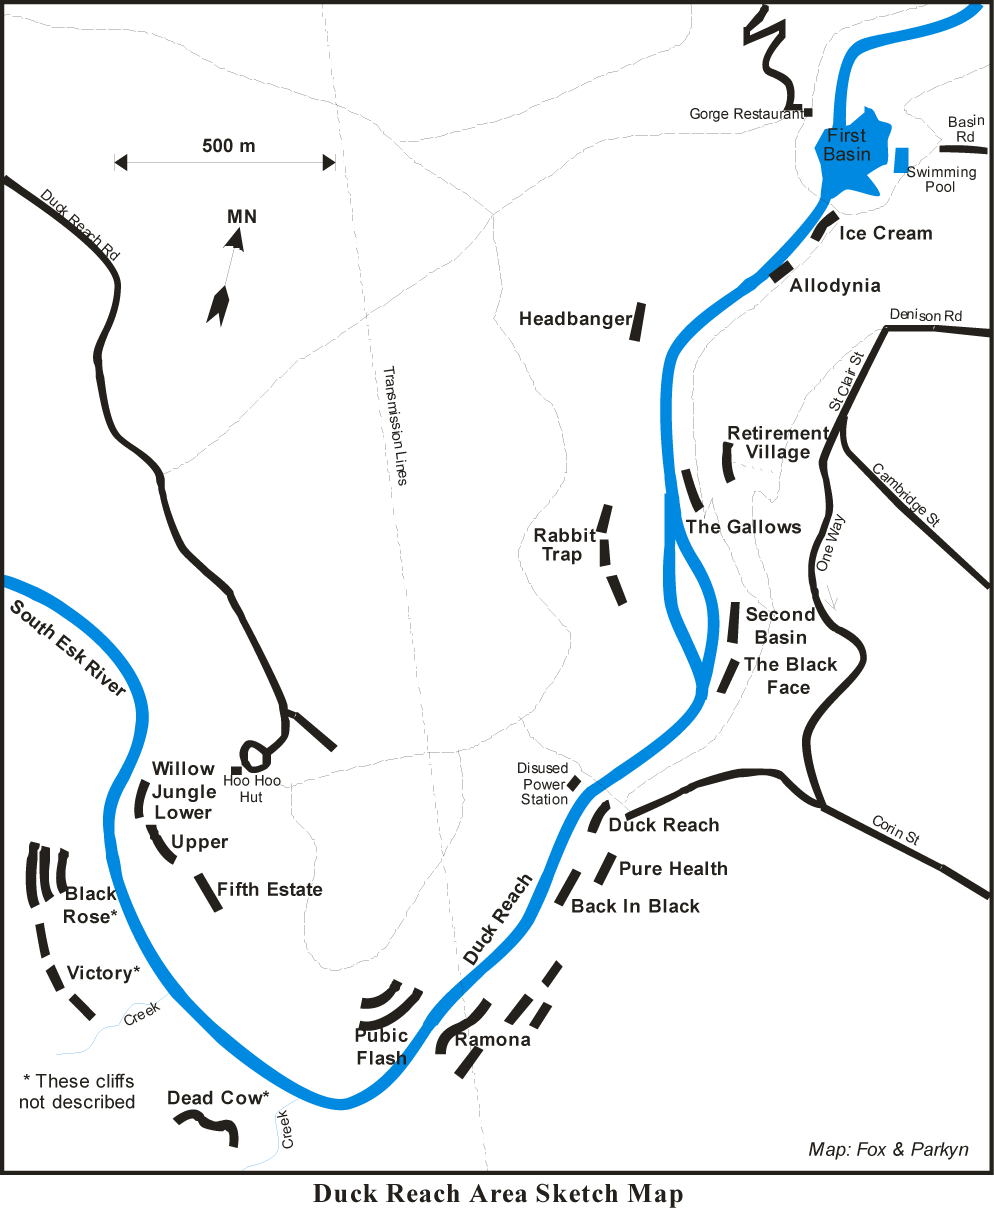
Access: These first routes are around the track that heads south from the suspension bridge at the First Basin. See map. Council has also very nicely placed distance markers on the track starting at the Suspension bridge. These make handy guides to the climbs.
Ice Scream Buttress
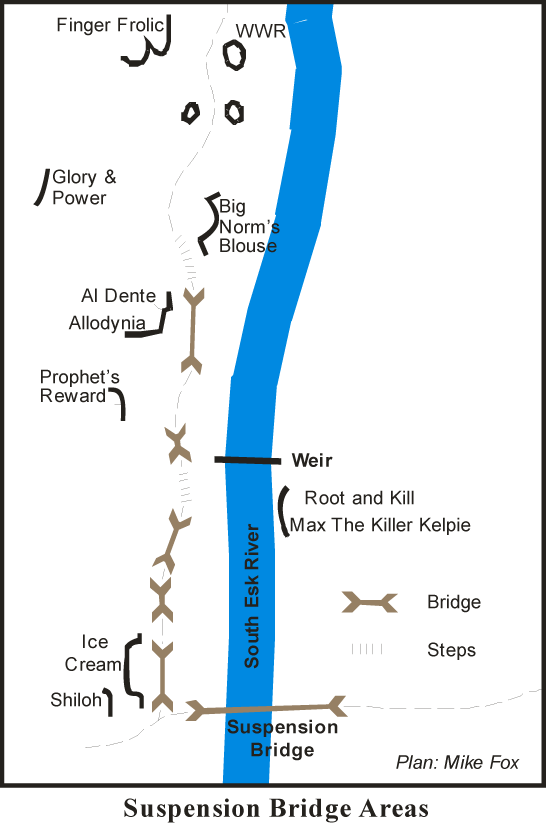
Access: From the first bridge on the Duck Reach track stand and look at the cliff. Straight in front of you is an orange and black face with two FH. This is Ice Cream. Above this and slightly downstream is a large block with 3 FH this is Shiloh. The face on your immediate left is Zerubbabel and Spooksville.
Climb on the left of the arête past three FH. DBB.
Narkowicz, 2001.
Climb the blank face to the horizontal break, which is only 16 if you have the reach, then continue up.
Narkowicz, McMahon, 2000.
The next route right up the stepped scoop. Originally done with a piton runner.
Narkowicz, Bennet, McMahon, 2001.
Cause it tastes so good. By which ever way appeals to you climb on to the grassy ledge beneath the black and orange face with 2 bolts. Climb this to crack and then up to the DBB.
There are obviously a few climbs possible in the amphitheatre right of Ice Cream. This next climb is on the pillar on the right and above the amphitheatre. Access either by climbing up to it or scrambling up from the upstream end of the bridge.
Climb the face and thin crack protected by small wires. Requires a degree of commitment so may be beyond most blokes. Worth doing so you can get to the next two climbs which are must do’s if you have an interest in the obscure.
Narkowicz, McMahon, 2000.
20m up hill from Not By Might is a pinnacle with one bolt. Take a wire as well.
Narkowicz 2001.
20 m further up hill and upstream from Treasures in Heaven is another little boulder with 2 bolts. Use your ingenuity for the belay.
Narkowicz 2001.
The 50 m of track from marker 4 contains some excellent climbing combined with easy access. A Prophet’s Reward is visible from the track just before you get to marker 4. The crack and off-width on the left may look appealing but don’t be mislead. Climb the bolts to the right instead. Best access is by scrambling up the track just past the marker.
The only reward you’ll get here is a good pump. Excellent climbing just beware of knocking anything down on to the tourist track and the unsuspecting public. Climb up past 4 FH to a DBB.
Narkowicz 2001.
Allodynia Buttress
On the upstream end of the wooden bridge just after marker 4 is a large buttress. Access by climbing down off the bridge or walking across the gully from the downstream end of the bridge.
The first route on the left (up hill) end of the buttress. Start on the stacked boulders and pull the bulge to easier climbing above. If the stacked boulders are no longer there (or you simply want a little more of a challenge), starting off the ground increases the grade to 28.
Up arete past 2 U-bolts to horizontal break (1/2 friend) then up thin crack past another U-bolt to DBB. Worth doing at 21 by pulling on the first bolt.
Fox, Kearnes, 2002.
Climb up the face past the two eye-bolts to the horizontal break and the up the thin crack passing 2 more eye bolts. Keep going over the bulge past a U bolt to a DBB.
Fox, Kearnes, 1996.
Step off the bridge onto the large hand crack and corner 2m right of Allodynia, or if you really must, go all the way to bottom to start.
Big Blouse Buttress
Access: from the top of the stairs after Allodynia step over the fence and walk over to the she-oaks hanging over the cliff. There is a DBB which raps straight over Big Norm’s Blouse.
Superb, pumpy climbing up the face from the ledge on the left of Big Norm’s Blouse. Climb the crack on the right of the face then clip the first U-bolt and continue left past another 3 U-bolts to a DBB.
DeCesare, Fox, 2002.
Although it’s tempting to only rap to the ledge, and climb the face past 3 FH, you actually get better value if you go all the way to the ground and wack some gear into the crack at the bottom.
Selby, 1999.
The corner 2m to the right of Norm’s Blouse which goes up to a flake/off-width. Actually climbs very nicely.
Climb the twin cracks 4m right of Lady Midnight’s Daughter to the ledge then step right at the FH and over the top.
Not exactly clip or die with 4 FH and a DBB but good and powerful. Continue straight up the arete above Little Gerry’s Knickers.
Narkowicz, 2001.
Across the river (cross on weir) and down stream about 50m are two more climbs.
Look for a flaring crack that blanks out after about five meters, spot the bolt above this and your there. The crack to the bolt, then right to gear, back left to another bolt then up past bulge to DBB.
Bissett, Tierney, 1997.
Just right of R&K is a broken looking face. Climb this to a slot, then over the bulge to same DBB.
Tierney, Bissett, 1997.
The next two climbs are above Allodynia Buttress and best accessed by scrambling up the slope 10m past the top of the stairs after Allodynia.
Another exercise in curiousity value. Visible from the track as pinnacle on the skyline 40m above Allodynia Buttress. 2 FH, the first can be tricky to reach. Single bolt belay on top.
Narkowicz, 2001.
From the top of the stairs an orange buttress with a FH on the face is visible 40 m uphill and slightly upstream. Climb the crack up to the first FH then up to the horizontal break (1.5 cam) then move left to the 2nd FH. DBB.
Narkowicz, 2001.
From the second horizontal break of Glory and Power move right and continue up past a FH. Less contrived than GAP especially if you don’t have the reach for the 2nd bolt.
Fox, DeCesare, Bissett, 2002.
Line of four left trending eye-bolts visible 10m up the hill when standing at marker 5.
Johnson, Sam, 1996.
Excellent climbing and a great discovery by young Alex. At marker 5 turn and look downstream at the river. You will see 3 FH on the edge of a pinnacle 20m away. Scramble down to the base then climb up past 3 FH and a 3 cam. DBB.
Wilson, 2001.
30m past marker 5 if look up between the boulders you will see an orange face with 3 FH on it. Best access is to scramble up 10m back. DBB.
Narkowicz, 2001.
Sound’s like some kind of IUD. 150m past marker 6 there is a lump of rock very close to the track. On the right side is 3 FH. The first FH can be clipped by climbing the ledge on the left. Heck so can the second. Worth doing if you’re there. DBB.
Narkowicz, 2001.
At marker 9 head up hill for 40m. The face with 1 FH is just visible from the track. Climb past FH to thin crack.
Narkowicz, 2001.
The Gallows
Access: 50m past marker 10, just before the track steepens to go up the switch back, jump over the fence and go down to the river. From here walk upstream for 100m. Hangman’s Noose is the very obvious prow.
Face on left of cliff.
Gerry Narkowicz, Mick Ling, 3 Dec 1983.
Up over the roof past 4 FH being careful not to impale yourself on the 3rd one. DBB way over the back.
Matthew Mann, 2002.
Either traverse in from the left or the right or go straight up it the river is down. The face with 4 FH 3m right of Hangman’s Noose, meeting it at the same DBB.
Narkowicz, 2002.
Up the blocky chimney and then up the left hand crack.
Mick Ling et al 1983.
Same start as Reprieve but take the right hand finger crack.
Narkowicz 1984.
The hand crack 3m right of The Gallows.
Narkowicz 1983.
Arete/Pillar on the far RH side of the buttress just right of Waiting to be Blown Away. Classic arête climbing with a couple of "Fridge Lifting" moves in the middle. At the fourth bolt there is the option of moving right and turning the arête into a layback. Optional wire for the last move over the top. Rap Chains at the top.
Ian Ferrier 13 Nov 2007.
Second Basin Terrace
10m downstream from marker 14. Jump over the fence and you should see some DBB on the edge of the tier 2m below. Rap off these to the ledge 10m below.
From the main ledge go left on to the grassy ledge and then climb the thin corner.
Narkowicz, 2001.
Climb the sharp arete with 3 FH to the DBB.
Narkowicz, 2001.
Excellent climbing up the bolted corner then traverse right to finish up the overlap and crack passing more iron mongery and a fixed wire.
Narkowicz, 2001.
Improbable climbing up the blunt arete past 4 FH. Worth pre-clipping the first one. Hard to avoid moving right in places but worthwhile if you can.
Narkowicz, 2001.
The thin seam up to the crack 2m right of RYC.
Fisher, 2001.
The Black Face
There are lots of ways to get to this face which has got some of the longest and most enjoyable climbs in the South Esk. The quickest way is to park at Duck Reach and walk back down the river on the track till you get to marker 15. 60 steps down river from there you should see a tree with a chain around it (provided some well meaning idiot hasn’t removed it). Alternatively you can walk up from the First Basin and 60 steps past marker 14 see the same tree. Or if you want to be different you can walk in from the Denison Grove car park. This has the advantage of taking you past the Retirement Village cliff. Abseil from the tree to the base of the cliff which is 35m. There are 2 rap stations on the ledge 10m down if you don’t have an extra rope.
If you rapped in from the downstream rap station you would have passed directly over this climb. Scramble up slab to broken crack then move left to slab. Up past FH to off-finger crack in the corner and up to DBB. Scramble up right on grassy ledges then climb the crack which leads back to the rap tree.
Hyland, Tristram, 2001.
The same start and the same finish as CTTTM. Up slab to broken crack but then blast straight up thin twin cracks to join CTTTM at the off-finger crack.
DeCesare, Fox, 2002.
Once again start up the slab as for Cop that to the Max but continue right to the thin corner with 5 FH.
Fox, DeCesare, Tiz, 2002.
Start 3m to the right of Cop that to the Max. Up downstream facing corner past 2 FH then continue up broken crack system past 5 more FH to DBB.
Fox, DeCesare, Tiz, 2002.
Retirement Village
From the carpark at the top of Denison Grove walk down the path to the Duck Reach track. After about 200m you should see a big cairn on your right. Head across to this and then continue down to the pipeline. Walk along this for 20m and you will be at the top of the Retirement Village.
The obvious off-width with a hidden finger crack on the inside. Luckily no fist jamming is required. Up this to the ledge and then continue up thin crack and face to DBB.
The face 2m right of Dementia. Up past 3 FH and some cams to a DBB.
Fox, DeCesare and Nichols, 2002.
The hand crack to the ledge and DBB
Up steep face then on to slab above. 3 U-bolts to a DBB.
Duck Reach
Sewerage Buttress
Access - The first buttress that you come to 50m 3 levels each about 10m high.
The thin crack on the bottom level on the right.
McMahon, Johnson, 1995.
The next two climbs are on the middle level.
On the downstream side is a small roof with a single eye-bolt beneath it. Up this to the crack above.
McMahon, Johnson, 1995.
The slightly off-width corner 5m right of Sinistra.
Johnson, McMahon, 1995.
The third tier has another two climbs on it.
The left hand crack and corner.
Selby, McMahon, 1995.
Two bolts up the right hand face to the thin crack. The huge block on the top at the left is loose so watch out!
McMahon, Johnson, 1995.
The off-width/chimney 3m right of Libido.
McMahon (solo), 198?.
Bouzareah Buttress
Access - best reached by following the footpad found at the upstream end of the car park down and across gully.
The arete with 2 eye-bolts.
Johnson, McMahon, 1995.
The thin crack round the corner from Break On Through. Up to horizontal break then up the left trending diagonal to join the previous climb.
McMahon, Johnson, 1995.
Skidrow Buttress
Access - walk 100m up from the bridge to the first major buttress.
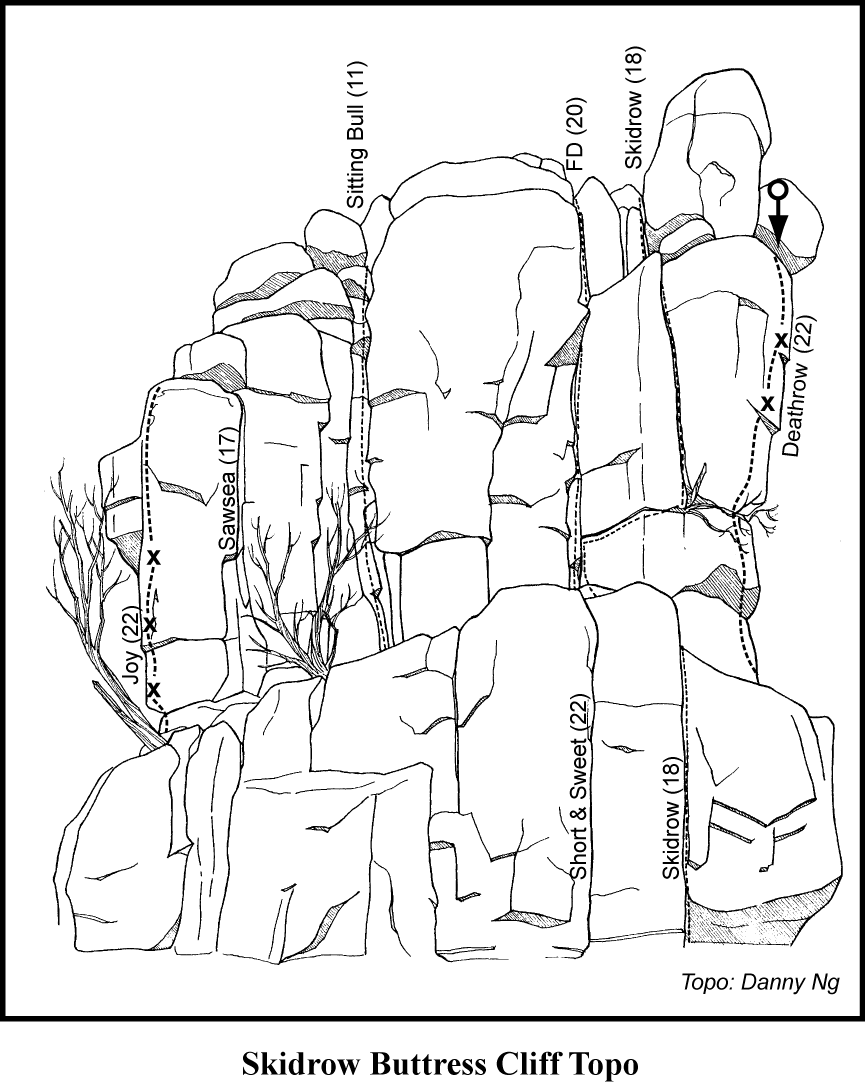
The left hand arete with 4 or 5 eye-bolts.
Fisher, Johnson, 1996.
Chimney R of Powerhouse.
3 eye-bolts to the crack.
Fisher, Johnson, 1996.
Start R of Joy of Specs at block. Climb crack, then left to join Joy.
Narkowicz 1985.
Offwidth.
McMahon, Schmidt, 1973.
Bridge to hand crack.
McMahon, Schmidt, 1973.
The blunt arete. Thuggish moves at the bottom with an insecure rock-over at the top
Oliver, Johnston, 2011
The thin seam with 3U bolts. Goes very pleasantly at 22 pulling on the final draw (originally had a bolted on artificial hold here). Alternately goes all free in the thin seam at 27.
FA: Fox, FFA: Johnston
The off-width crack.
McMahon, Wells, 1989
The next two climbs start on the lower tier.
Thin crack splitting the face with a rusty old piton buried deep in the crack at about 2/3 height.
The crack on the right of Short and Sweet which makes a nice route by continuing up to the main wall and then traversing right 3m on the horizontal break to join the widening crack past the blackberry.
Starting around the corner from these routes on a small platform go up the thin twin cracks to the slab and then up to the peapod. Up the crack system above this to 2 eye-bolts and then up to DBB. A commiting direct finish can be done at 24.
Parsons, 1980's.
A bolted variant to the classic Deathrow (22) on Skidrow buttress. Same start on natural gear, then up the overhanging face via a 3 bolt boulder problem, then finish up the last 2 bolts of Deathrow taking in the crux of that route as well.
G. Narkowicz, Oct. 2012.
The arête 5m R of Death Row. 5 bolts of thin face climbing to a crux dyno to the sloping ledge.
G. Narkowcz, Oct 2012
John of Gaunt Buttress
Upstream 40m from the last buttress is a hand crack that goes up to the next tier.The next climbs are on this tier.
McMahon 1973.
The obvious hand crack on the left.
About 7m Left of Dagenham are two climbs with a U-bolt in them. This is the left most. Up past bolts, then tricky mantle to gain flake. Head left around the flake on gear. DBB.
Bissett, Tierney, 1997.
The climb right of TGH. You can stick clip the bolt, although the first ascensionist didn't. Up to flake, then on to top. DBB.
Tierney, Bisset, 1997.
Thin crack and face climb 2m left of the off-width crack which runs the whole height of the cliff.
McMahon 1996.
The big wide corner.
McMahon 1973.
The next section of cliff is broken in to four distinct levels. There are many natural lines on this area a lot of which have been climbed, once. Feel free to repeat them but take your secateurs and shovel.
Traffic Fine Buttress
The next buttress upstream with well travelled and more continuous climbs. There is a DBB belay at the top of the next 3 routes.
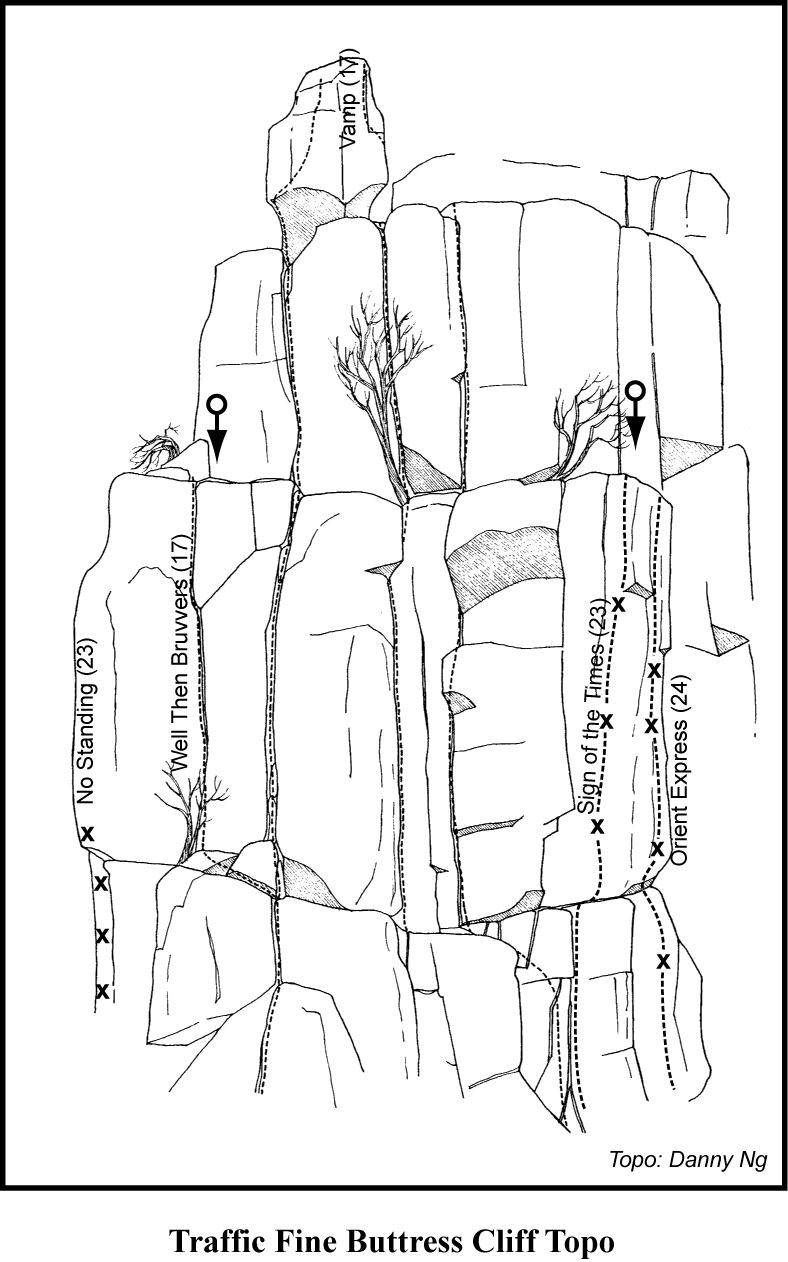
At the far left of the buttress. Awkward start, climb up and bridge on small foot hold up until block. Crux move pulling though the block, continue in the crack above.
M.Koch, P.Koch: 2014
Bridge up the chimney formed by this buttress and the bottom tier of the last one and then step right on to the large block. Climb the finger crack to the overlap and then continue up the hand crack above. DBB.
Various extensions have been added to this climb. As it now stands it starts beneath the eye-bolt and avoiding the large block on the left continues up past three carrots to the arete and thin crack. One of the best climbs at the grade.
Ng and Vincent, 1990.
Start the climb 20m right of No Standing climb to the terrace at one-quarter height and then take the left hand jam crack to the top. DBB.
Newell 1972.
Chimney / crack, right up to the top of the summit boulder.
Joe Friend 1975.
Climb the blunt arete left of Vamp past 4 FH to a DBB. Some flexibility in the grade, with the crux getting into a position to make the second clip. More like 27 if this's pre-clipped but excellent either way.
Fisher, 2001.
Starts 20m up stream and around the corner from Free Parking. Climb the off hand width crack and corner to the tree. DBB. Then continue up the fist crack and then on to the pillar on top of the cliff.
The next 2 climbs finish at the same DBB.
5m right of Vamp is a black face with 3 carrot bolts.
Danny Ng, 1989.
On the blunt arete just right of SOTT is an unfinished climb with 2 carrots in it.
The climb with 4 carrots (which are difficult to clip if you don't have the right genetic predisposition) and a 2 or 2 1/2 friend.
Danny Ng, 1989.
The next 2 climbs start by scrambling up 20m upstream of the last climb to the next tier beneath where a "cake slice" of rock has come away.
Climb the crack beneath the roof, yes there is a genuine roof in Launceston, and then take the left hand crack out past the piton to the thin crack and face above.
Parsons, Narkowicz.
The crack going straight through the roof hasn't yet been done yet to my knowledge though it could well have been climbed by a naked Tibetan monk while on an astral journey to Tasmania.
Climb up where the slice of cake was.
Smart, McMahon, 1979.
10m up stream from the last climbs is a large block behind which are two cracks. DBB on top of Fantissimo.
The left hand hand-crack.
Fantini 1980.
You guessed it, the right hand crack.
McMahon 1973.
The tiers above the last two climbs may have some worthwhile climbs but I haven't done them.
A striking line, and a contender for the best route of its style in the gorge. Originally done with 3 bolts (as it stands now it is equipped in the same style as the first ascent), it was the hardest climb in Tasmania at the time of the first ascent. Start by climbing Long Knife and at ~5m place a runner (slinging the massive chockstone with a 240 runner seems to work a treat) start traversing left until the small seam is reached, place small RPs in the thin seam and then climb past a few FHs and good RPs at the lip to double chains at the top. A small cam - red or green C3 - can be nice for the very top.
Parsons, 1980's.
The direct start to Seize the Day past one additional fixed hanger. The grade is unashamedly reach dependent - it will feel much harder if you're not tall. Further, the first bolt was placed to dovetail with what was at the time a fully bolted line above. It's now not clear if this can be led ground-up.
Al Williams
The surprisingly delightful and enjoyable chimney.
Start as for Seize the Day/Long Knife up the chimney but break right at about 8m and climb the bolted blunt arête of the large hanging pillar. The upper half is one of the best positions in the gorge. Currently, the direct start is a 32 or 33 project.
Polinski 2011
Line on fixed hangers.
On the front of the block that forms the Long Knife chimney is an off-width. DBB.
Lewis, Closs, 1973.
The next two climbs are 40m past the end of the major buttress and are very short even for the vertically challenged.
Hand crack to off-width.
McMahon, Selby, 1996.
Amen. The thin crack on the right.
Selby, McMahon, 1996.
Back in Black Buttress
100m past the last climbs this small buttress is set back 50m from the river but worth the scramble up to it.
The left most line, a worthwhile descent route.
The corner right of Possum Run with one FH. Looks like a corner but climbs like an off-width. A great climb to put your gym junkie mates on and watch them burn rubber and finger tips.
Narkowicz, 2002.
The thin crack line running up the face 5m right of Possum Run.
McMahon, Selby, 1996.
The thin crack around the corner from Back in Black.
Narkowicz, Ling, Deka, Smith, McMahon.
The dual crack system in the corner.
Selby, Wardlow, Fox, Nichols, 1996.
Nebraska Buttress
The next buttress is another 100m upstream almost opposite Pubic Flash.
Climb up on to ledge and then up crack and slightly overhanging corner.
McMahon 1983.
Nice hand jamming.
McMahon 1983.
Delicate face climbing up a thin crack line in the corner. Quite excellent.
Neale Smith 1983.
Climb the crack in the corner 15m upstream from the last wall.
Selby, 1996.
5m on from the Proctologist is a thin crack climb this to a ledge and then up corner to exit out left under small roofs.
McMahon 1983.
Arete to R.
Neale Smith 1983.
Corner round from Jonestown Flood.
McMahon 1983.
Fused corner with tree.
McMahon 1983.
Offwidth past roofs.
Neale Smith 1983.
Between here and Ramona buttress is a lot of broken cliff line most of it pawed by Narkowicz, McMahon and the likes. A lot of the obvious natural lines have been done and quite a few of the bolted ones. Some of them are probably worth repeating. Go and get the Narkowicz Guide To The Cosmos to be fully enlightened.
Bolted arete directly underneath furthest upstream powerline.
Narkowicz 2002.
Ramona
Access - walk upstream for about 800m from the Duck Reach Cliffs and on the same side. The buttress is visible from Duck Reach suspension bridge as the river bends around to the right.
Fine crack and arete climbing on the small buttress facing the river 50m downstream from The Sting.
Climb the thin twin cracks 4m right of Louis the King for 3m then slightly right before moving back left to the main hand crack.
10m upstream from Mac The Finger is a black corner with a crack on both sides. Climb either or both of these.
McMahon, Ling, Smith, 1980.
The left trending flake/undercling that leads to the straight crack above.
Colyvan, Smith, 1981.
An excellent climb and probably Mick Lings most lasting contribution. Across the gully/chimney from the previous climbs is a 25m pillar split by an off-width at the top. Climb from the base of this to the roof and out left to stand on the ledge and clip the fixed hanger. Up a thin crack with good RPs past and then past an eye-bolt to a horizontal break. Briefly up off-width before escaping out left in diagonal jamb crack. DBB.
Mick Ling.
Start up The Sting and clip the first bolt then head right up past 4 carrots. A bit crumbly and contrived. Not one of Danny's best efforts. Same DBB as The Sting.
Danny Ng.
Climb the corner 10m upstream from The Sting and then continue up the hand crack above. DBB.
Headbanger Buttress
You can get to this buttress by crossing the river and bashing up the hill from the Duck Reach track just past marker 9. Better is to come in from the Hoo Hoo Hut side of the gorge. On the Duck Reach Road to the Hoo Hoo hut, 1.2 km from the cattle grid, is a sign for the Snake Gully track. Park and follow the track downhill past the horse jumps till you get to a junction with a 4wd track. Turn right, which will take you to the Hoo Hoo hut, the Duck Reach Power station and the Rabbit Trap Buttresses. 40m from the junction, at a slight crest, go left and into the bush. You should pick a cairn fairly soon (for some reason Parks has taken to removing all cairns visible from the track). Follow these along the faint ridge and then down the hill for about 150m. You should emerge either at the top of the buttress or at the bottom of it on the upstream end.
The broken hand crack above the cairn on the left of the buttress.
Narkowicz, 1985.
The thin looking corner/crack 1m right of DGTIF. Good climbing.
Narkowicz, 1985.
The corner right of TMR. Superb bridging with small wires.
Narkowicz, 1985.
The large hand crack on the upstream facing wall right of DY. Climb this to the ledge (grade 16), then finish up Impale me on the Horns of Death.
Narkowicz, 1985.
The great looking twin cracks on the face around the arete and right of Paranoia. Some loose sounding flakes can be disconcerting but worth doing anyway. Up to the ledge, then again on to the top.
Narkowicz, 1985.
The crack right of the above climb. Climb this to the top of the boulder. It's pretty short, but you can then climb into the climb described below.
Narkowicz, 1985.
The crack around the corner and up hill from AOTMA.
Tierney, 1985.
The next line uphill and right of KWP.
Narkowicz, 1985.
Rabbit Trap Area
A great area with morning sun and afternoon shade so good climbing is possible in summer and winter. Access- see map. To get to the Hoo Hoo Hut drive from the Old Kings bridge at the bottom of the Gorge up Trevallyn Rd./Gorge Rd and follow the signs to Trevallyn State Reserve. Once in the reserve take a left across a cattle grid on to Duck Reach Rd and follow it to the end. Park there and then take the walk to the Duck Reach Power Station. Instead of walking down the stairs to the power station continue along the track and down the hill. Cross a dry (generally) rocky creek bed and continue up the hill on the other side. At the crest of the hill turn 90 right and walk about 80m. This should bring you to the top of the Old Timers Buttresses. All up it's about 15 minutes walk.
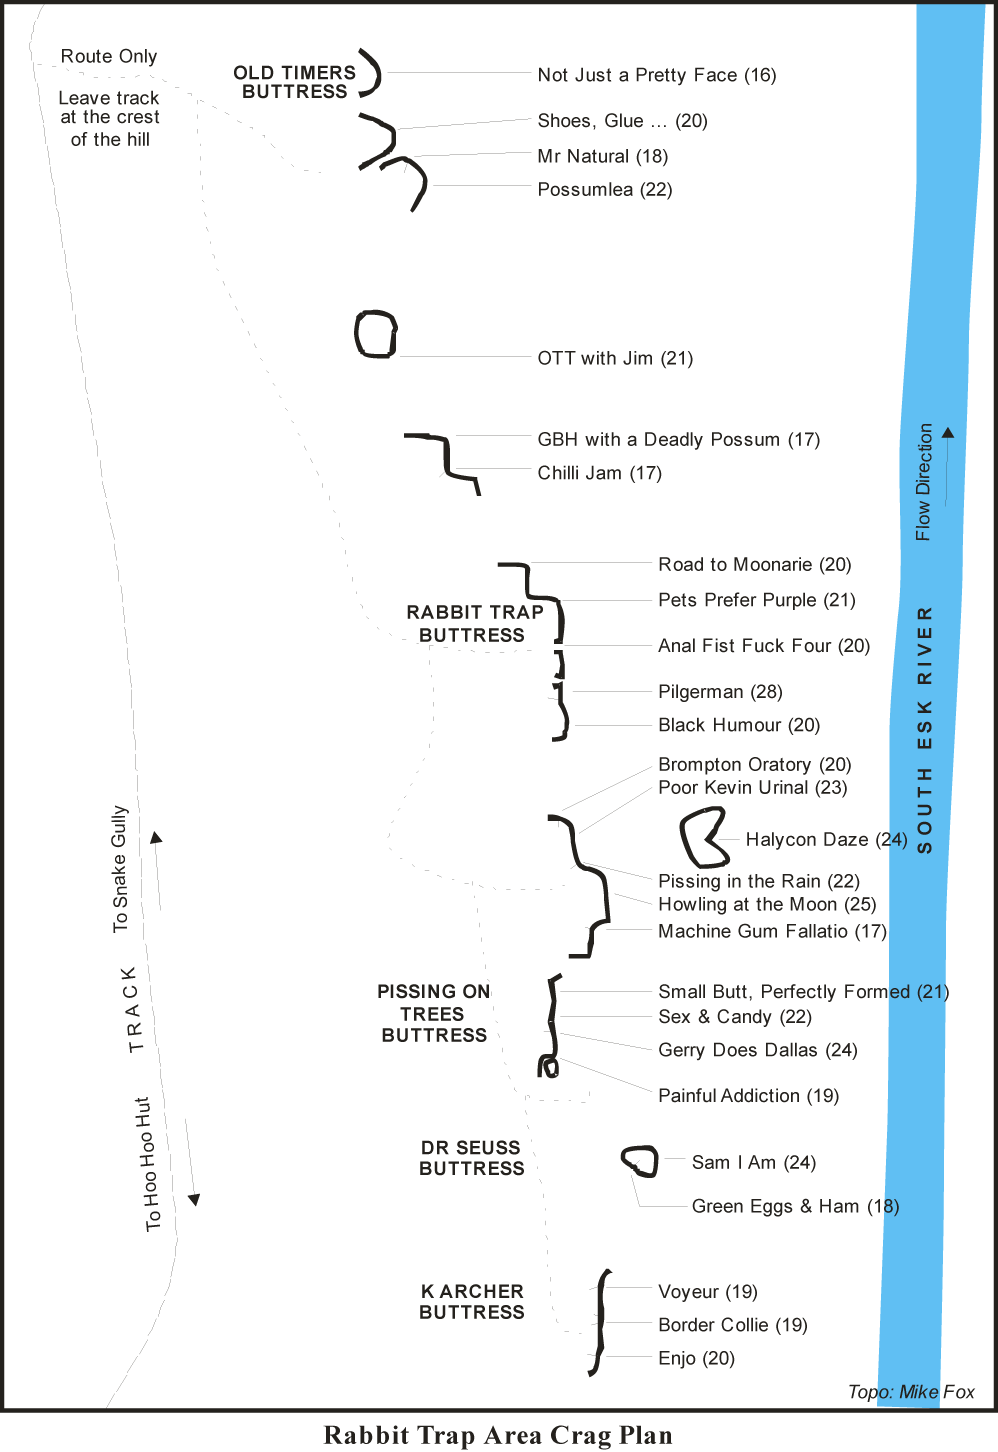
K.Archer Buttress
The left most crack on the K.Archer Buttress.
Fox, Tiz, 2002.
4m right of Enjo.
DeCesare, Kearnes, 2002.
The last obvious crack of the buttress.
Webb and the little girl, 2002.
The Dr Seuss Pinnacle contains the following climbs and has a DBB on top.
The large hand crack on the upstream face of the pinnacle. Climbs better than it looks.
Fox, Tiz, 2002.
Start on the bottom tier and climb up to ledge via 2 FH then fire up the pillar past 3 more FH to DBB.
Fox, Tiz, 2002.
Pissing On Trees
See Map. Either walk in directly from the 4WD track or walk above the cliffs from the Old Timers Buttresses. The first 4 climbs are set on a slightly separate part of the cliff.
Up to ledge then past 2 FH on the left most arête of the buttress.
Tiz, Kearnes, 2001.
Give yourself the full grade if you place gear as you go. The thin crack 3m right of Painful Addiction.
Bissett, Kearnes, 2001.
This time the action goes up past 3 FH. 2m right of Gerry Does Dallas.
Fox, Kearnes, 2001.
Now the truth is out. Boulder up past the single FH 2m right of Sex and Candy to the thin crack above.
Kearnes, Tiz, 2001.
The rest of these climbs are back on the main buttress.
The left most crack of the buttress. Follow your nose to the top.
Kearnes, DeCesare, 2001.
Up past 3 FH to the crack. At the top move right past another FH to finish at a DBB. Excellent climbing but the 2nd FH can be hard to clip so it is probably better to stick clip it and not bother with the first one at all.
Fox, Tiz, 2001.
Up easy flake past 3 FH then to crack above with a FH in the off-width at the top. DBB.
Fox, DeCesare, 2001.
The blunt arête 5m right of Pissing in the Rain. Up past 4 bolts and a 1.5 cam in the horizontal break. DBB.
Fox, Bissett, 2001.
On the rightmost end of the cliff. Boulder up to horizontal break. Up thin crack above which gradually widens. Same DBB as PKU.
DeCesare, Haas, 2001.
When you look from the top of the Pissing on Trees Buttress towards the river there is a pillar 30m away and slightly down stream. Either rap from the Pissing in the Rain belay down over the vegetation or scramble down over it to the front of this pinnacle for the next climb.
The superb orange corner, up past 4FH to a ledge. Step right up past 2 more FH to a DBB.
Fox, Bissett, 2001.
Rabbit Trap Buttress Proper
See map. Named after the old rabbit trap that should still be at the top of the buttress.
Boulder up the left most face of the cliff past a FH then up the crack system above to a DBB. Nice climbing but marred by the fact that it is split into 3 tiers. DBB.
Originally done by Narkowicz with-out the bolt or the belay.
Uninspiring looking climbing up the cracks 3m right of Black Humour.
McMahon, Narkowicz, 1982.
Commonly abreviated to AFFF for some reason. How Bob and Gerry missed this on their original sortie to this cliff I don't know so it was named in memory of those times. The awe inspiring off-width with 3 FH. Has a DBB on top but don't pull your rope down from here or it will jam.
Fox, DeCesare, 2001.
One of the best climbs in the gorge. 5 bolts going up the arête 3m right of AFFF to finish at DBB.
DeCesare, Kearnes, 2001.
8m right of PPP is another arête. Up past 3 bolts and some cams in the horizontal break. DBB.
Kearnes, DeCesare, 2001.
An excellent variant finish to RTM. At the horizontal break move left to finish up the crack.
Tiz, Kearnes, 2001.
Half way between Rabbit Trap Buttress Proper and the Old Timers Buttresses is a small cliff with the next two climbs. Access is by walking along the bottom either from Rabbit Trap or Old Timers.
Climb the orange corner on (shock, horror) natural gear. Don't worry there is a DBB on top.
Fox, DeCesare, 2001.
Up the face 2m right of Chilli Jam past 2 FH and some cams to a DBB.
Fox, Nichols, 2001.
Old Timers Buttresses
If you take the turn off from the 4wd track on the crest of the hill you should find yourself on top of Possumlea which has a DBB on top of it.
Climb the face and arete to the right of Over The top With Jim. 3FH and DBB.
Rob DeCesare, Dennis Kearnes Mar 2008.
20m upstream from Possumlea is a separate pillar. Climb the left arête of this past 3 eye bolts to a DBB.
Fox, Sharman, 2001.
2 bolts up the blunt arête. Stick clip the first. DBB.
Fox, DeCesare, 2001.
Around the corner from Possumlea is another natural gear route. What is the world coming to! However it does have a DBB.
Kearnes, DeCesare, 2001
Start with the first move on Mr Natural then move right and up the blunt arete. 1 wire and 2FH, DBB.
Dennis Kearnes, Rob DeCesare Mar 2008.
The face on the pillar 3m right of Mr Natural. 2 eye bolts and some cams.
Sharman, Fox, 2001.
Ain't that the truth. The slabby face with 2 bolts up the pillar 10m right of SGAANCD. DBB.
Kearnes, DeCesare, Fox, 2001.
Pubic Flash
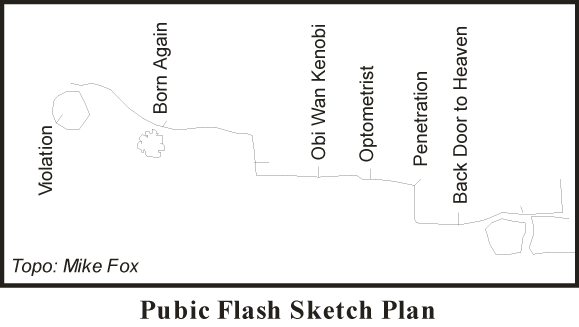
From Hoo Hoo Hut you can go either way along the loop to Deadman's Knob until you come to a rock cairn beside a log on the river side of the track(see map). Either way it is about 800m. Then walk towards the river for about 100m. This will bring you to the top of the cliff. It is also possible to get to the cliff from the Duck Reach power station but the walk up the hill is not recommended. There are some shorter easier climbs on the top section. However all the action starts on the lower cliff. This has some of the hardest climbs in northern Tassie so go and flail yourself. Just beware of the Peregrines around nesting time (Sep-Dec) and that the cliff is south facing so will need a bit of wire brushing after a winter of sloth.
Pubic Flash Pinnacle
On the upstream side of the isolated pillar is a hand crack, climb this to the top.
Maddison, McMahon, 1978.
Climbs Pubic Flash for 10m, then left on blocks.
Reg Marron 1973.
Wide crack and chimney on downstream face of main cliff.
McHugh, McMahon, 1972.
Pubic Flash Wall
The thin crack starting behind a bush 20m upstream from Obi Wan Kenobi.
Narkowicz, 1985.
Prominent thin corner.
Narkowicz 1985.
2 bolts and 2 fixed hangers. Brilliant laybacking the whole length with the crux coming just before the first bolt. A small cam (green alien) and medium nut are usefull if going ground up.
Ng 1990.
4 carrot bolts. The bolts are quite widley spaced and awkward to clip so check it out before you attempt the onsight (or have someone else check it out if you really want the onsight).
Ng 1990.
5m upstream from Back Door to Heaven is a corner and crack which looks like it will improve dramatically with a clean.
Smart, McMahon, 1982.
2m upstream from the off width chimney/corner is a line of 7 carrots some of which are hard to get hangers over.
Ng 1991.
Willow Jungle Area
Access- see map. Stand in front of the map at the Hoo Hoo Hut and then walk directly south as indicated on the map(actually south-west). With-in 50m 10 minutes all up if you find the right way). The top tier is 40m back from the river and 50m down the river from the bottom tier. The bottom tier is at the end of the HEC water channel nestled against the willows. Alternatively you can walk up from Duck Reach power station, past all the other crags not described here, which takes about 45 minutes. The first 4 climbs are on the bottom tier and have a DBB.
Willow Jungle Main Crag
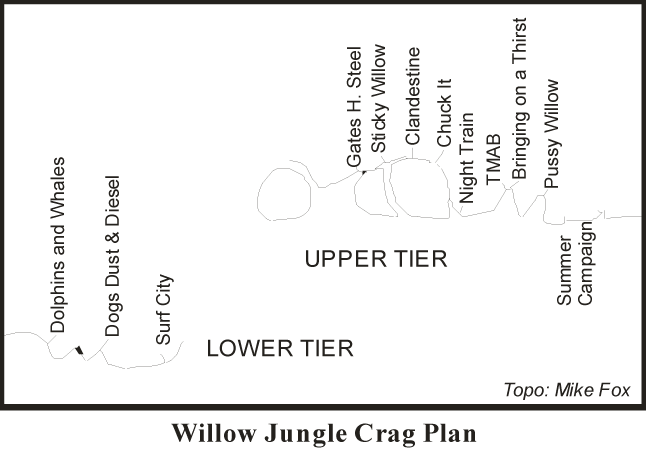
Blocky corner on far L of causeway.
Humzoo 1984.
Thin face with tree at half height.
Narkowicz 1984.
The face/corner with 4 carrots. All of which are hard to get hangers over so add a grade if you like hanging around in extremis trying to get bolt plates to fit.
Ng 1990.
The corner with 5 FH. Excellent and unlikely climbing.
Narkowicz 2001.
The corner with 3 FH, 2 of which are beside the old pitons. Needs some wires/small cams between the first and second FH.
Narkowicz, 1982.
Up to the roof and on to the arete past 4 carrots.
Ng 1990.
Crack to right of Surf City.
Narkowicz 1984.
Line up middle of smaller crag 20m right.
Narkowicz 1983.
Right of Shouldering On.
Ling 1983.
Mansion On the Hill
These climbs are on the Mansion On the Hill, which is up to the right of the main Willow Jungle crag.
On the separate pillar at the far upstream end of the cliff is a bolted face. Hard start then eases up. 4 FH and a DBB.
Narkowicz 2001.
Follow crack out to arete, then up Missing Josiah.
Narkowicz 1983.
Narrowing chimney.
Neale Smith 1983.
The thin crack in the shallow corner.
Neale Smith, 1983.
A bouldery start to gain access to the thin crack.
McOwan, Wells, 1991.
The hand crack 2m left of Chuck It.
McMahon 1983.
The corner.
McMahon 1983.
The bolted face L of Night Train (the arete with carrot bolts by Danny Ng). Gymnastic face moves past 4 bolts to join the same anchors as Night Train.
Gerry Narkowicz 7 Dec 2004.
Start from the ledge 8m left of Those Mornings After Blues climb the blunt arete past 4 carrots. DBB.
Ng 1990's.
The next two climbs start in the same corner and look too close to be independent but are actually quite separate.
The left hand crack from the same start as BOAT.
Starts in the corner and then goes up the right crack.
Narkowicz 1983.
The corner/crack with the chockstones.
Neale Smith 1983.
Same start as SC before moving left at the undercling to the arête up past 3 FH. DBB.
Narkowicz 2001.
Up thin crack for 3m to horizontal break before moving right to the hand crack.
McMahon 1983.
Fifth Estate
From the arrowhead rock cairn to Willow Jungle continue straight ahead following the other cairns for 50m 4 good looking sports routes and a few natural gear routes that look O.K
Aclai Del Lei
The climbing here is great. On a sunny winters day it's possible to climb in just a shirt.
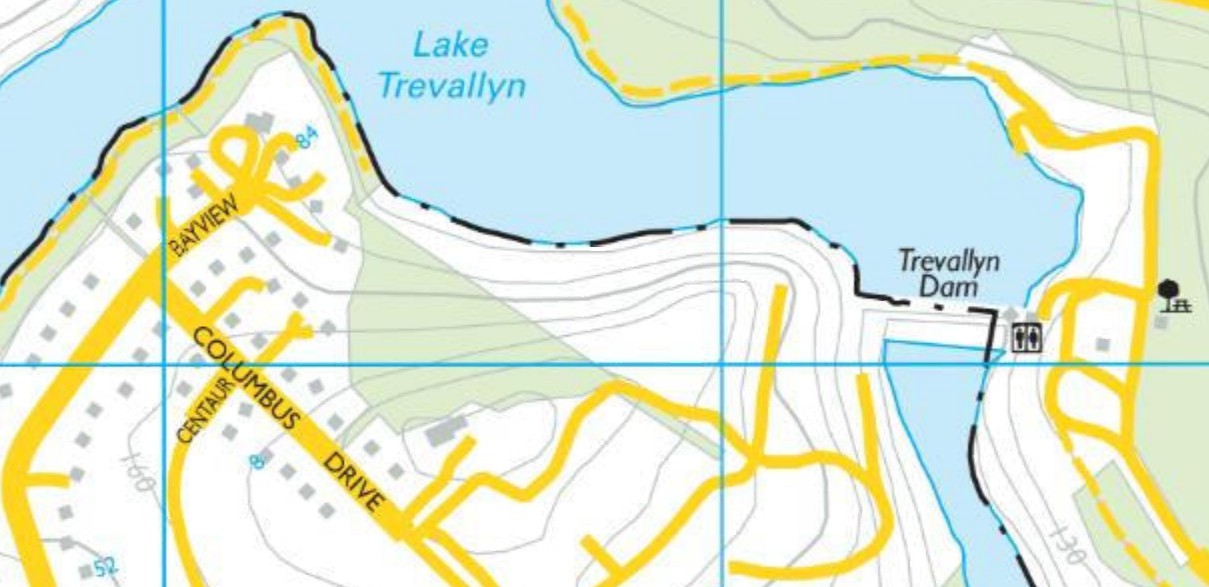
This cliff is reached from Columbus Drive: head towards the Launceston casino, take a right turn into Blackstone Rd, follow this for a few km's, turn right into Panorama Rd and follow this to a T intersection, turn right onto Bayview Drive. Hint: if you follow Bayview Dr to its end and look to the right you will see Aclai Del Lei - this will help subsequent navigation but don't start the walk from Bayview; instead go up Columbus Dr. Three houses from the end (on the NE side of the street) is what looks like a vacant block. This is actually crown land and connects with a larger area of crown land between the houses and the Hydro Tasmania land that the cliff lies on. The route to the cliff is about 300m and was taped a few years ago (not sure if they are still there though). There is a rap station set back on a boulder above Northern Man. NB: In the past access was made via the track going NW from the very end of Columbus Drive - do not go that way as this is private property and the land-owner has asked that people don't trespass.
To find your way around first find Wasp Factory (the wall with 3 eye bolts and a DBB) and work from there.
Bridging steeply up face on left of crag.
Narkowicz 1982.
Blocky start up to FH and corner above then trend right. A bit loose in places.
Neale Smith 1983.
Right arete of main face with one bolt.
Parsons 1982.
Twin finger cracks left of Wasp Factory. One FH near the finish; DDB at top.
Narkowicz 1982.
Tho' I reckon it's a grade harder especially for the onsight or the less than six foot climber. The face, sporting 3 bolts and a DBB. Good, committing climbing.
Tierney, Fox, Bissett 1997.
There is a set of rap chains on the wall at the top of White Fang.
The arête with 3 bolts across the gully and right of WF. A mid-size cam is handy (but not essential) once you gain the flake. Dangerous fall potenial between first and second BR.
Bissett, Fox, Tierney 1997.
Same start as MW but head right past 2 carrots to the right leading crack (good small cams). As with the route to its left, there is dangerous fall potenial between first and second BR.
Ng.
This is the fun crack right of ITOM. Up the crack to the overlap then a tricky move left to gain the final crack. Both the climbing and the protection are good.
Narkowicz 1982.