
Bicheno
 5-10 mins
 Mostly morning
 Granite - Slab to Overhung
Introduction
The bouldering in Bicheno is located on coastal boulders. The boulders can be found at the Blowhole and run north for 300m to a large block with more at Peggys Point. The problems here, although limited in extent, are some of the best in the state. The rock is funky granite that is quite different from the rock at Coles Bay. Generally the rock is clean, except for barnacles. The majority of problems depend on a low tide and swell. See the Mercury or http://www.ntf.flinders.edu.au/TEXT/TIDES/TIDES/tas.html for tide predictions. The weather in winter here is amongst the best in the state, with lots of warm sunny days, which makes Bicheno a good escape from Hobart. In summer you've got the sea right next to the bouldering to cool off in.
Access
Bicheno is on the east coast of Tasmania, about 2 and a half hours from Hobart or Launceston. It is about 35 minutes' drive north of Coles Bay.
Camping
There are plenty of campgrounds, motels, shops and takeaways in town.
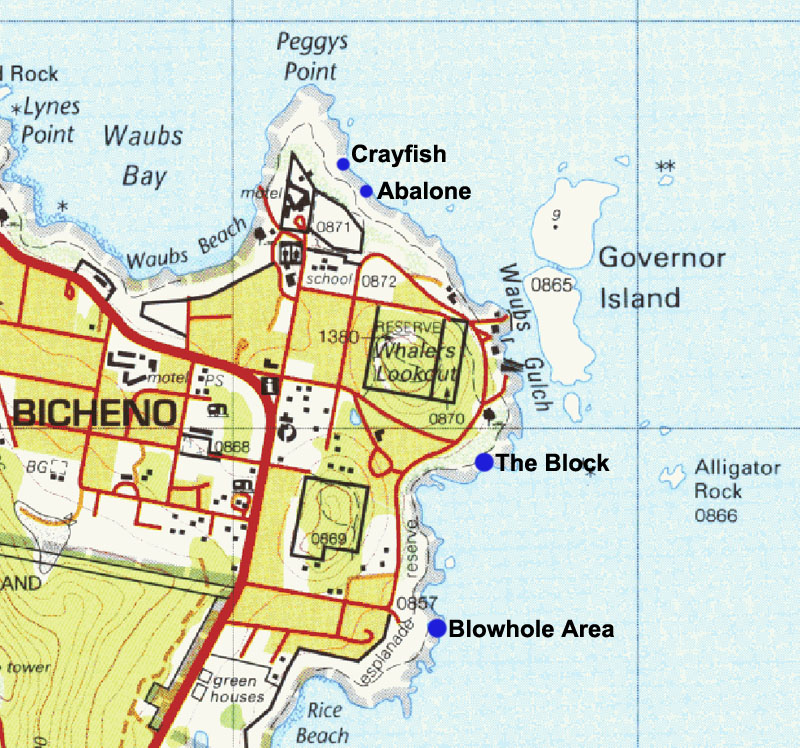
GPS
The Blowhole Area
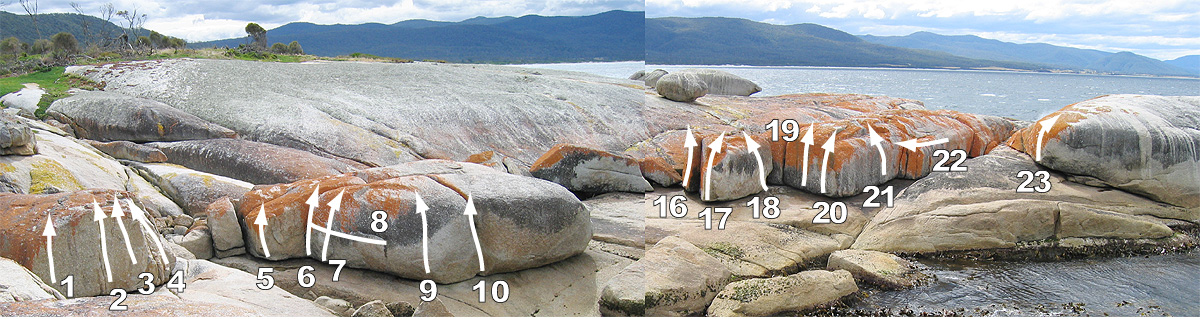
There are some great problems on the freestanding boulders and walls around the blowhole. Follow the signs off the main road to get to the parking area for the Blowhole, then walk 50m out to the obvious block.
Blowhole Boulder
There have been a few problems done here on the boulder next to the Blowhole.
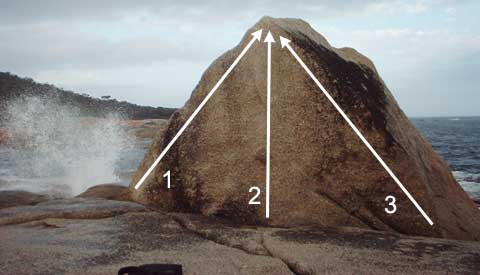
Unnamed
V?Some easier lines have been done on the slabby side of the boulder.
Sit start on small crimps up slightly overhanging face. Excellent problem.
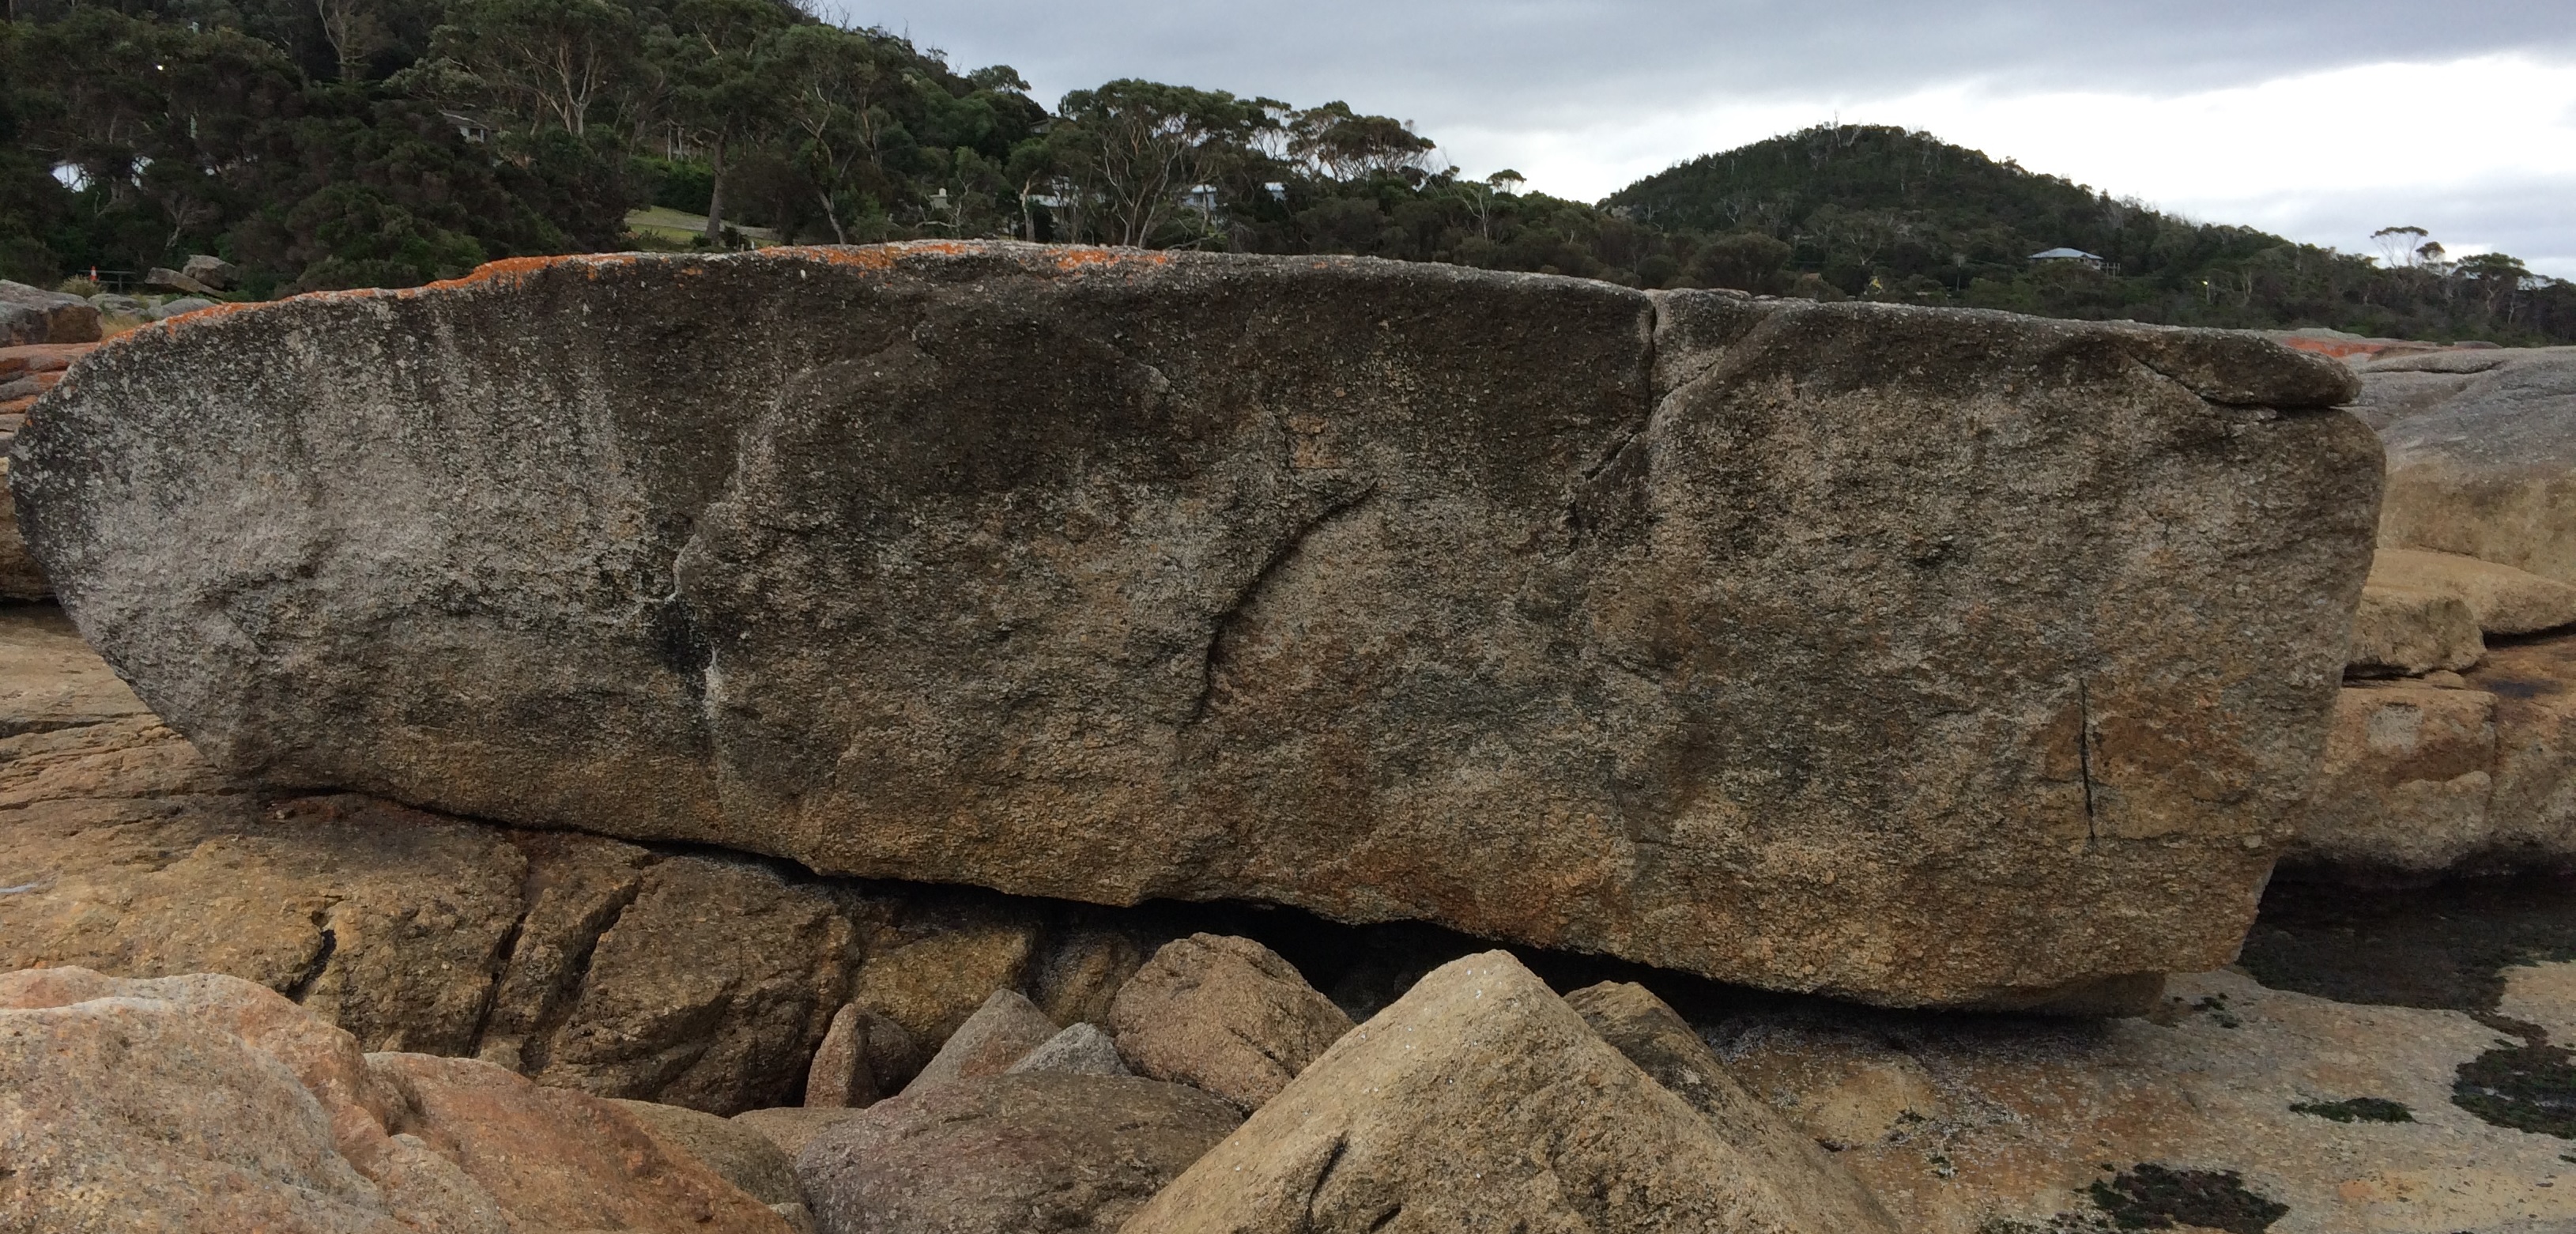
Whale Boulder
This is the south facing wall about 40m south of the Blowhole.
Sitstart on low hold, hit arête and up.
Project. Same start as no 1, blast high and right then up.
Flakes.
Undercling and up.
Flakes to high topout. SDS is a project.
Classic steep arête to slopey topout.
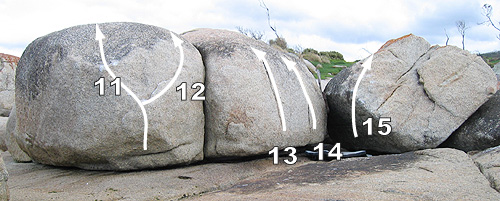
Old Man Boulder
This block is directly across from the Whale boulder:
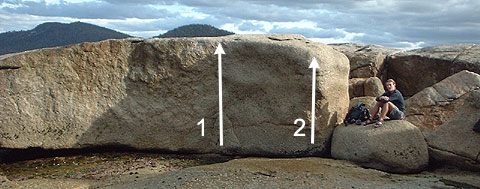
Sitstart at flake and up groove.
Just left of arête, pull up through pockets.
On the back of the same block:
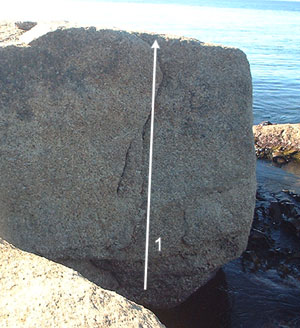
Up nice flake/crack.
Warm Up Boulder
Across from the previous problem:
Up juggy face.
Up quartz jugs.
Up steep quartz arête.
Layback off the bulge, pull up through the ridge.
Layback on the crack.
One handed start off the round arête hold, up through jugs. Can be campused for an extra grade.
Starts on the large horizontal overhanging flake. Start hanging underneath, work your way around and up to top out.
Blowhole Walls
There are some great vertical and slightly overhanging square cut walls below and immediately to the south of the Blowhole. Most of these problems depend on a low tide and swell.
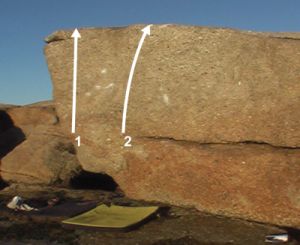
Style up the right side of the arête. Sitstart looks hard - V8?
Step onto the wall and it's done.
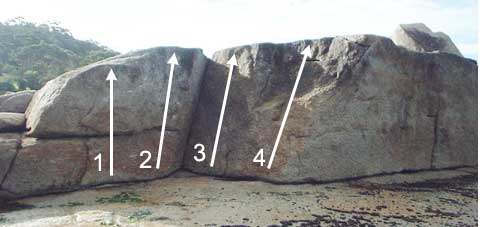
Up from break to small pockets.
Up from break.
Easy slab.
Easy slab.
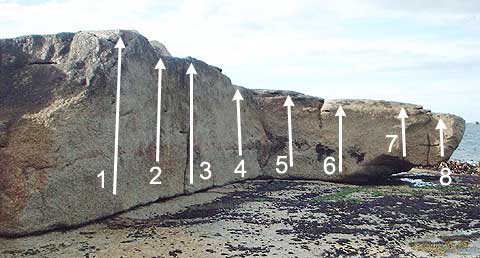
Start on pockets just right of arête.
Project - start from big flat hold.
Up crack.
Up from underclings to pockets.
Easy slab.
Easy slab.
Awkward sitstart and up crack.
Awkward sitstart just left of arête and up to jugs.
Sitstart off low slot and up steeply to jugs.
This is around the corner into the next little zawn, below Blowhole Boulder:
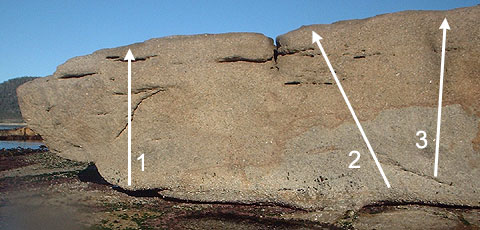
Sitstart up flake to slopey topout.
Face using big slots.
Project - knob to shallow pockets.
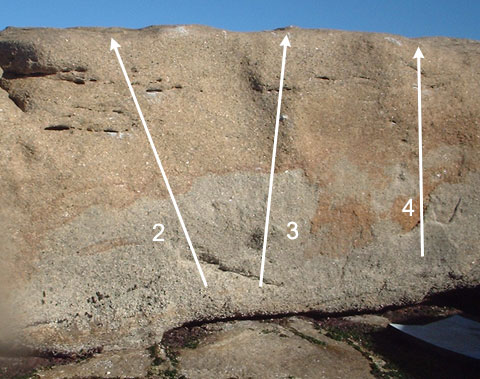
Up face using high crimps (hard to reach) to slopey topout. The sitstart will be very hard if it goes.
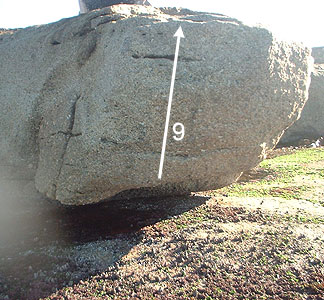
This is directly under Blowhole Boulder:
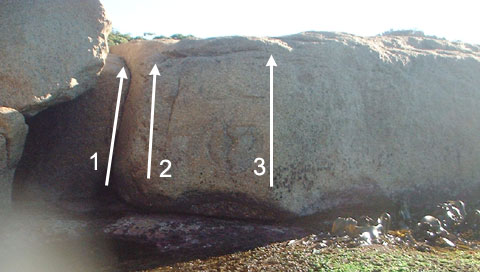
Layback up corner.
Up arête.
Up arête.
Exploding Crystal Boulders
These three free standing boulders are about 40m north of the Blowhole. The rock isn't as good as some of the other boulders and tends to be a bit gravelly.
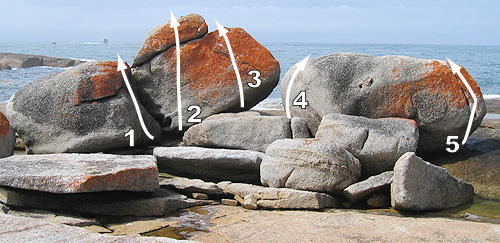
This is the side facing land:
Slab.
Slab up highest part of boulder.
Slab with underclings.
Project.
Sitstart at arête.
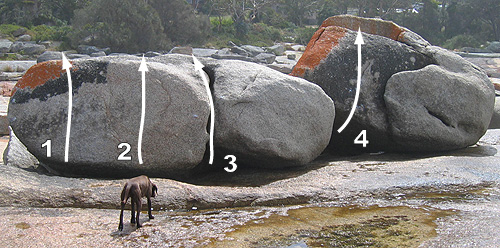
This is the seaward side of the boulders:
Slab.
Slab.
Sitstart and up crack.
Project.
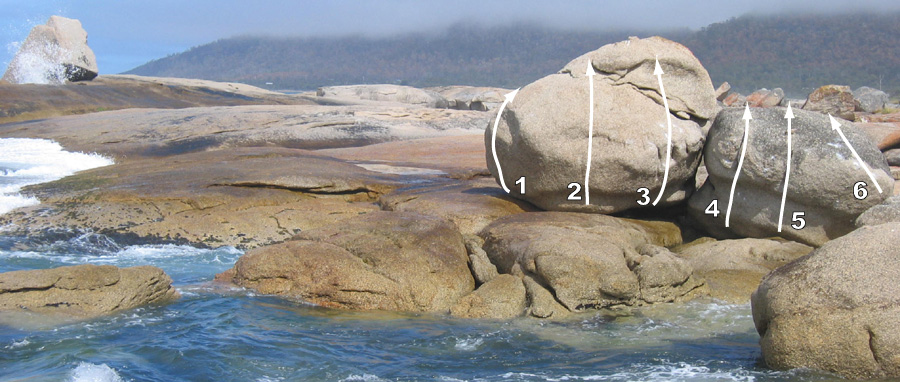
This is the northern side of the boulders:
Pull over the slopey shelf from sitting.
Start on slopey protrusions at the base of the left cleft. Slap up and left to the lip and fight upwards.
Hang start on lowest hold on lip above overhang and slap up.
Mushroom Boulder
This is next to the Exploding Crystal Boulders, and the problem faces inland.
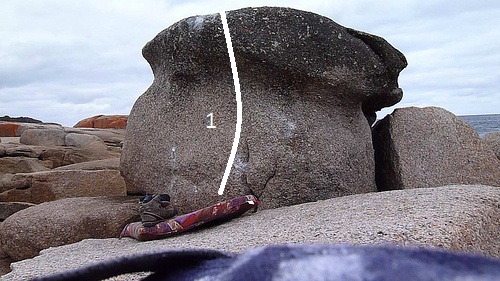
Pull up using the crack and anything else, gain the slopey arête and then the top.
Crab Boulders
These boulders are about another 50m north of the Exploding Crystal Boulders.
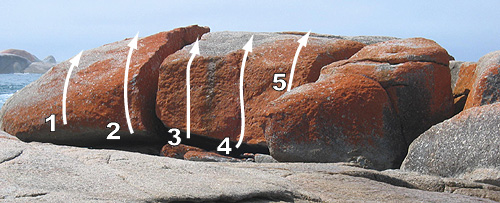
A heel helps pull up the hanging arête.
Slab.
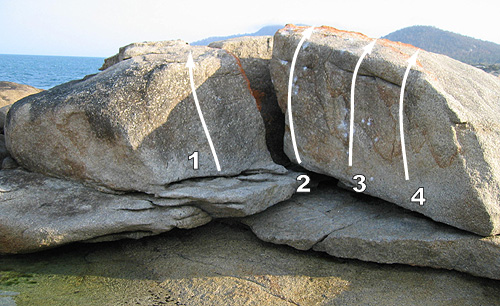
This is the north facing side of the boulders:
Arête over awkward landing.
Start off flakes.
Go into the gap between problems 1 and 2. There are four different slab problems in there.
Gaston Wall
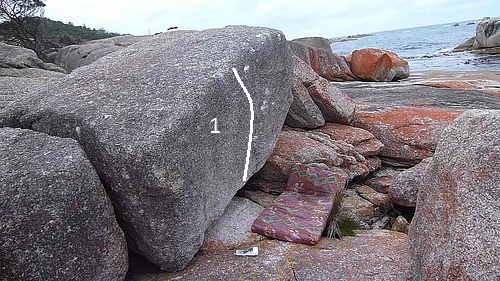
Some way back towards land from the Crab Boulders is a nice face.
Pull to a hard move from a thin gaston. V9?
Suntrap Cove
Halfway between Crab Boulders and The Block Area is a small cove with several large boulders on the southern side.
Suntrap Boulder
This is the smooth boulder closest to Suntrap Cove. A short walk south along the Foreshore Walk from the Suntrap Cove roadside sign.
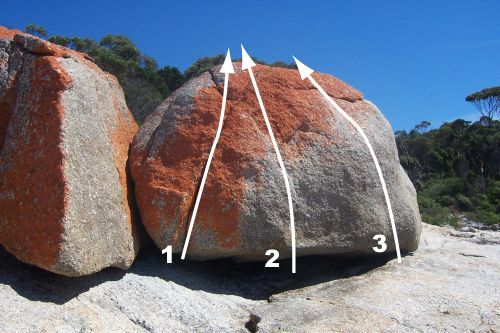
Up on flake.
Ugly first move leads to crimp and highstep. Best avoided.
Step onto hold/rock and head for the top.
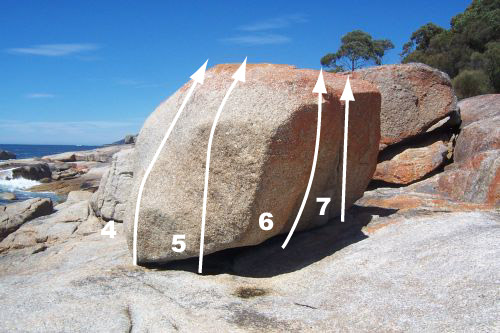
Pull onto the face with a high foot.
M Hitchcock 2017
Start on slopey rail and head up through more slopes.
M Hitchcock 2017
Start right hand in the corner and left on the arête. One hardish move to gain a higher handhold on the arête then up to a mantle top-out.
Start in crack using right arête.
M Hitchcock 2017
Sharp Boulder
This boulder is 100m south of the Suntrap Cove boulder. It is sharper than most of the boulders in this area.
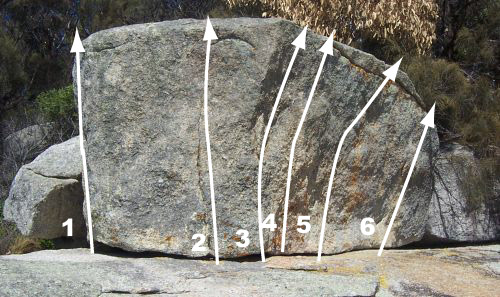
Move up left arête.
Start at base of crack using hold and crimp layaway. Move to top of crack layaway and then to the top rounds.
Sit-start on layaway and good hold. Up face to crimp, left hand arête and up.
Start left hand on the undercling and step up into it. Just one move and then the mantle. Sit start would be hard.
Start on the obvious flake. Layaway and head for the top jugs.
The Block Area
Park at the little picnic area on the coast just south of the Gulch area and 300m north of the Blowhole. Wander down to the obvious square cut blocks.
The Wall
This is the vertical wall directly opposite the Block.
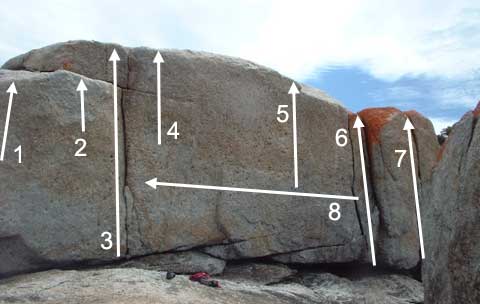
Using left arête and slopers pull to ledge. Sitstart might be possible, but very hard.
Start off 2 slopers, pull to ledge.
Nice corner.
Thin face 1m right of corner, don't use corner.
Straight up the middle of the wall on crimps with a throw to the top jug.
Corner.
Crack.
Unnamed
V0Diagonal crack around corner to right of previous problem.
Traverse across very thin wall finish up 4.
The wall continues on around to the left:
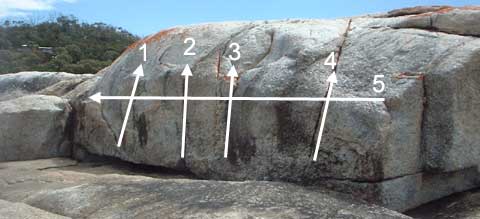
Right to left traverse.
The Block
This is the main free standing boulder:
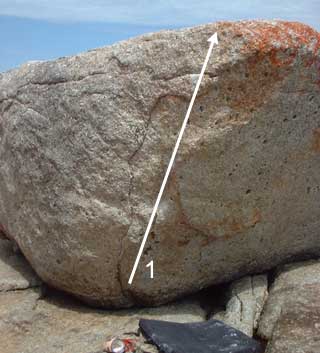
On the boulder there is a completely blank overhanging face. This problem climbs the steep left arête on pockets.
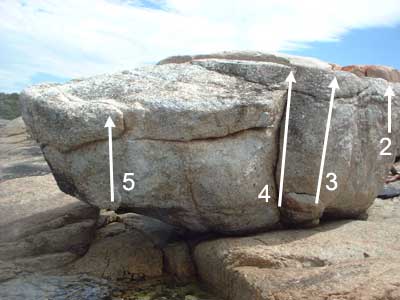
Pull up off thin slopes.
Up off jug to slopes.
Up corner.
Sit start on the big jug and pull through to the top on slopes.
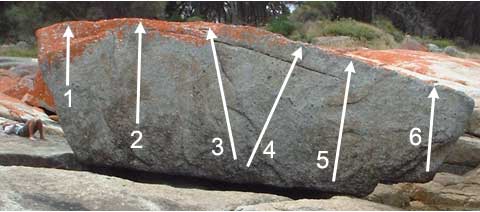
The opposite side of the freestanding boulder:
Unnamed
V3/4(Stand)Just left of the arête, pull up on flake and do a tricky mantle over the top of the steep face.
Near left arête.
Up slab.
Up flake.
Start as for previous problem but go right to pockets.
Start in little depression and up slab using underclings.
Up using undercling/crack.
Grey Dog Boulder
This is the orange slab adjacent to the Block.
Unnamed
V0(Stand)Left side of slab.
Unnamed
VE(Stand)Crack in middle of slab.
Unnamed
V0(Stand)Right side of slab.
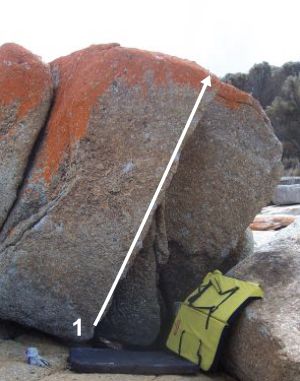
This problem is just around to the right.
Use the undercling to the top then head left.
Glory Hole
★V0(Stand)In the middle of the back of the Grey Dog boulder, start down in hole, climb the nice flake.
Unnamed
V2(SDS)Start a couple of metres right of Glory Hole off the blocks. Sitstart off sidepull, move L up face.
Unnamed
VE(Stand)Easy cracks to R of previous problem.
Unnamed
V0(SDS)Diagonal crack left of arête.
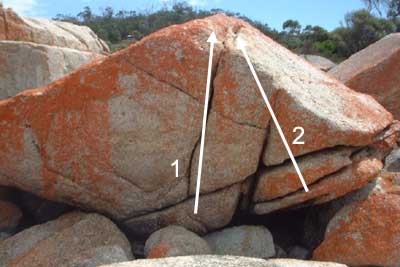
This small boulder is just behind the Grey Dog boulder.
The Orange Slab Area
These slabs are about 40-50m east of the Block Area and face out to sea.
The Black Slab is about 20m left of the Orange Slab.
Unnamed
V?(Stand)Prow around to the left of the Black Slab - looks nice but a bit scary.
Unnamed
VE(Stand)Crack on left edge of slab.
Unnamed
★V1(Stand)Slab 1m R of crack.
The Black Slab
★V1(Stand)Up middle of slab on nice dimples.
Unnamed
★V0(Stand)Slab 2m R on more dimples.
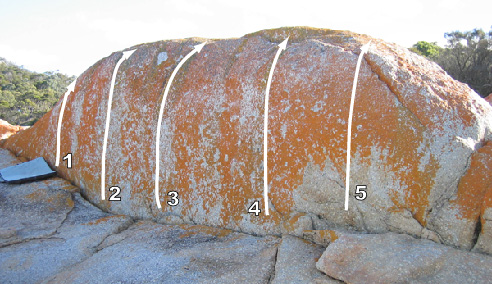
This is the Orange Slab itself.
Project - very thin up the steepest part of the face.
Project - Up thin seam on small flakes.
Up thin slab.
20m right of the Orange Slab is a smaller lower angled slab - The White Slab.
Unnamed
★V1(Stand)Diagonals on L side of slab.
Unnamed
V0(Stand)Crack in middle of slab.
The White Slab
★V2(Stand)Nice slab 1m right of crack.
Unnamed
V0(Stand)Diagonal on R of slab.
Peggys Point
The following great free standing boulders are on the Gulch side of Peggys Point. Park near the Silver Sands resort and walk across the oval and down to the coast. The boulders are obvious if you are on the right bit of coastline.
Abalone Boulder
This is the more southerly of the two free standing boulders. It has excellent fine grained rock.
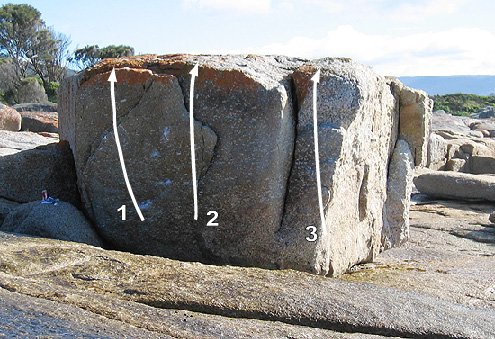
From jug up left to flake.
Up large flake.
Arête and corner.
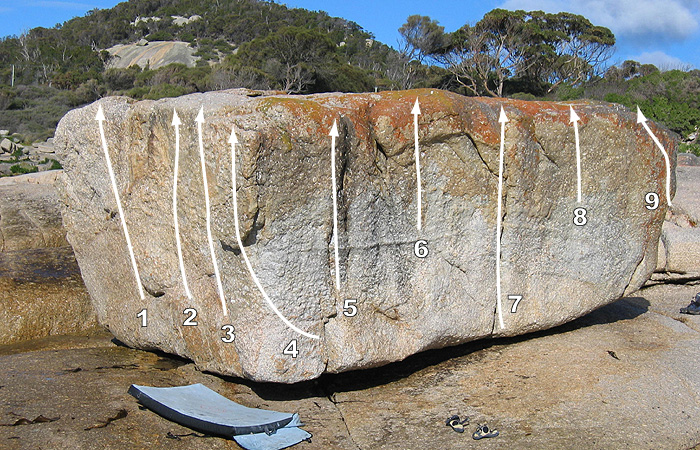
From the curving crack, pull up the face. V2 from standing.
Up face. SDS is a project.
Corner left of arête.
Sitstart at the crack. Move left to the big undercling flake on the arête and up. Eliminating the crack from the start would make it harder.
Crack.
Sitstart the face (rh pinch the undercling) and pull up to gain the short hanging crack. V1 from standing.
Crack.
Face.
Crusty arête.
Traverse the top lip right around the boulder.
Project - Start at Mullet and traverse leftwards without using the top of the boulder to finish at Crab Stick.
This small boulder is about 20m north of the Abalone Boulder:
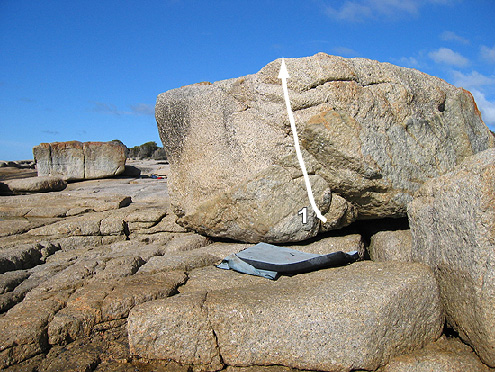
Low sitstart and up jugs.
Crayfish Boulder
This free standing boulder is less than 100m north of the Abalone Boulder, and has an overhanging east face.
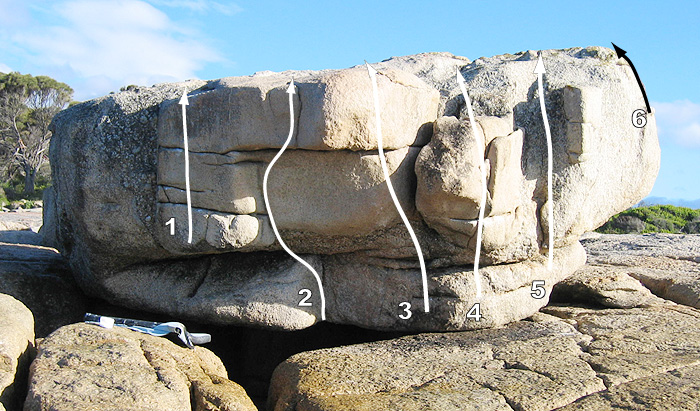
Up jugs on hanging face. Project - start down in cave and climb up to the face.
Start dangling on slopers over void, throw left heel into groove and mantle into left roof hold, link up onto face.
Brendan Heywood Dec 2013
Project.
Sit start in break and up.
Sitstart at break and up groove using honker jugs. Brilliant easy problem.
Jump for the great jug and haul your arse over the top. More fun than a barrel full of monkeys.
Start on the big jug on Crayfish and traverse around the horizontal line to finish up Craypot. At problem 3 (project) move between horizontal breaks using awkward jams. A great problem with a little bit of everything - juggy traverse, handjams, campus moves, deep water soloing and a slopey topout.
Diamond Island
Diamond Island has some nice freestanding boulders and walls on its seaward side. To get there park at Redbill Point and walk north along the beach to the spit which connects the island to the mainland. At low tide you should be able to easily walk across. Walk around the southern side of the island for 5 minutes or so until you get the south east corner, where the boulders start.
Moby Dick Wall
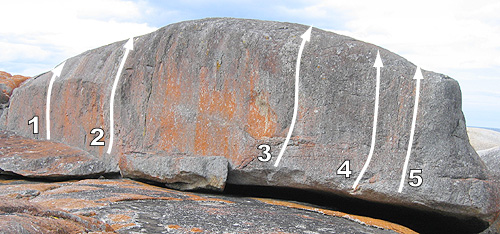
This large sheared off wall is the first decent bit of rock you come to. I'm not sure of the names and grades of these problems, but they had chalk on them.
Diamond Boulder
This beautiful free standing boulder is hidden behind the red slabs to the right of the Moby Dick Wall. The first topo is the back of the boulder.
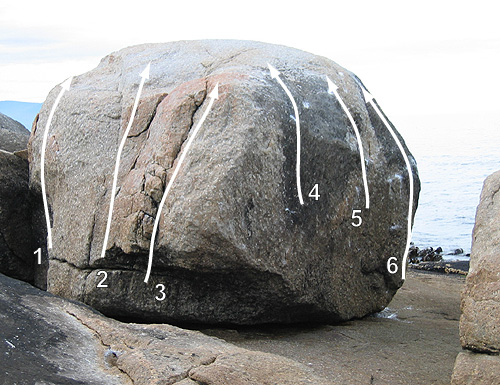
Sitstart up little corner on left side of boulder.
Easy featured slab, also the descent.
Sitstart under arête, up on big jugs.
Up face just right of arête. The thin sitstart might go.
Slab in middle of face. Sitstart might go.
Project - Sitstart up arête to tricky slab.
This is the front of the boulder, which faces the sea.
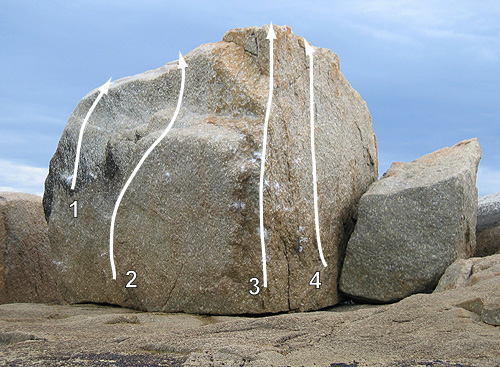
Project - start on high flat hold 1m right of arête. Up to flake and topout.
Sitstart in corner and follow ramp rightwards, then up onto ledge.
Up arête from awkward sitstart.
Beautiful featured face.
30m south of the Diamond Boulder is this little roof.
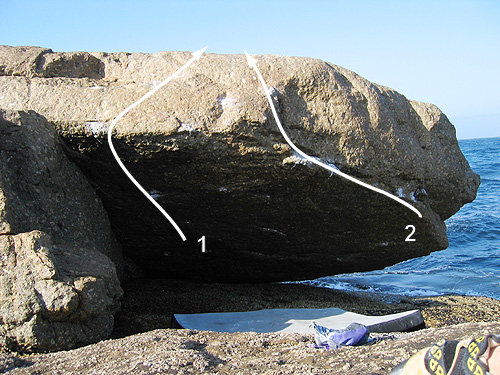
Start on hold under left side of roof. Don't use rock to the left.
Start on the right hand edge of the roof, traverse left and then up.
Random Slab
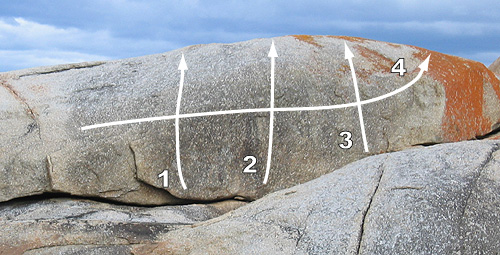
This slab is up and to the left of Moby Dick Wall.
Left side of slab.
Middle of slab on nice holds.
Right side of slab.
Traverse from left to right.
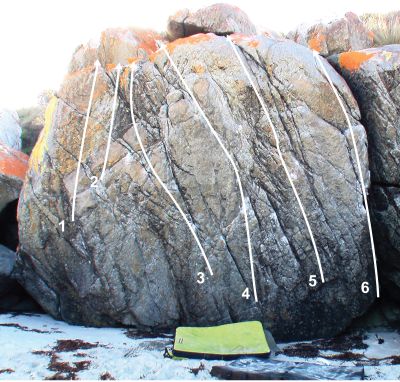
Diamond in the Rough Area
From the Moby Dick Wall, head left down a small gulch to find this great area of freestanding boulders and walls. Most of the problems here are easy to moderate, but there are some blank slabs and walls that may or may not have been done.
Face and mantle left of crack.
Crack in middle of face. The sit start is a bit awkward.
Face using sidepulls.
Easy right arête.
Arête.
Crack.
Sitstart to jugs.
Traverse right to left along jugs.
Project? - hard slab up arête.
Hand crack.
Sitstart on arête, up left.
Sitstart on arête, go right then up.
Nice crack in slab.
Nice crack in slab. Can be done as an SDS.
Start under little overhang, up and over.
Crack.
Nice little arête.
Project - start under arête on R of face, move left and up.
Cracks up face.
Jugs left of arête.
Flake in middle of face, up to slab.
High holds 2m right of flake, up to slab.
Traverse jugs in either direction from corner to corner.
Start a couple of metres left of arête on jug, pull up and mantle
SDS, up arête.
Little Beach
Little Beach is 35km North of Bicheno. Several km past the Elephant Pass turn off look for the Little Beach sign almost at the bottom of a dip. It's a lovely spot for swimming, fishing and bouldering. Head down to the beach then north; the boulder is in the first alcove along the beach.
The sand now is completely gone and probably made the boulder better. The starts have now dropped by around 1.5m.
Take a couple of pads and it should be good.
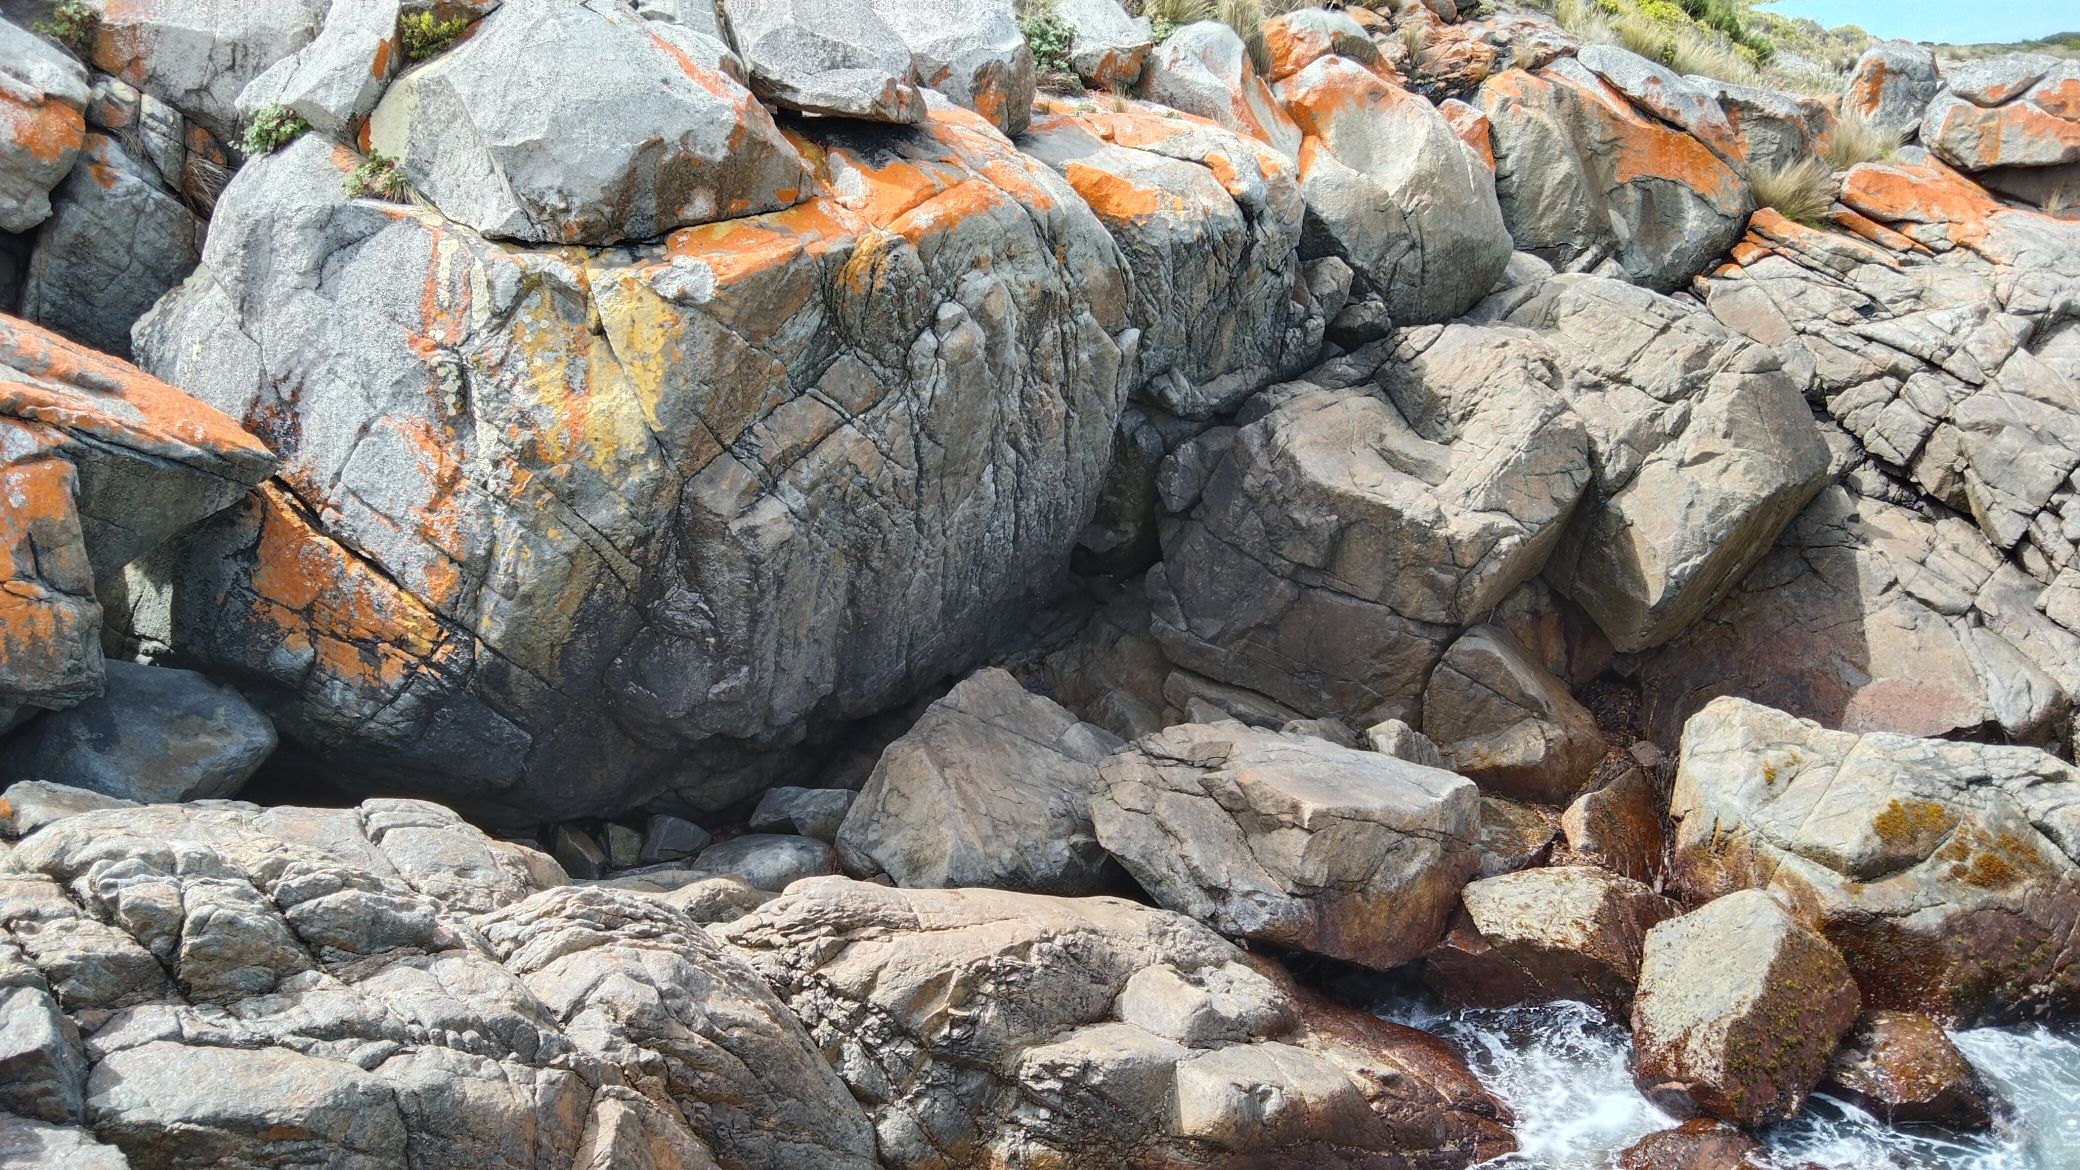
Most problems below will have changed a lot, rename/rewrite as necessary.
Straight up using jugs. The sit start will probably go.
Use more jugs and up. The sit start looks hard but will probably go.
Project. Head up and left.
Pull up to side pulls then jugs to top.
Hardest line. Cool looking problem.
Project. Arête to slopey topout.