
Oatlands
 5 min
 Afternoon sun
 Steep and solid sandstone caves
Introduction
Oatlands is one of the best bouldering areas in Tasmania, but has lately been mostly underwater since the lake has filled up. The climbing is on both roofs and faces and is of very high quality. The sandstone is generally quite solid, which is fairly unique for Tasmania. As well as Tasmania's hardest bouldering, Oatlands also has a number of quality moderates.
History
Oatlands was first developed in 2001 by Sam Edwards and Kim Robinson. Stu Bowling, Jon Nermut and others later develop many of the more moderate lines. For much of the decade the lake was dry, which allowed the development of the Island. Since 2010 or so, the lake has filled up again, which makes the climbing here much more limited.
Access
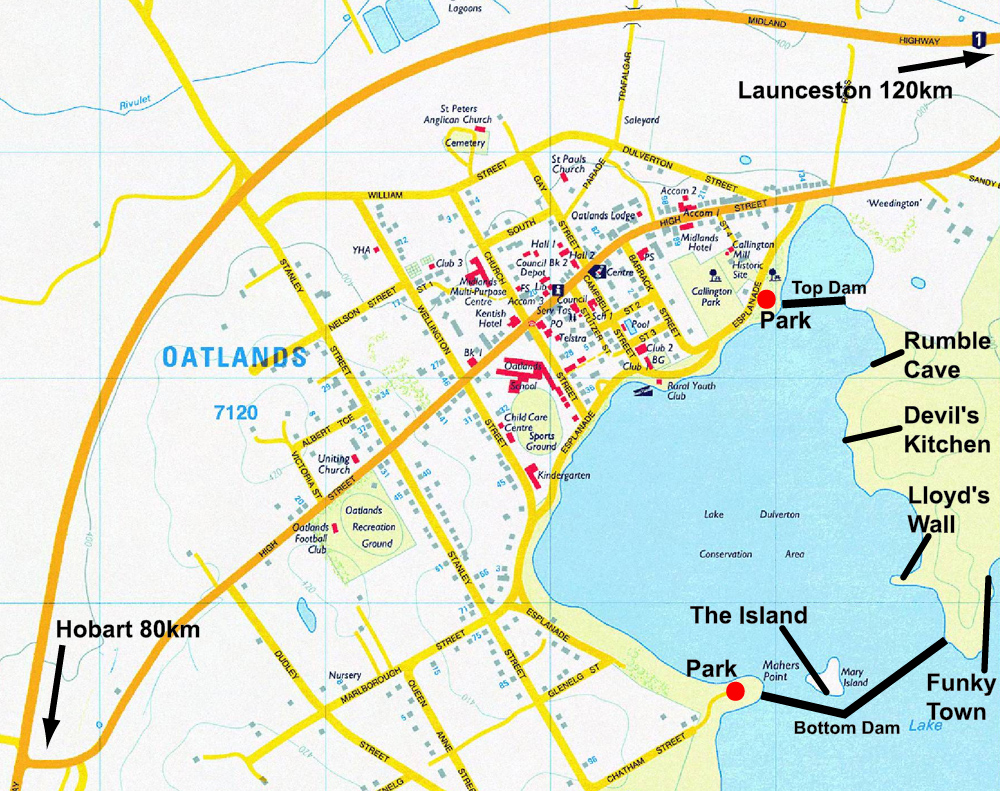
Oatlands can be found about 1 hours drive north of Hobart up the Midlands Highway, or a bit longer than 1 hour south of Launceston. Park at the picnic area near Milk Point and walk across the Top Dam to get to the areas. The Devils Kitchen is the obvious, enormous roof and is clearly visible from the parking area. To get to the southern areas such as the Yellow Cave and Funky Town it is quicker to park near the bottom dam and walk across it.
The areas that are currently dry enough to climb on are marked with a "dry" tag.
GPS
Dead Sheep (dry)
This is the small cave and wall to the left of the Rumble Cave. It is the furthest left of the caves in the line of cliffs that face the top dam. It has the skeleton of a dead sheep in the right side of the cave. All these problems are sandy and need more cleaning.
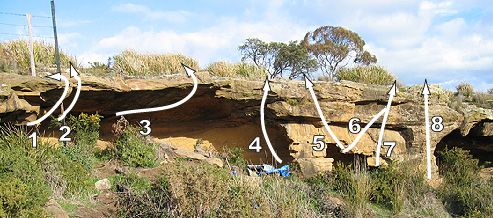
Start at underclings 1m left of the green fence post. Up to crimps and slopey topout.
Start at big jug 1m right of fence post and dyno up to lip and desperate slopey mantle.
Start in the right hand side of the cave just to the left of the dead sheep. Climb out through loose and dirty jugs. Needs more cleaning.
Start at a jug in the middle of the little arch. Up and left to slopey top out.
Start as for previous, go right to finish as for Mutton.
Start as for previous problem, crank straight up to the lip (rather than move right) and do the slopey top out.
Up face to slopey topout.
Up face to slopey topout
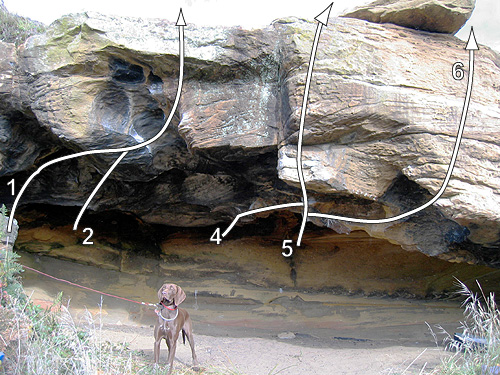
Rumble Cave (dry)
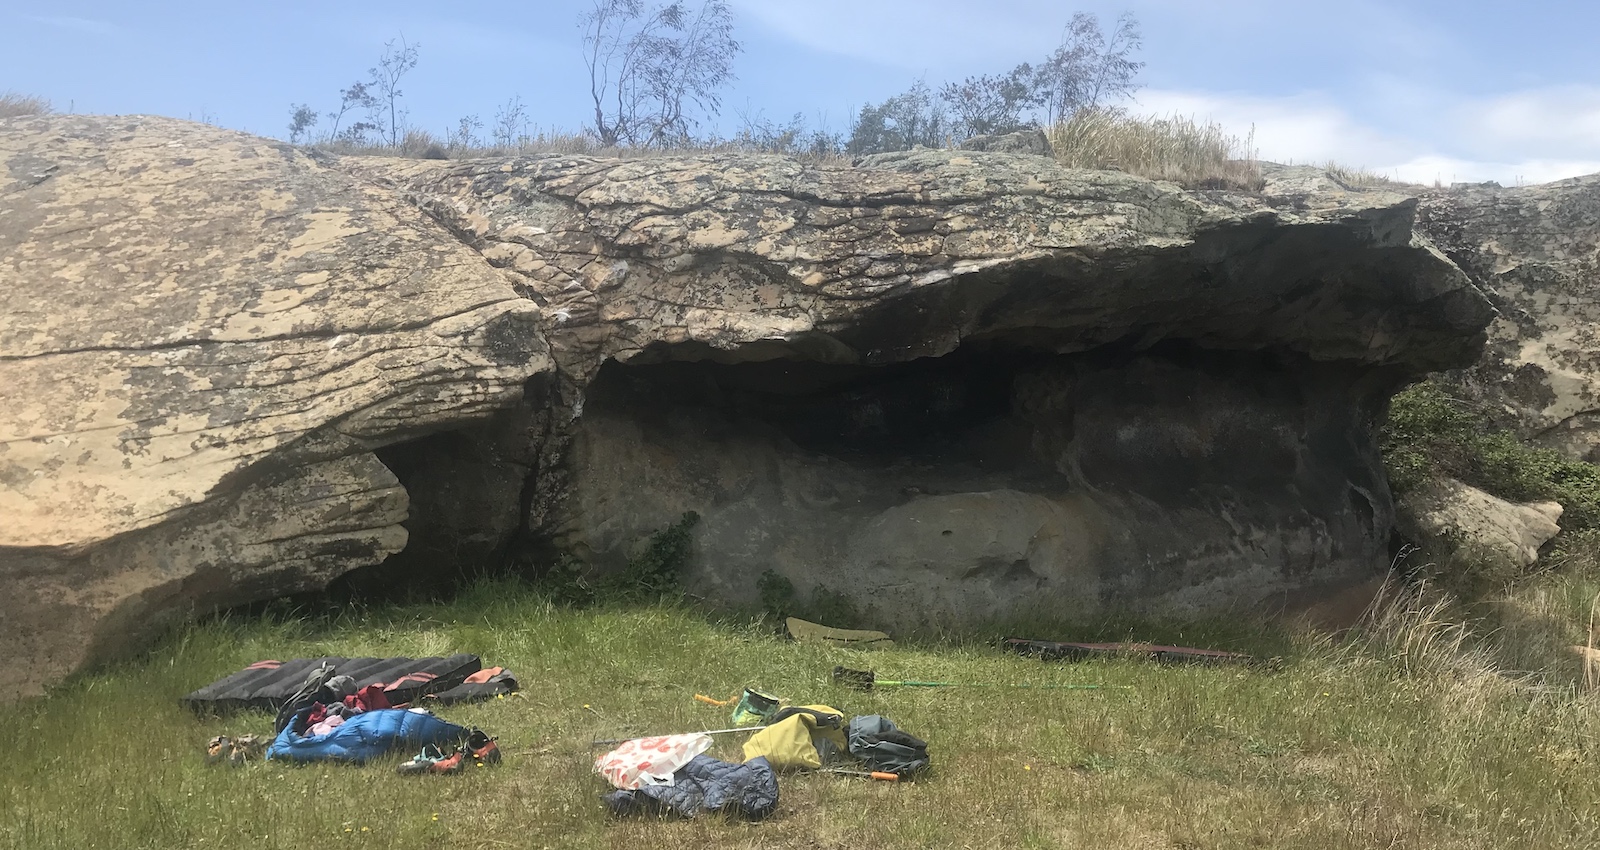
This is the first sizable cave that you come to when walking from the top dam. It faces north and is warmer than the other areas, and is above the lake. Follow the shore around from the top dam.
Sitstart on pedestal on left edge of cave and head out right to top out
Note: This was originally given V7....general consensus grade seems to be around V5
Start on the black rock, both hands on good hold at head height in roof, a few metres back from the lip on the left side of the cave, at a bit of a ridge 2m from the very back. Climb out and into Fire in the Hole. Project -start from right at the back.
Jake's Problem Extension
★★V12(Stand)Start off the Thriller Extended Undercling, finish as for Jake's Problem. Adds a couple of hard moves to the original. Could be V11.
Jem Clemens, March 2026
Start as for Fire in the Hole and traverse down into the bottom lip jug of Rumble via big move, finish as for Rumble.
T. Krauss
Left hand start to Rumble in the Jungle. Start off opposing edges in roof.
Thriller in your Hole
★★V6(Hang)Start as for Thriller in Manilla, climb to jug at lower lip and head left via big move into finish of Fire in the Hole.
S. Young, 2012.
Thriller Extended
★★V8Start off the undercling in the back of the cave climbing into Thriller in Manilla.
Start off flat hold in back of cave, out through jugs to lip and top out
Finish Rumble in the Jungle to the right
Start as for Rumble in the Jungle and finish as for Fire in the Hole
T. Krauss, 2012
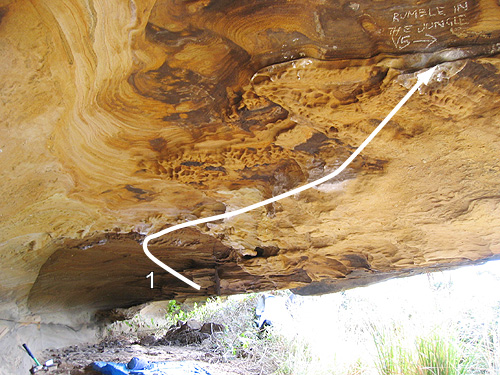
Crawl into the back of the cave to the right of the start of Rumble in the Jungle. Climb out through sandy holds in the roof to finish on the starting hold of Rumble in the Jungle. The Rumble linkup goes at V7.
Update: The final move linking Bongo in the Congo into Rumble in the Jungle has broken and further deteriorated in around 2013/14? The linking move is now considerably harder and Bongo in the Congo including the last move now goes at around V6. Historical Grade, V4..
Rumblathon sit starts as for Bongo in the Congo in the far back of the cave.
Climb the first couple of moves and link into the start of Flounder and Flathead underneath the prow.
From there climb the Flathead on Fire extension of Flathead all the way to the top left of the cave finishing as for Fire in the Hole.
T. Krauss, 2014
Start as for the Flounder sitstart, and traverse the lip leftwards to finish as for Rumble in the Jungle
Flathead On Fire
★★★V6(SDS)Climb Flat Head to the jug of Rumble and continue left via dynamic move to finish as for Fire In The Hole.
T. Krauss, 2012
Sitstart under lip and climb up on slopers 1m left of corner. The stand start off the big sloper is V3.
Sitstart up short hanging corner
Start as for yoga, move right on slopers to finish as for Congaline.
Yoga Tra-Reverse
★V5(SDS)Start as for Congaline of Suckholes move left on slopers to finish as for Yoga.
S. Young, 2012.
Sitstart about 2m right of corner on crumbly edges
Frogger
★V6Starts in the left back of the constant gardener cave, gains the slopey lip to the left of the cave, traverses the lip to the left for about a metre and heads straight up.
T. Krauss, 2013
Frogger Direct
★V3Starts in the left back of the constant gardener cave, makes three or so moves and links into the constant gardener.
T.Krauss, 2013
The Constant Gardener
V2(SDS)A few metres right of Congaline of Suckholes is a bit of a cave, with a flat hold at the lip. Straight out through the cave to the flat hold, then up the slab.
Knobs
V4(SDS)Climb the line of holds on the right hand side of the cave, 1m right of the previous problem.
Smelly French Bulldog AKA Ode To George
★V5/6(SDS)Climb the black groove on slopers 1m right of the previous problem
C. Hampton, 2014
Yeah Daddy Go Daddy
★V4Start as for V2 out to lip sloper, then big move left to left hand crimp and sketchy mantle
C. Lang, 2014
V2
V2SDS with hands matched in little cave around 2 metres right of Ode To Gorge, right hand out to sloper on lip, heel hook and difficult mantle to top
Hanging Corner
V1(SDS)Hanging corner climb 4m right of previous
Blackberry Jam Wall
This short vertical wall is about 50m to the left of the Devil's Kitchenette and has some OK easy problems.
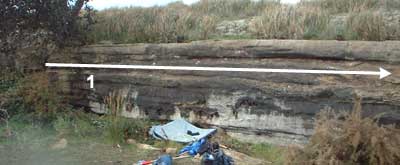
Traverse the featured wall from left to right, without using the top
There are 3 or 4 easy upward problems you can do on this wall
The Devil's Kitchenette
This smaller cave is about 100m to the left of the Devil's Kitchen
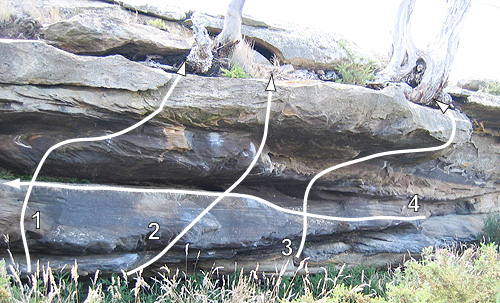
Unnamed
V2(SDS)Start about 1.5m left of the fallen block on the far left of the Devil's Kitchenette at a finger slot in under the roof. Move left to lip and up over bulge
Unnamed
V3(SDS)Start as for previous problem but go right to lip, then up and right on jugs
Start about 2m left of The Cheeky Little Devil. Straight up then top out as for Cheeky Little Devil so as to avoid the hollow block
Sitstart from low flake, up and right, then back left and topout
From low sitstart climb straight out the largest bit of the roof to a hard mantle top out.
Traverse right to left, keep going around left as far as the rock is dry
Do the 1844 traverse then finish up The Cheeky Little Devil
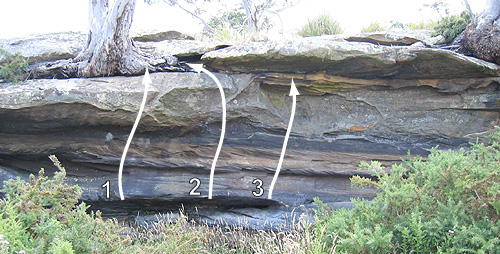
Start as for Kitchen Bitch but head straight up. When hitting the lip, mantle leftwards and don't touch the tree.
Optional top out to the left
The Devil's Kitchen
This is the huge cave visible from the parking area.
Left Side
The left edge of the cave has some easier warm up problems.
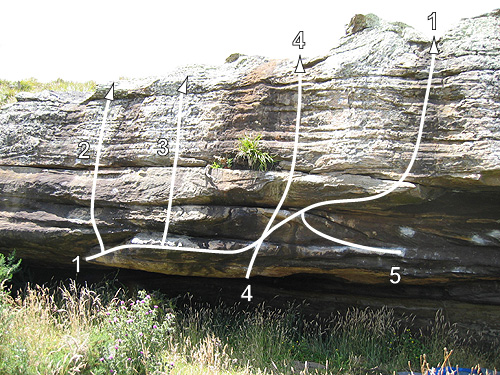
Traverse juggy rail left to right then top out up right hand groove
Start as for Sorted but straight up. There are a couple of variations on this
Go upward from part way along the rail
Start about 4m right of Sorted at good hold in roof. Campus up to rail and finish straight up left hand groove.
Start on the huge flat hold of the start of Antichrist. Go left to more jugs and finish as for Sorted
The Antichrist Area
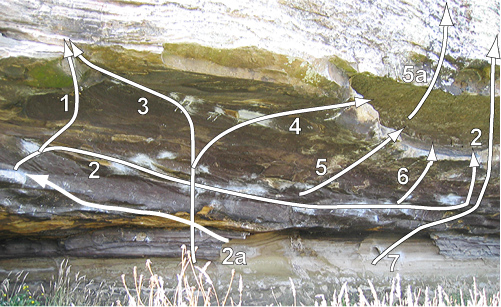
Start as for The Antichrist, but go straight out through the roof
Start on the large flat jug and traverse right for about 7m and then out to the lip.
Sam Edwards
Project - traverse right to left using the footholds of the Antichrist.
The Antichrist can be split into two easier problems, split by the large jug in the centre of the traverse. The first half climbs at about V7, and can also be done at a slightly harder grade in reverse. The second half can be done at about V8/9
Start as for Trident, and instead of throwing to the large slope slap to the crimp 1 foot left instead. Finish out left on lip.
Kim Robinson
Start in the slot at the back of the cave, climb out to the large slope and jump out right to the lip.
Kim Robinson
Big jump out to lip from two crimps.
Sam Edwards
Top out from the left hand end of the big ledge. Provides a finish for Trident or Scab Robinson.
Hikers problem. Start from crimps and jump out to lip, feet stand on the sandy stuff.
Kim Robinson
Start on the back wall below the finish of Antichrist. Climb into Antichrist, do the dyno to the ledge, then top out up the water streak on the right side of the ledge.
Vanishing Point Area
This is the next section of the cave to the right.
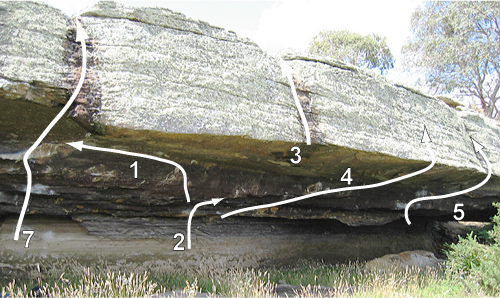
Mega hard project
Campbell Godfrey
Jump up to lip and top out up water groove.
Kim's project
Start on the flake at the back of the roof, 1m behind the large jug. Out to lip. Originally given V14 but downgraded after a quick repeat.
Tyson Atwell
Darkside Area
This is the wall above the lip of the cave to the left of the fallen block, and to the right of the finish of Vanishing Point.
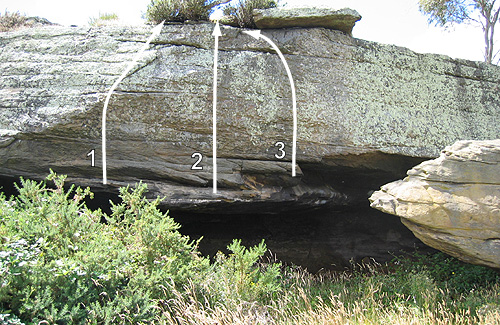
Up face from jugs at lip
Up face from jugs at lip
Up face from jugs at lip
Start as for 2 then traverse the lip to the right, then head up and right ending to the right of the tree.
The following problems are in under the roof on the right hand side of the cave.
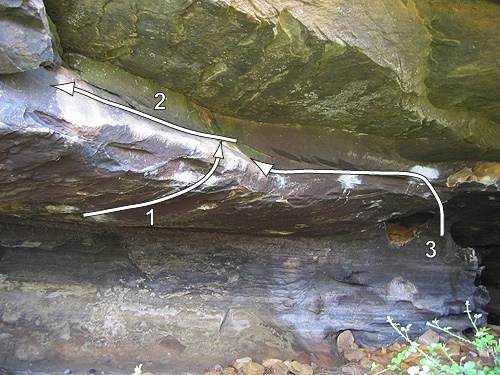
Not originally done with topout.
Sam Edwards
Traverse right to left along rail
Start at back of cave, jump out to big slope and traverse left. Not originally done with topout.
Sam Edwards
Start about 3m right of Darkside on the obvious jug at head height, pull out into roof then move left and finish as for Darkside. Not originally done with topout.
Right Side
This is the far right hand side of the cave.
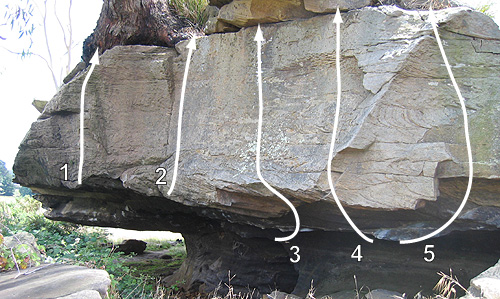
Unnamed
★V2(Stand)Start a few metres left of the campus problem, and follow the diagonal line right.
Up from good hold at lip
Up from lip via hard "mantle"
E. Robson, 2013
Start one meter right of Six V6, hang start the crimpy jug, move up and left, and mantle the short headwall via some sharp crimps.
T. Krauss, 2014
Super project. Begin on the head-high starting jug of Presence of Mind, and climb out right on the thin line of edges and underclings. Has been done in 2 overlapping sections - about V14
Start on the left of large sloping flake - straight out through crimps and over lip.
Through far right side of roof
Sit start on the left of large sloper as for 4 - under roof at far right of crag. Hard moves out to lip, then up. SDS from under lip is V3.
The Fallen Block
This is the large freestanding block that sits in front of the right hand side of the Devil's Kitchen. It is often overgrown with blackberries, you might need to do some gardening to get to the problems.
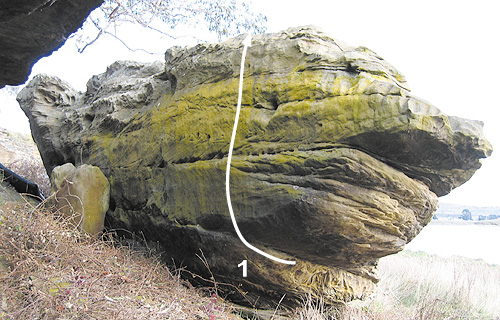
Very low sit start, then up on slopey pockets
Bird Turd
★V4(SDS)Starts on same starting hold as V5 Flat Out, move up and head right to 'nose' of boulder and mantle over right around the lip
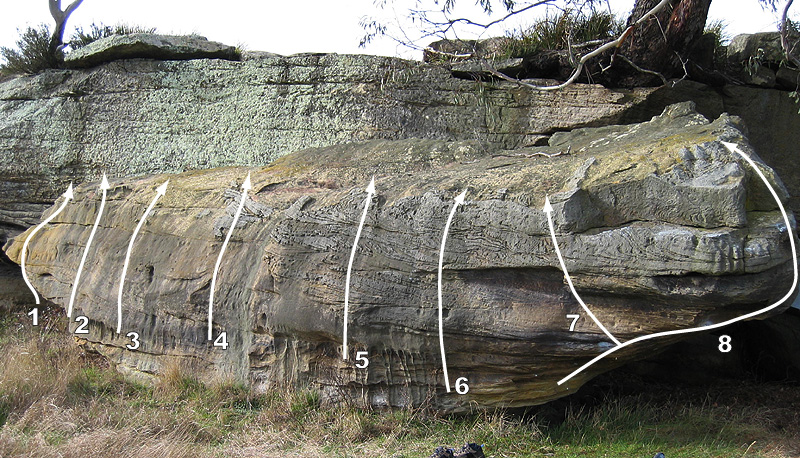
Start underneath overhang and pull up and over
Slab just right of overhang
Slab
Slab
Slab
Awkward sit start 2m left of Cripple
Start on the two pockets of Cripple, but pull up and left to the big jug and the top
Sit start at two pockets on the left edge of the roof. Head out right to the arete and then finish up to the right.
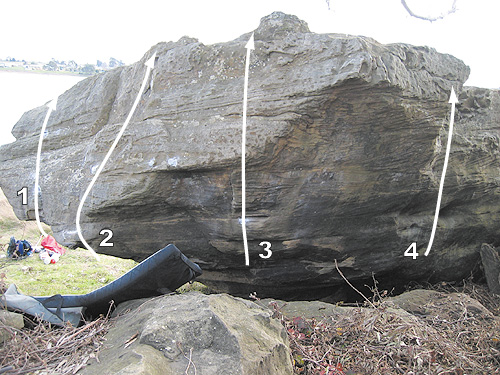
Hard pull off ground from under lip about half way between Cripple and Fallen Angel, then up on slopes.
Pull up from sloper on lip 2m left of Lucifer
Pull up from pocket, starting off block
Highball Wall
This is the high orange vertical wall, which is the next bit of rock to the south of the cave.
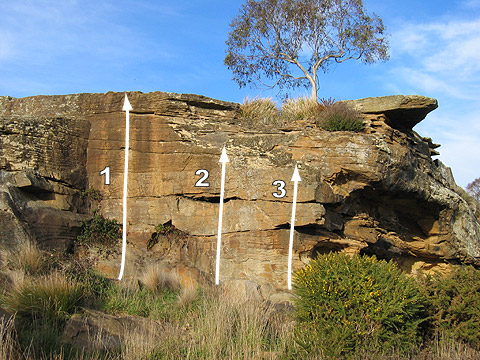
Up the highest part of the wall, watch out for dicey holds.
Vincent Day, Kim Robinson
Sit start around to the left, under the chossy cave, and traverse leftwards on quite nice rock, to finish up in the corner.
Warm Up Blocks (dry)
These angled yellow free standing blocks are about 80m south of the Devil's Kitchen, on the next bit of rock that you come to. From Rumble Cave, head south across the dry land, past the Devil's Kitchen etc, until you see the top of a Blackwood, which is the tree next to the Backdoor Block. Scramble down a bit north of this where you can see the Warm Up Blocks.
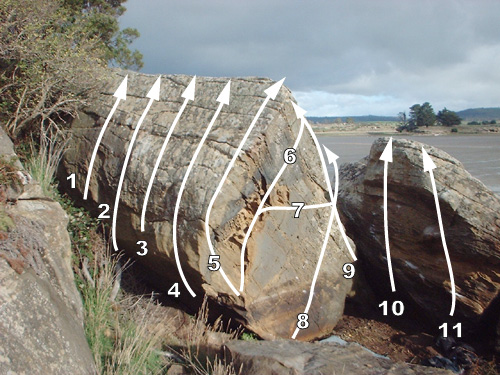
Easy slabs. There are 3 different slab lines on the left end of the boulder
Sitstart from flake
Sit start about 3m left of arete on horizontal break
Start left of arete under roof. Up on good holds about 1m left of arete without using arete after start
Left to arete then up it
Start as for Getting Warmer and go up the face to the R of the arete and top out
Start as for Getting Warmer, go up and right to finish as for Comedy Value
Up thin wall to slopey topout
Start at the bottom of the arete. Climb onto the slab below Comedy Value.
Project - traverse slopey lip to top
Up thin holds to slopers. Don't use any handholds on Warm Me Up
Up jugs on right side of block
Backdoor Block (dry)
Head up the corridor to the left of the Warm Up Blocks to find this boulder with a distinctive overhanging prow.
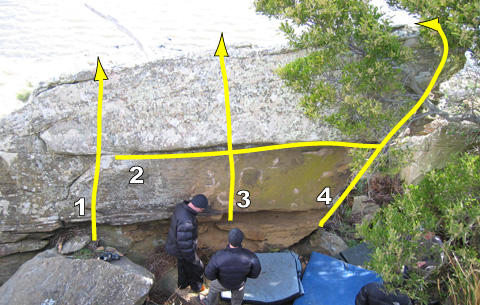
Up to the left of the overhang
Traverse the thin line rightwards and finish up no 4.
Out through roof and top out
Up arete and out through overhanging prow on jugs
Start as for no 4. but go up and right and do the slopey topout
The next boulder problem is on the short arete just opposite Backdoor, on the same chunk of rock as Wedgie (Warm Up Blocks).
Start using RH crimp and left arete. A couple of moves gets you to the top jugs. Avoid tree on topout.
Hidden Wall (dry)
This is the high wall that is partially obscured by the Backdoor Block. The left hand end of the wall, which is opposite to the Backdoor Block, forms a slab.
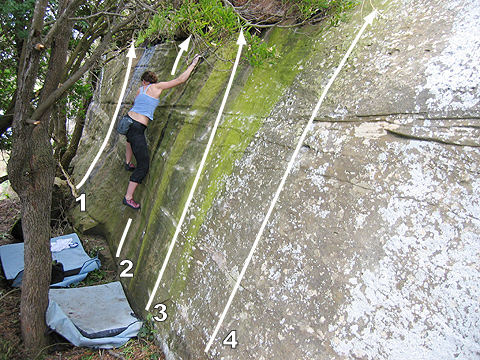
Easy slab to left of stump
Slab to right of stump
Tricky slab directly below right hand stump
The slab to the right of green rock on pockets.
Use brushed and non-brushed holds up most lichenous part of the slab. Would probably lose a grade in difficulty and gain a grade in quality with a decent clean.
Further to the right the wall gets steeper and higher.
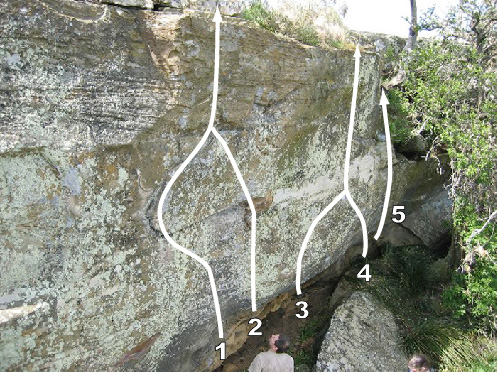
Up to flake and then jump to top
Up to loose jugs and then dyno to flake to join no 1
Start at jugs under roof near left side of fallen block. Up and right via crimps to slopey ledge and the top.
Sitstart at very big jugs then up via thin sharp edges to sloping ledge, high top out
Start in slot, out to slopey edge, fire for lip, continue to top on average holds. Sometimes a little sandy after it hasn't been climbed for a while, but a real classic.
Stu Bowling
Project - Start as for Time, then trend left at half height to meet no 4. and finish as for that
To the right of the main face is a small overhanging face.
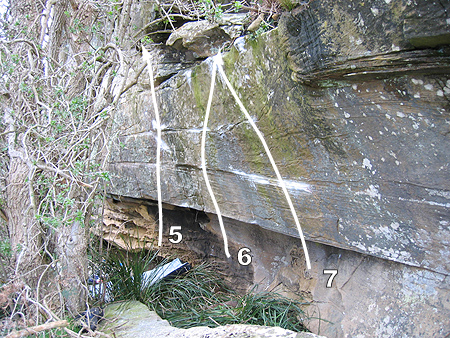
Sitstart under little rooflet, up on thin holds then jump for jug
Sitstart under little rooflet at flake, up on thin holds then jump for jug
The far right hand side of the wall ends in a sharp steep arete.
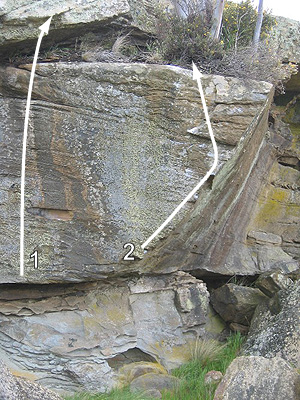
High steep arete. Harder if your short.
Kim Robinson
About 15m up to the right is a grotty cave.
Unnamed
V?(SDS)Start at the painted arrow at the lip of the grotty cave.
Lloyd's Wall (dry)
This vertical wall is on the north facing side of the point, which is ~80m south of the Warm Up Blocks
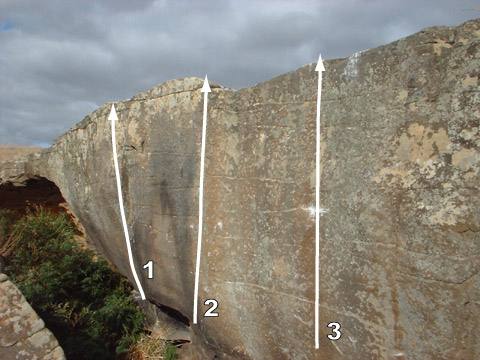
The Chossification
V2(SDS)Start at the hole at the back of the chossy cave at the left end of the wall. Out on jugs to a mantle at the lip.
Grendel
V4(SDS)Start just left of the Lloyds engraving on the left hand side of the wall (the obvious left sweeping arc). Sit start at pinch (feet off slab), up via under clings to your left and sharp edges to your right. Top out using good holds at lip.
A big reach to holds in the little corner - the first ascent was by a very tall person reaching across to the top holds, this problem is considerably harder using the lower holds. The low hold has now broken and is bigger, and goes from here at about V8.
Reachy to first hold. A crucial foothold has snapped off, making this climb much harder. Grade is unconfirmed.
Dyno to top from good hold
Unnamed
V?(SDS)Project sit start to Lloyd's dyno. Start 1m right, up thin flake, then left to good hold
Campbell's Problem
V6(SDS)5m right of Lloyd's Dyno, sitstart up flake, then right and up thin slab
Campbell Godfrey
The middle section of the wall forms a high cave.
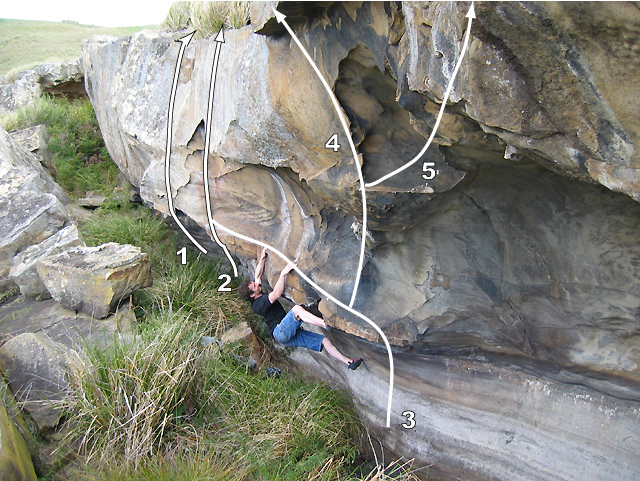
Sitstart under roof and climb up onto slab via jugs
Sitstart and up into curving undercling
Start on two small edges around corner, traverse leftwards along rail and into Cardboard Thin.
Start at the start of the Nettle Lover traverse and climb up to the high ledge and the top.
On the far right of the cliff line is a small overhang.
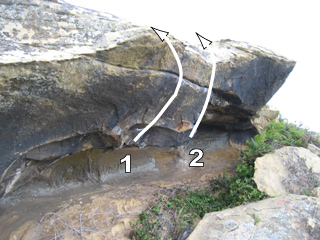
Start on undercling and blast up and right to good hold below lip, move left slightly to top out. Original starting holds have fallen off, making the problem harder - grade is unconfirmed.
Semi hang start using left toe hook, dynamic moves through reasonable holds to lip and top out slightly right of centre.
The Egg Boulder
Around the corner from the Lloyd's Wall area is a free standing boulder on the shore of the lake. There are a couple of fun problems.
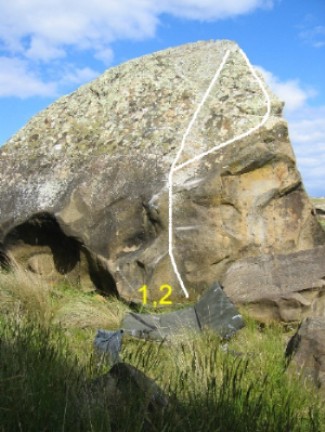
Sit start on good edges, move up and onto slab via small holds to top.
As for 1 but move right via good holds to arete, then to top.
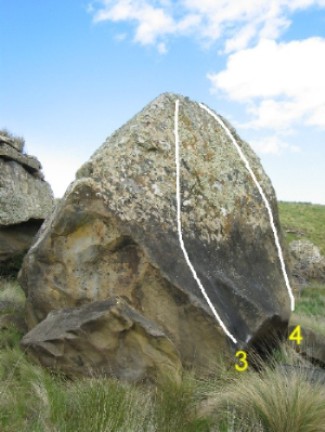
Rock onto the blankish black slab and to top via mossy holds. Fun slab problem.
Right hand arete and slab.
The Gorse Factory (dry)
This is the two tiered crag past the Egg Boulder and before the Bakehouse. It has a large clump of gorse in front of it.
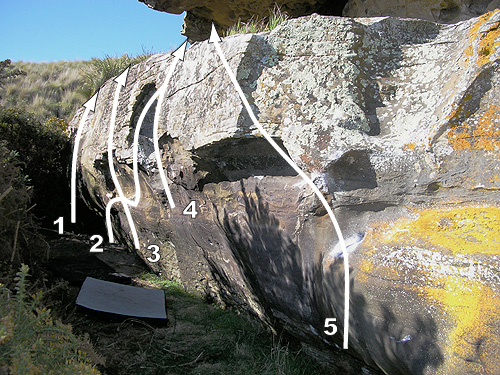
This is the left hand side of the lower tier, in behind the gorse.
Stand start above the wombat burrow.
Project - Start on the good flat hold and traverse right, and up into the arch
Start 1m right of no 2. and pull straight up to tricky topout, don't use holds on the arch.
Hang start on the right side of the arch and up
Sitstart on slopers on the right end of the wall. Pull up and left, don't pull round onto the slab.
The Bakehouse (dry)
This high buttress is about 50m to the left (north) of the Yellow Cave. There are several lines yet to be done here.
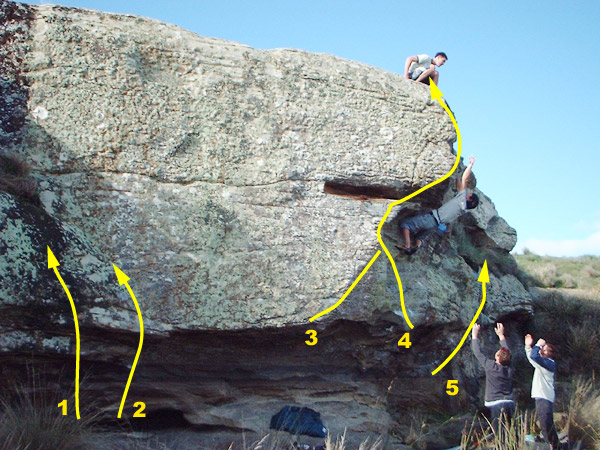
project
project
Project harder left start to Chocolate Eclair
The stunning arete up the centre of the wall, start on slopers to the right. A little high.
project
The Yellow Cave (dry)
This large cave is about 20m to the left of the bottom dam. Currently you have to climb up the slab at the end of the dam, and then scramble back down just north of the cave. There are a lot of blackberries encroaching on the cave, take some clippers.
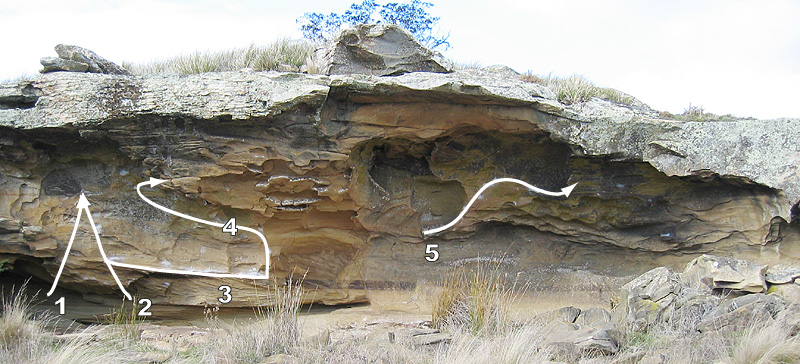
Up through roof from sitstart at the back of cave.
Up into finish of Sanguine from under roof.
Traverse left on slopers then up for a couple of moves to finish on flat jug
Start as for Sanguine, but move up a couple of metres, then head leftwards on slopes and pinches. Big move out to the finishing jug.
Variation: Out of confusion as to exactly where the route goes, most people tend to do the slightly easier 'Roof-Pocket' variation which uses the big roof pocket instead of the slopes and pinches. This variation goes at around V5
Start on slopes left of the conventional start to Roundhouse and directly below the roof pocket, crank up.
Better Than a Kick In the Head
V2(SDS)Start 1.5m right of Sanguine at an awkward start at the next rib. Up that, then pop to jugs.
Hang start on low ledge with your heel up. Move right along the line for a couple of metres to finish on jug. The extension through the lip and top out would probably go.
Dam Wall Left
This is the slabby wall directly north of the bottom dam, and just around to the right of the Yellow Cave.
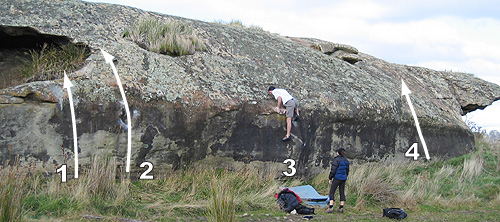
Easy slab
Project - Up using very slopey basin. Way harder than it looks at first.
Project - Up slab using high underclings to slopey mantle.
Dam Wall Middle
These problems are at the end of the dam, and are dry, with nice flat grassy landings.
Start in the little cave, use the undercling to gain enough height to get up onto the slab
Up the crack/seam line. Not bad.
There are at least 3 possible lines through the roof feature to the right to be done.
The Island
The Island - Dam Side
The cave on the side of the island that faces the dam has some great problems. Access is easy as long as the lake is dry!
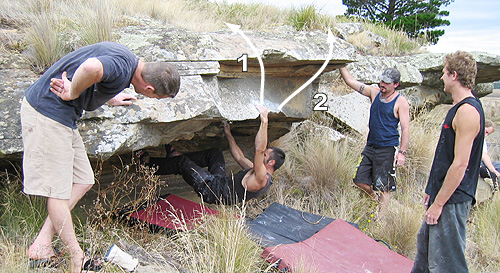
This is a small cave around and up to the left of the main cave.
Start as for previous, but go right through choss.
Hang start on the large jug, climb up to the crack, jam through it and battle over the top.
Dave James
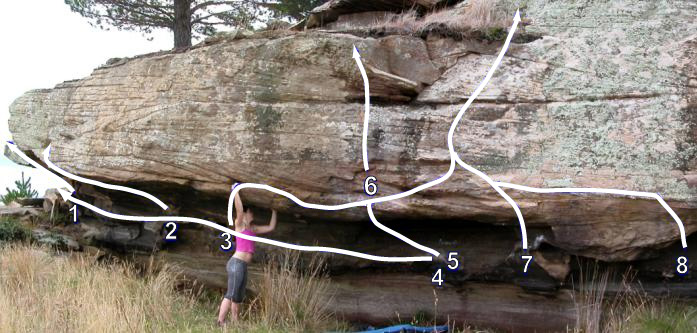
Start at back of cave and climb out on jugs and jump around lip to big slopey basin. Has been done with top out at V7.
Kim Robinson
Climb out from back of cave to big jug on lip and traverse the lip rightwards to finish up La Nina.
Kim Robinson
Oonga Boonga
V9(SDS)Project - Start at back of cave directly in from the big jug, near the Oonga Boonga grafitti. Hard moves out the roof to the jug on the lip, and then even harder moves straight up to finish. The two halves have been done individually, both at about V9.
Start as for La Nina and traverse the entire length of cave leftwards on the back wall to the start of Spirulina.
Kim Robinson
Doug's Linkup
V5(SDS)Start as for La Nina, and do the first move out to the flake/undercling. The head left on jugs through the roof, to finish at no. 2.
Start on jugs on the back wall 2m left of El Nino. Straight out to lip then finish right and up.
Jon Nermut
Direct Finish to La Nina.
Kim Robinson
Start at the right hand end of the cave. Out to lip then up and slightly left.
Jon Nermut
Start in between El Nino and BuzzyLand at an undercling. Up to the two crimps on BuzzyLand and then straight up.
Start on undercling and go up and left, to finish as for El Nino.
Kim Robinson
Marys Wall
To the right of the cave is a long slabby wall. Most of these problems are still quite lichenous.
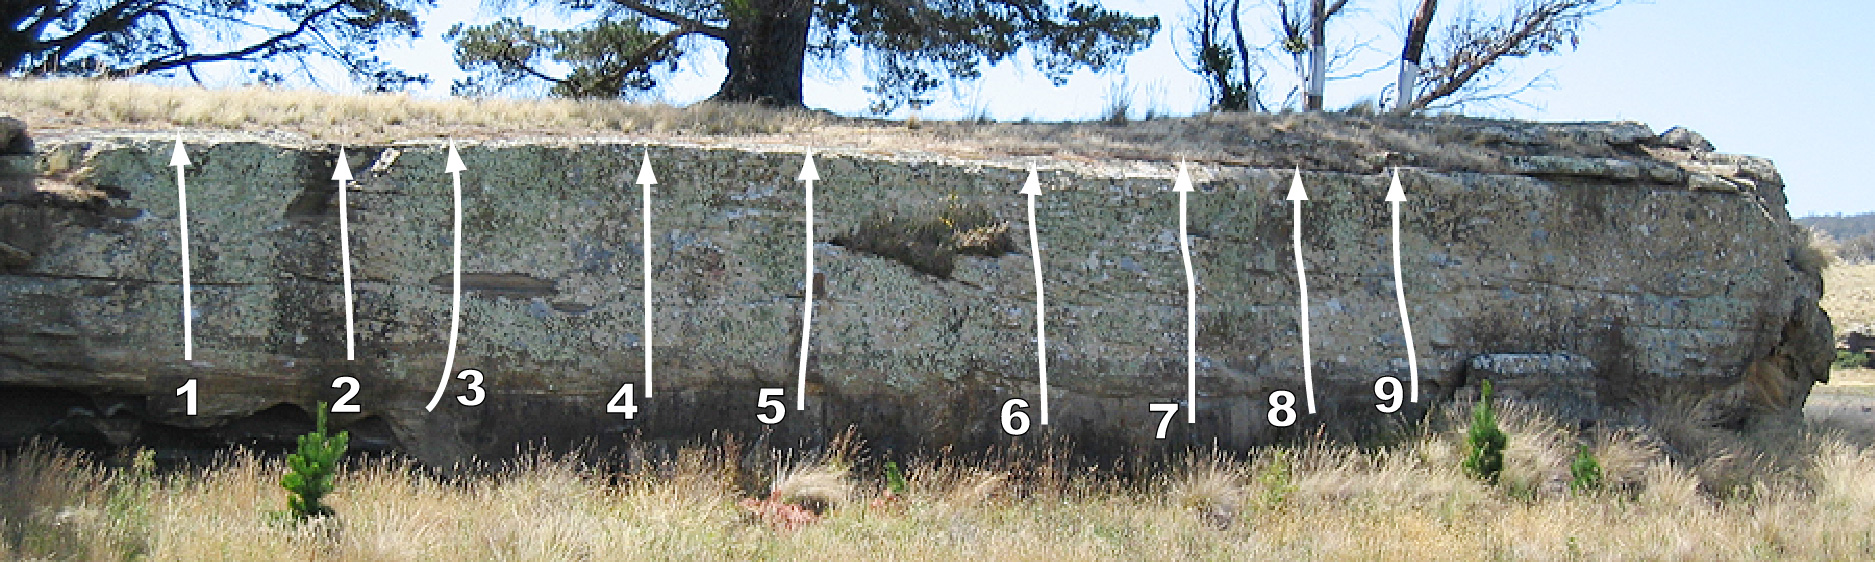
Project - up slab above right most little arch. A sitstart might go as well.
Stand start on 2 finger pocket, up to crimp to ledge and top out. Can also be done as a sit start at about V5.
Straight up the middle of the face, trickier if you are shorter.
Up layback flake. Slightly harder with a sit start.
Slab on slopers
Thin crack left of arete. Can be done with a sit start.
Easy slab on ledges right of arete to harder top out.
Slab on slopers
These problems are at the far right of the wall.
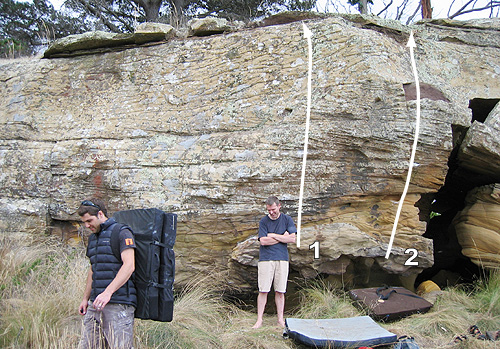
Good if you like mountaineering. For full effect start in the back of the cave.
Anzac Wall
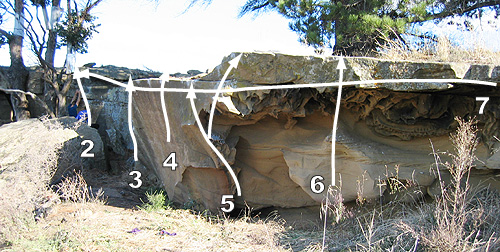
This is the short wall around to the right of Mary's Wall. Mostly easy problems, and it gets morning sun.
Stacked blocks to the left of the trees
Wall just right of tree
Project - hard pull off slopers on the left of the steep section of the wall.
Mantle
Pull up either left or right and mantle, on the left edge of the little cave.
Pull through little roof and mantle
Start at right edge of cave. Traverse the wall leftwards all the way to the tree.
The Island - Town Side
These buttresses face the town. They look a bit sandy but provide some good climbing.
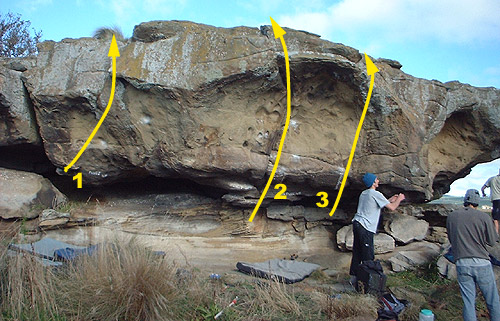
Hang start and up and right on pockets to slopey topout. Stand start is V7.
Body & Mind
★V9(SDS)Start just left of Aeon Flux, move out left to arete then up into Pungi.
Unnamed
★V8(SDS)Start as for Body & Mind, but climb up arete.
Sitstart out small roof to pocketed face, hard mantle top out.
Project
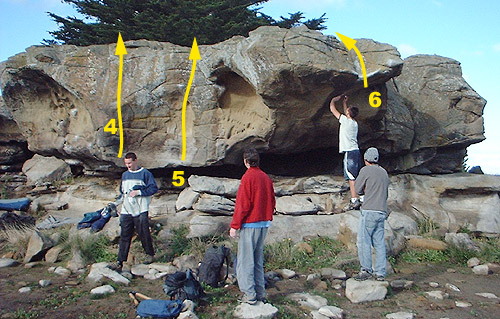
Jump for lip then mantle.
Dam Wall (dry)
To the right of the bottom dam is a long, steep, featureless wall
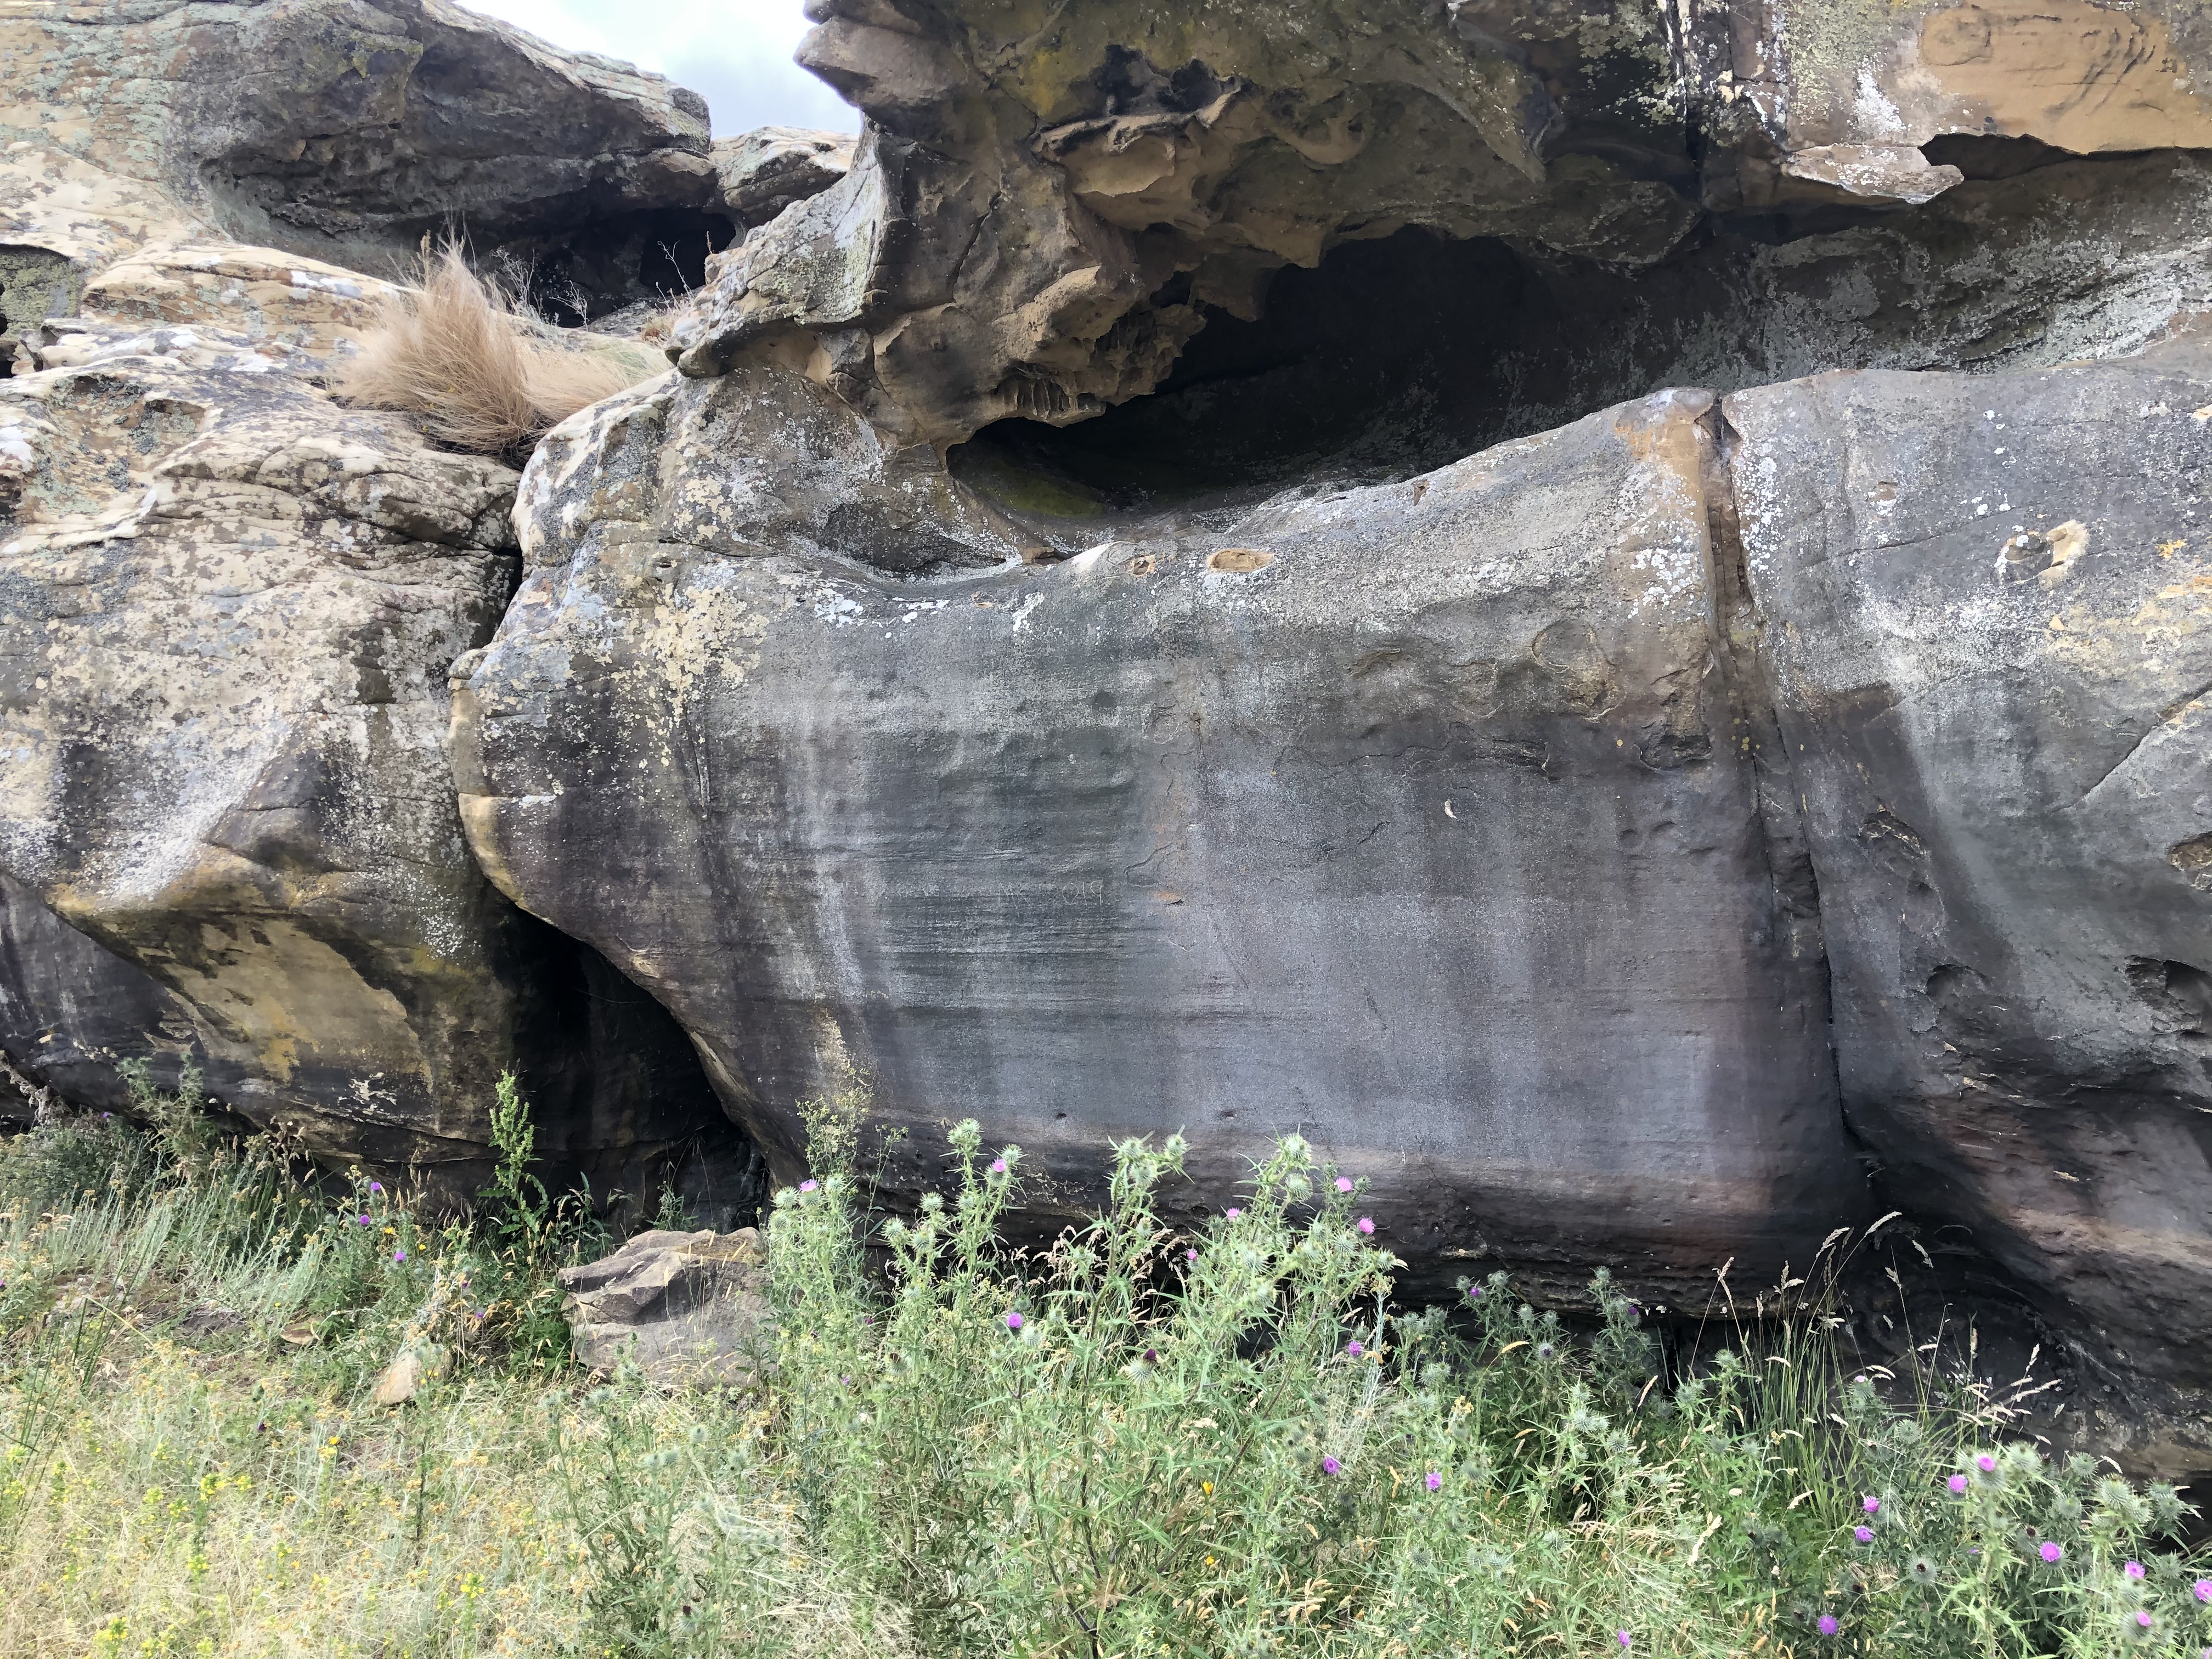
15m right of the bottom dam is a bulgy arete feature just to the left of a little chimney crack. Sit start left of the crack with right hand on slopey side pull, head left and around the arete, then up to slopers.
Sam Edwards
The shallow crack 6m right of My Happy Place. Sit start on sidepull at bottom of crack, climb up to ledge and then top out in any direction that appeals.
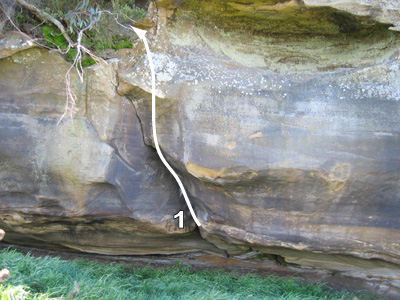
About 50m right of the dam is a very steep hand crack usually full of cobwebs. Sit start on finger locks, up to jams, top out on ledge
About 25m to the right of Crack Head is a free standing boulder, a bit fractured and loose but has a couple of fun problems.
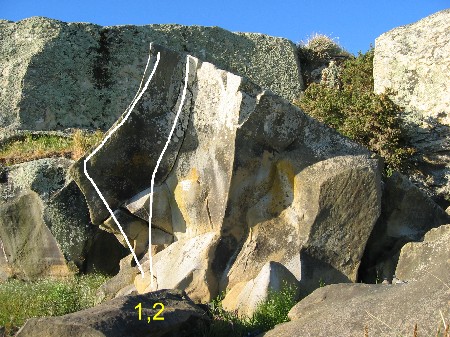
Sit start on good holds, up to curving arete, use holds only on arete. Top out at apex of boulder.
Start as for previous problem, up middle of face using good edge and loose finger crack, dyno to apex. No holds on arete.
Funky Town (dry)
To get to Funky Town walk across the bottom dam, and then over the point. Follow it around to find a cave in the back of the point, on the opposite side to the Yellow Cave.
Funky Town Boulder (dry)
There are a couple of lines on the free standing boulder you pass on the way to the Funky Town Cave.
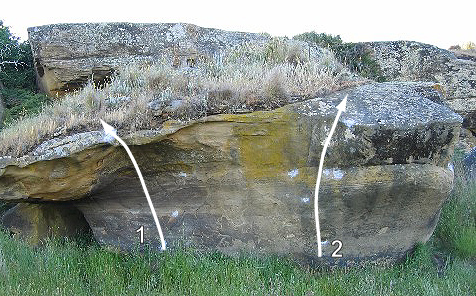
Project
Stand start off slopes with foot in large pocket at base of boulder. Up to slopey lip and top out. Sit start is a project.
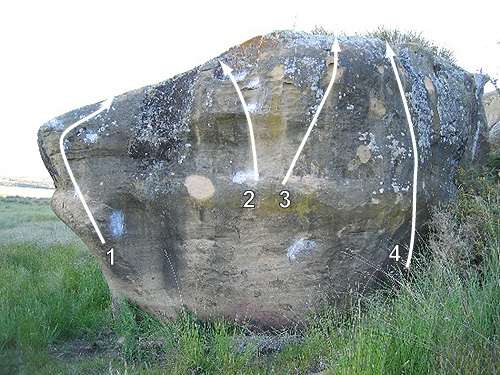
Start off slopey side pull and horizontal crimp, with the help of a couple of pads or a rock. The full sit start is a project.
Stand start off edges, static up and left to good hold, power up to jug. Top out.
Start slightly right of 2 on edge and slope, powerful move up and right to large open pocket, top out.
Sit start 1m right of arete, up to sloper and top out
Project - traverse right to left around the boulder to link into 1 on the other side - very hard due to a lack of footholds and average handholds.
Funky Town Wall (dry)
There have been some lines attempted on the high slab to the left of the cave.
The farthest left of the 3 water-grooves
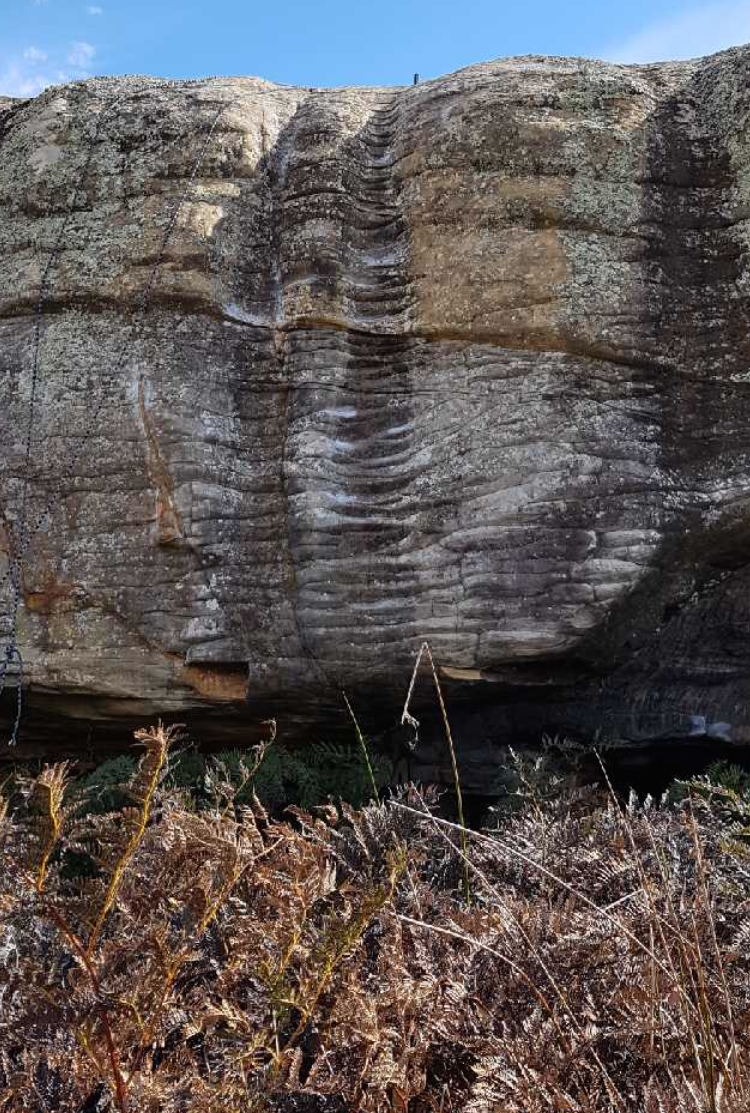
The attractive double water grooves, technical to the top.
Hamish Jackson 2017
Funky Town Cave (dry)
This is the large grotty black cave. It may or may not be dry...
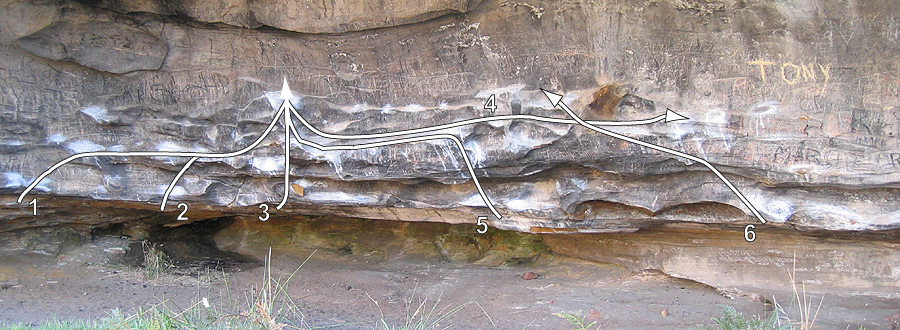
The left arete of the cave. Start right hand on sloper left on broken edge. Follow the hanging arete to finish on the flat jug. A hard topout may be possible.
G. Maddox, 2013
The low start to 'Angels on the Sidelines'. Start on sloping crimps just below the 'sexy' graffiti. Adds a few hard tension moves.
Joe Schwarz, 2024
Crouch start on the horrendous pinches, slap up to slopes and traverse right to jug as for Kung Fu Fighting.
Sam Edwards
Start on undercling and slope and slap up to slopes and traverse right to jug.
Sam Edwards
Start on undercling and right hand pinch.
Sam Edwards
Start on the slopes just to the right of 3 and up to the same finish
T. Krauss, 2014
Traverse - Start on the big sloper and head right via the low rail as far as you can
Start on slopes with heel up. Probably easier if you're tall and harder if you're not.
Kim Robinson
Start on low crimpy rail 3m right of Groove Train, up to slopers then head left and finish at the nose.
The Electric Avenue
These are the short walls on the next point across from Funky Town. The first section has potential for quite a few more short, moderate problems.
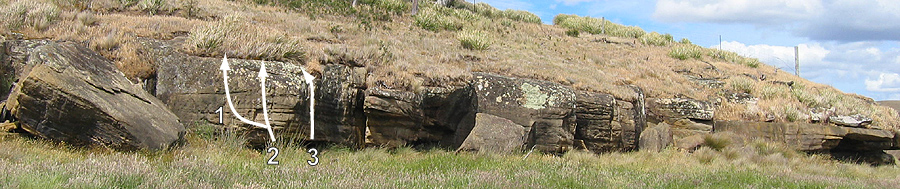
Start as for Electric Avenue but go left to the next set of jugs
Start 1m left of arete at jug. Up jugs to top.
Start at flat hold 1m right of arete
Electric Wall
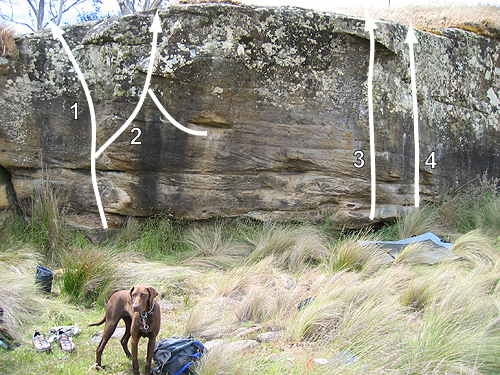
Around to the right is this higher wall, just to the left of the fence. More cleaning is needed on these problems.
Sitstart and up flakes, go left to finish, or straight up which is harder
Either sitstart as for no 1. or come in from holds to the right. Up to flake/ramp and to top. Sit start from the right is a project.
Dyno from flake to top and desperate topout. Sit start may also go.
Project - pockets and thin flake 1m right of arete
Freds Point (dry)
Freds Point is the next point south from the bottom dam. Either walk around/across the lake from there, or park at the end of Hay Street.
Lairmairanepair Park
Drive along the road to Paratah for a couple of hundred metres and turn left into Hay Street. Drive along this, through the gate, and park at the sign that marks the entrance to the little park. Walk along the track to find some smallish overhangs.
On the largest of the overhangs:
The left side of the overhang to mantle.
There are three or so hard lines out through the middle of the overhang that haven't been done yet.
The right hand side of the overhang.
Black Cliff
On the south side of Freds Point is a cliff about 8m high. There are some problems to be done in the sandy cave at the bottom of the cliff. Bring lots of brushes.
There are several short walls and small boulders towards the south-eastern side of the Black Cliff. This little area might hold up to around 15 problems within the lower end of the grade range, most being around VE to V1.