
Fortescue Bay
 Up to 1.5 hours
 Mixed sun and shade
 Coastal dolerite columns, pinnacles and sea-cliffs
Acknowledgement
Original guide by Roger Parkyn, published in Craglets. The Safe House is by Evan Peacock, Sunny Gym Crag by Pete Steane, Canoe Bay Crag by Christoph Speer, Golden Pillar Area and Bivouac Bay Crag by Lang & Speer, Forgotten Columns by Speer, Jackson & L-R, Outer Limits by Speer, Jackson & Lang. Thanks to Dean Rollins, Peter McHugh and Mendelt Tillema for additional information. Candlestick update by Phil Robinson in 2018/19 with info and photos from Dave James, Chris(Basil) Rathbone, Chris(Ditto) Rathbone, Mendelt Tillema, Lyle Closs, Sebastien Meffre, Dave Gray, Tim Exley, Grant Dixon, Doug Bruce, Jon Nermut and Garry Phillips.
Introduction
There are many cliffs around the serene Fortescue Bay. Undoubtedly, the prime attraction in the area are the triptych of dolerite spires; the Moai, the Candlestick, and the Totem Pole. Each is totally different from the other two, but they all possess an adventure-climbing flavour that adds to the appeal. These summits have retained an exclusiveness which is rare given the current popularity of rock-climbing, and a trip to any one of them is not just another day at the crags - but it is a day you will surely remember for a long time to come.
In addition to this, exposed and high-quality multi-pitch routes are abundant on the tall sea-cliffs at Cape Hauy and Cape Nola, and these offer some fantastic climbing. For those looking for a more relaxed experience, there are a number of well-setup and easily approached crags around the sheltered bay itself. These crags vary from 15-30m high and have a friendly atmosphere, each with their own unique vibe.
Access
Fortescue Bay is about a 1.5 hr drive from Hobart. From the city, head to Sorell and take the Arthur Highway towards Port Arthur. The turn-off for Fortescue Bay is on the left, about 3km past Taranna and 4km before Port Arthur. From here there's about 12km of unsealed Forestry road to Fortescue Bay. All up, about 100km from the city centre. As with most roads in Tasmania, be careful of wildlife from dusk to dawn, as they seem to enjoy jumping into the middle of the road at unsuitable times. All of the spires and routes can be done in a day from Hobart. Choose a day when the swell forecast is low - information is available by checking the Bureau of Meteorology's website at: http://www.bom.gov.au/tas/index.shtml
Camping
Pleasant and well-equipped campsites exist right next to the beach at Fortescue Bay. There are toilets, cooking facilities and water, including showers (paid). For tent camping, the Banksia campground next to the beach is very good, with car and caravan camping available at the boat ramp further up the road. Camping is about $13 a night and you should book ahead with Parks in summer as it gets quite busy here, especially on weekends. Van camping outside the designated camping areas is strictly frowned-upon by the rangers, as it presents a safety issue and clogs the carpark when busy - suitable alternatives exist just outside the park boundary.
If you're heading out to climb at the Moai, Golden Pillar or Bivouac Bay Crag, consider camping at Bivouac Bay. There are good tent platforms, running water (creek) and a toilet, all in a secluded setting only 10-15 minutes from the climbs - the walk into the campsite is ~1 hour each way along an easy formed track. Camping here is also free.
Make sure to buy a valid Parks Pass.
Safety
It is worth noting there have been a increasing number of rescues and accidents involving climbers in the modern era, some of which involved inexperience as a factor, so it is important to factor in the exposed and inaccessible nature of all the spires in particular, which makes self-rescue much more difficult. The grade does not always reflect the serious nature of some of the climbing here - so read descriptions carefully and plan well. The Candlestick and Totem Pole are a poor choice for your first abseil-in sea cliff, as the logistics here are challenging on a number of fronts, and well-above the usual demands of standard abseil-in / climb-out routes.
Ethics & Environment
The climbing around Fortescue Bay and Cape Hauy / Nola is currently focused around traditional and mixed climbing with the occasional sport route. The Tasman National Park is a relatively recent addition to the Tasmanian Reserve Estate, and the use of fixed anchors in the park historically precedes the designation of the area as a National Park in 1999, where the National Park was then listed broadly as a State Reserve. The current management plan stipulates that 'A ‘clean climbing’ ethic/practice involving the use of lead climbing techniques and removable climbing protection will be encouraged'.
If installing abseil anchors or lower-offs, please consider doing this only to reduce inadvertant damage to vegetation, where safety is a genuine concern or provide access only where it would otherwise be considered prohibitive to the climbing experience. Please don't publicise route access outside of regular climbing groups (e.g. social media), the modern era has seen increasing impacts on climbing areas as a result of visitation from other user groups.
Please consult with the CCT crag stewards and local climbers if you are considering installing or modifying fixed anchors.
GPS
Cape Hauy
There are a number of interesting rock formations in the Cape Hauy area: The Candlestick, The Totem Pole, The Monument and assorted cliffs up to 100m high. It is a very spectacular spot and worthwhile even for just a look. Climbing on the Cape is usually epic and exposed.
The walking track to Cape Hauy starts from beside the boat ramp in the Fortescue Bay Campground, at the right-hand end of the beach as you drive in. The walk takes about an hour and a half. The track is well defined and in very good condition as it has been re-built as part of the proposed Three Capes Walk. To get to the abseil point for the Stick and the Tote, continue past the warning sign at the end of the formed track and follow a pad downhill. It is another 100m or so to the end of Cape Hauy. Follow a rough, slightly overgrown, and sporadically cairned track in the direction of Fortescue Bay along to a profile view of both sea stacks, at a level lower than the Tote's summit. From here you can traverse back across to a ledge within spitting distance of the Tote. Access to both stacks is by abseiling from a DBB here (about 60m).
Boat access to the base of the sea-spires is possible, but water movements through the channels and sudden surges make anchorage rather difficult. Kayaks can be z-pulley-ed out of the water to avoid damage from rock fall.
The Totem Pole
The Totem Pole is one of the most spectacular pieces of rock on the planet. It is a free-standing dolerite pillar spearing straight out of the water in a gloomy chasm infested with sharks and subject to volatile swell patterns. It is over sixty metres tall, but only about four metres wide at the base. It sways in the wind and shudders with the crash of every wave. The "Tote" is too slender to even be described as a phallic symbol, unless of course you've got a very skinny dick!
The prospect this piece of rock presents the climber is uncompromising and chilling. Equip yourself not only with the necessary gear but also a bottle of bravery pills. The challenge is psychological as much as technical.
See the Cape Hauy overview for details to get the the rap point. Fix a 60m rope to the DBB here and rap into the chasm. What you do next will depend on how big the swell is at the time...
In good conditions, it is possible to stand comfortably on the flat rock at the base of the Ewbank Route. There is a single carrot bolt at the bottom of route which can be used by the belayer for all routes on the Tote if that is the case. Even in moderate swell conditions, however it is subject to wave wash. (RP: I found that wearing bare feet and a waterproof jacket helped).
In more 'elevated' seas, a hanging belay is often employed at the start of the Deep Play Variant First Pitch, just left of the arete closest to the mainland. There is a spacious ledge about 4m off the water opposite the Fortescue Bay facing side that may be used as a base camp for the entertaining operation of penduluming over to the Tote. Taking a stick-clipping device of about 3 m length makes this crossing to this belay easy.
The easiest 'descent' option is to trail your abseil rope to to the top and use it to Tyrolean traverse back to the mainland. If you don't know what a Tyrolean traverse is, or how to set one up, then this is probably not the best place to learn how.
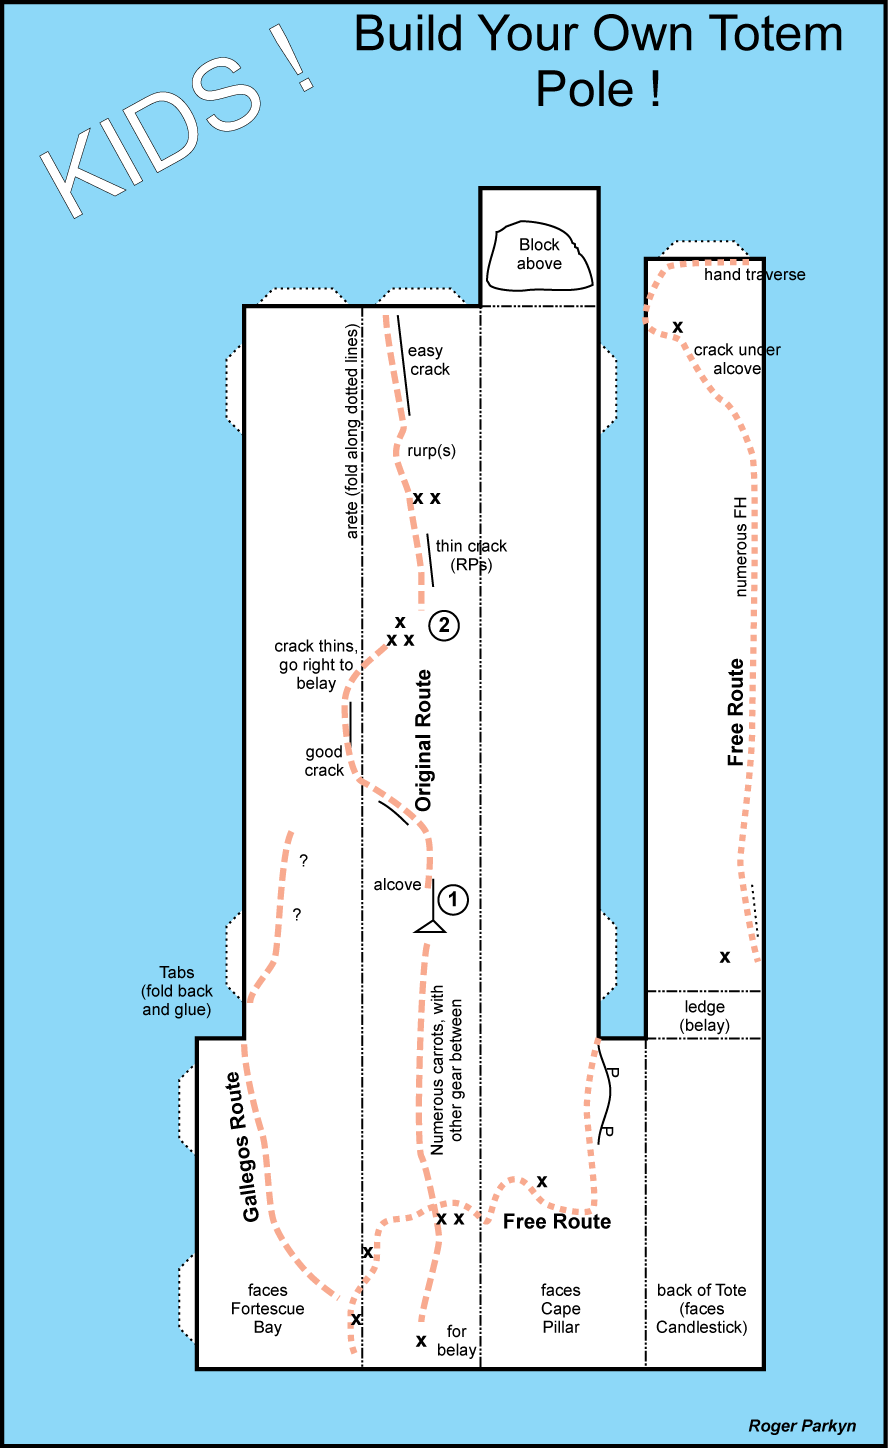
John Ewbank, Allan Keller, March 1968. FFA: Doug McConnell, Dean Rollins, Jan 2009.
Steve Monks, Simon Mentz (alt.), Jane Wilkinson, Simon Carter, Mar 1995.
No one seems to know anything much about this, except that it appeared in a Boreal catalogue. From fixed gear left behind, it appears that the first pitch goes out left from the start of the Original Route and up to the big ledge on the far side (this pitch has been freed and is now known as Deep Play). The second pitch then cuts back R across the Tote, following a thin diagonal hairline crack with 2 old pitons... to perhaps join the Original Route at belay two? It may finish as for that route, or it could continue up independently... no sé!
Gallegos brothers (Spanish aid hard-men) 1993.
A popular alternative to the first pitch of the Free Route, as it lessens then the shenanigans required to get your abseil/Tyrolean rope to the summit. This pitch was originally aid-climbed as the first pitch to the Gallegos Route. It has now been retro-bolted (with 5 fixed hangers) and freed to create a more direct approach to the ledge on the far side of the Tote. Take a set of wires, and cams to red alien.
Gallegos brothers (Spanish aid hard-men) 1993. FFA: Steve Monks, Enga Lokey, Feb 1999.
Garry Phillips and Chris Coppard, 2015.
The Candlestick
The Candlestick stands behind the Tote. The sea heaving and surging between them caresses the rock walls like a hot lover. The water isn't that hot though, pretty freezing really, but hey, you didn't walk all this way for some kind of disco-party. You lugged all that climbing junk down to this chasm of doom for something far more special - a climbing experience you can really launch yourself into ... bodily.
The crux of the Candlestick is the swim. About 10m of shark-infested, usually surging, water lies between the base of the Tote and the Stick. Send someone else into the water but first give them an end of a rope so they can rig up a Tyrolean. This will minimise the overall wetness of the party. I hesitate to state what should be bloody obvious but someone from Queensland wrote in to say that people should be advised not to swim around the Cape Pillar side to the Tote. Despite the sharp angle the 60m obelisk would put on their rope they were hoping that it would slide smoothly up the Tote as they climbed the Candlestick (until they would be high enough to simply flick it over). They appear to have been surprised when their ropes got caught!
Access:
To get to the abseil point for the Stick and the Tote, at the end of the formed track follow a pad downhill. It is another 100m or so to the end of Cape Hauy. Follow a rough, slightly overgrown track in the direction of Fortescue Bay along to a profile view of both sea stacks, at a level lower than the Tote's summit. From here you can traverse back right across to a ledge within spitting distance of the Tote. Access to both stacks is by abseiling from a DBB here (about 60m). A 70m+ rap line is required to be able to access start of routes (or extend the 60m rope).
There are two ledges on the Candlestick accessible by a short swim from the base of the Tote: (1) A small one to the north that has a double bolt belay with fixed hangers 3m above sea level. This is the start of the NW (The Corner)Route. Jump in and swim left to ledge with U bolts 2-3m above the water. Drag traverse rope across 15m gap and setup Tyrolean or swim.
and (2) a larger one, with no bolts, that is about 20 m south of (1) in the direction of Cape Pillar, behind the Tote, and directly below the actual Candlestick summit.
The Middle Way, the Original (1971) Route and The Wick (1981) start from the larger (southern) ledge. The West Wall is also accessible from here by climbing up The Wick a short way before traversing left.
Descent:
From the summit rap down to the bolts at the bottom of the last pitch. The 40m Tyrolean back requires two ropes and involves a controlled descent as anchors are approx. 20m higher than mainland. It is also possible to rap down to the bolts at the top of pitch 2 of ‘The Original Route’ and set up a Tyrolean from there, although ropes have been known to become stuck from this point.
Loose rock is the norm on the Candlestick so take great care. Look out for those below you.
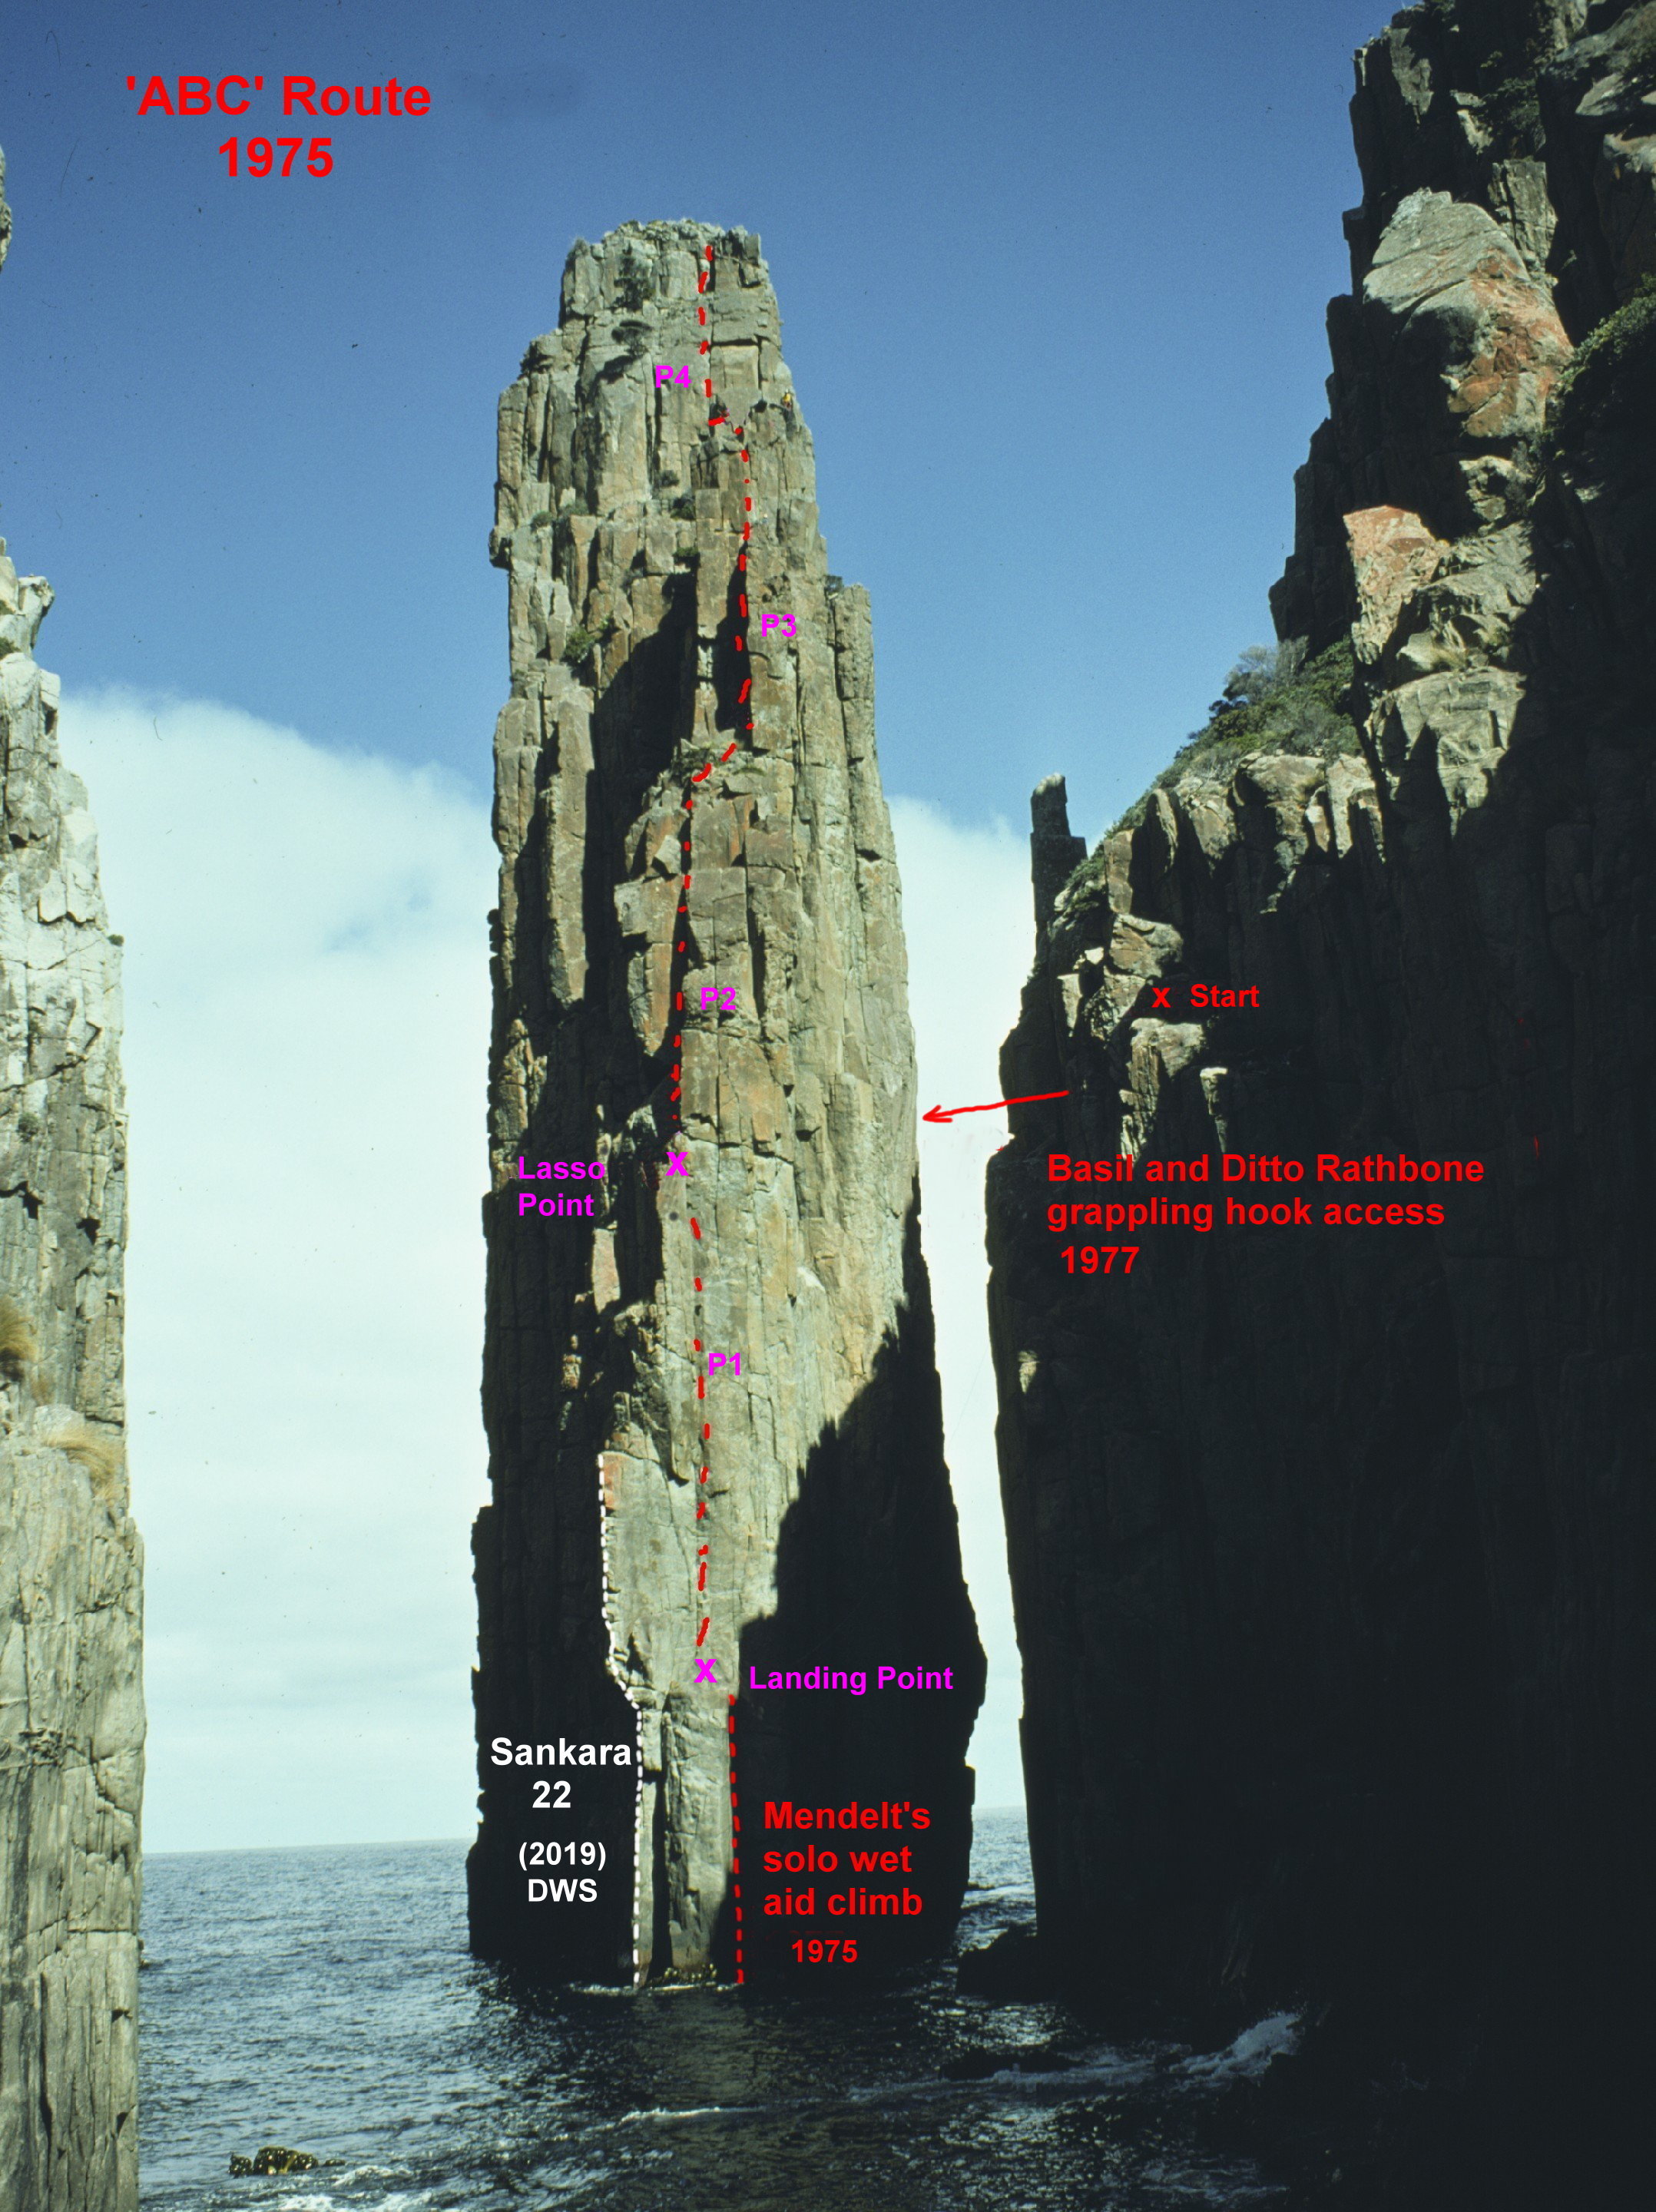
Candlestick NW Face
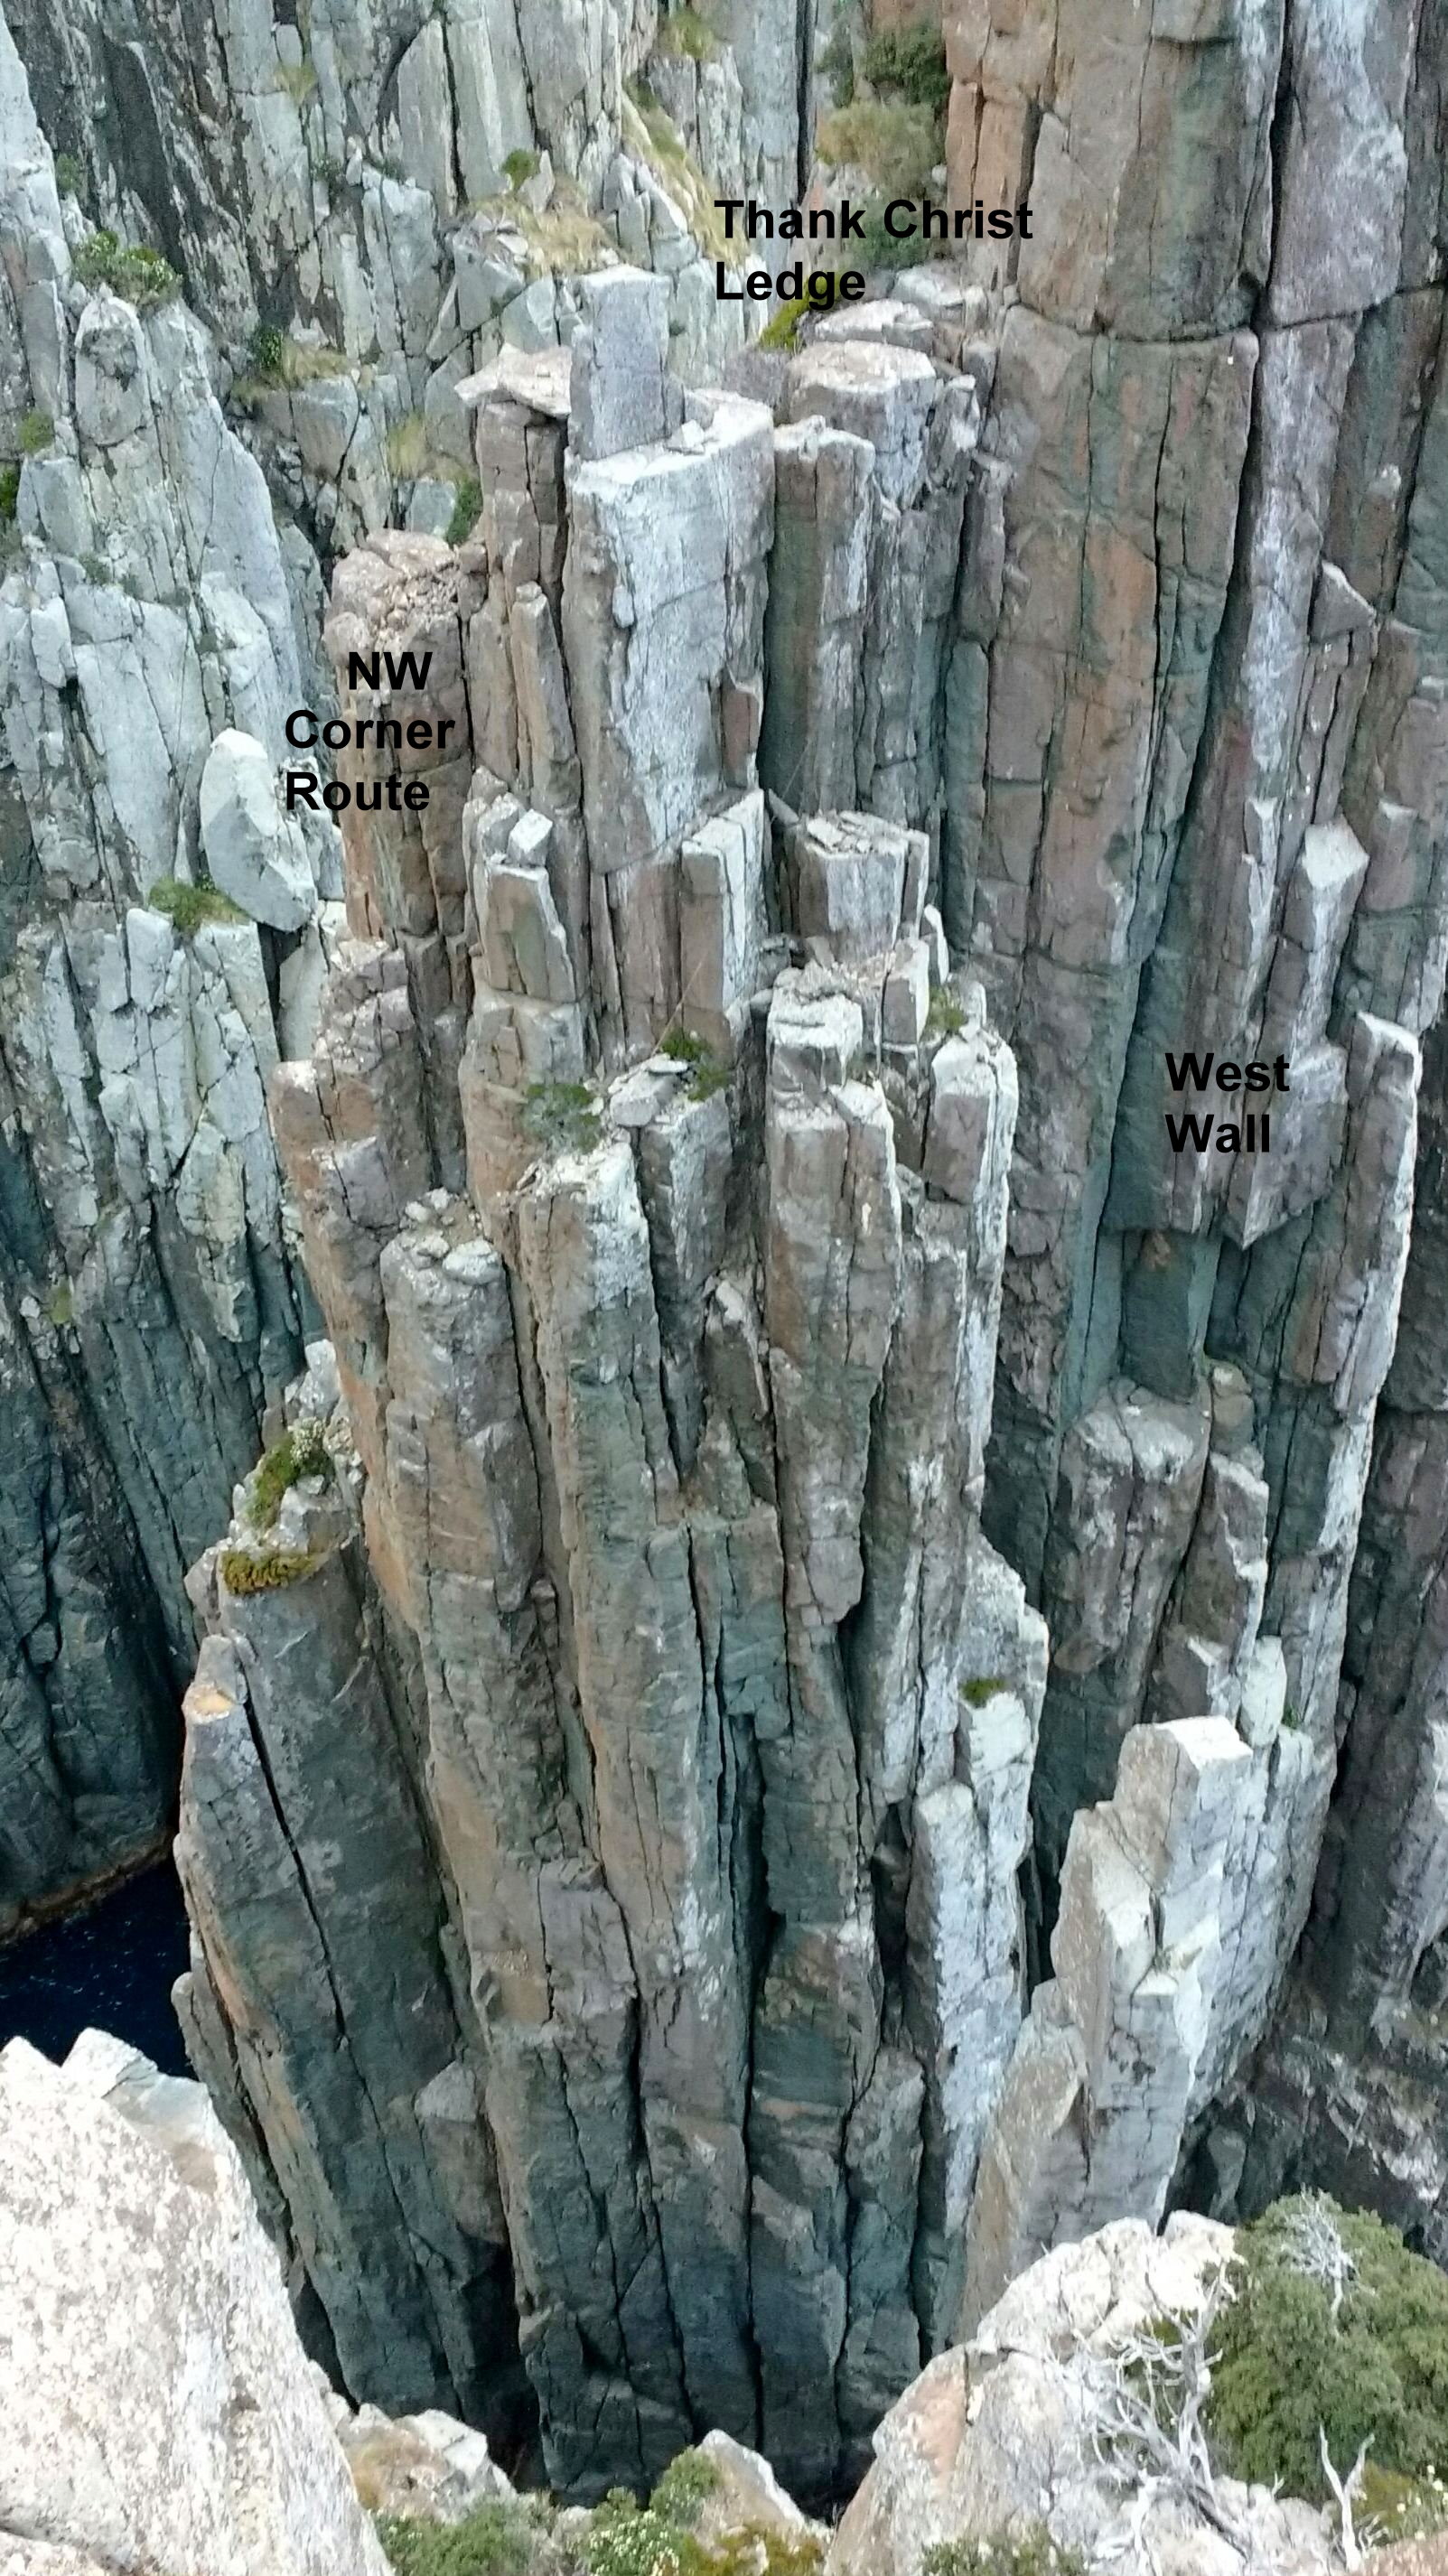
Candlestick WNW Face
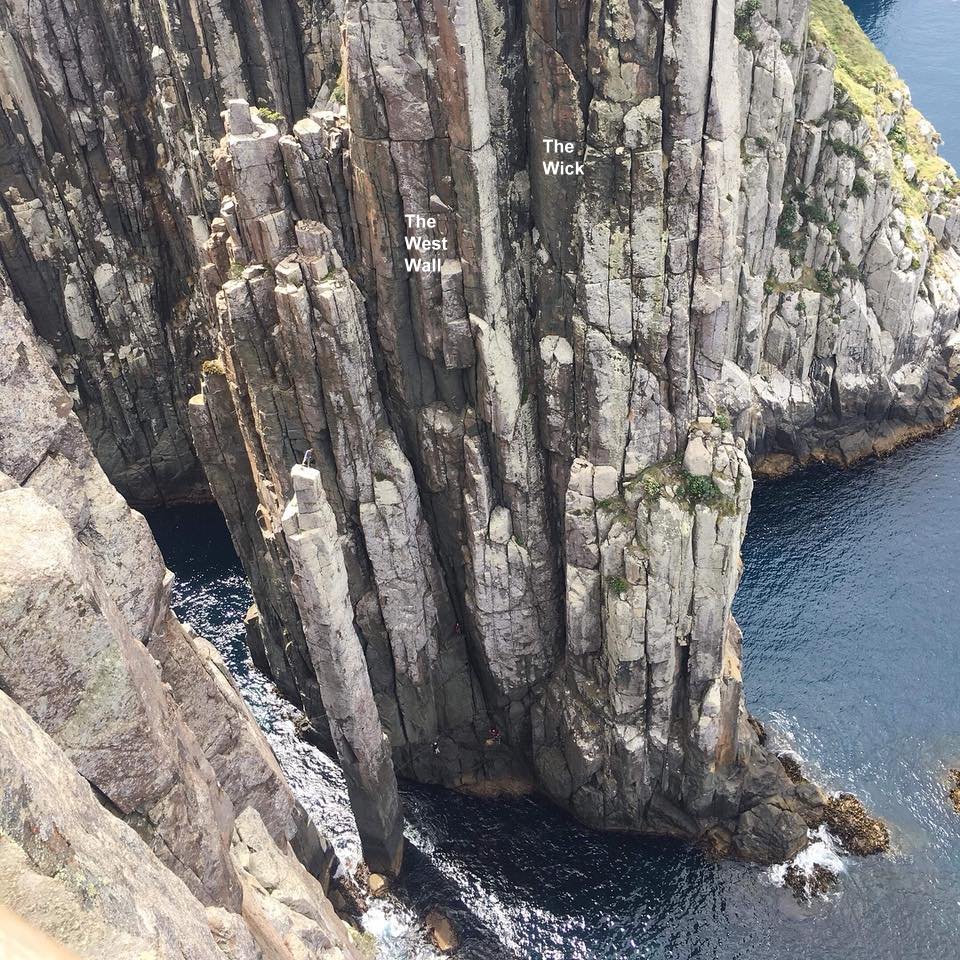
Candlestick West Face
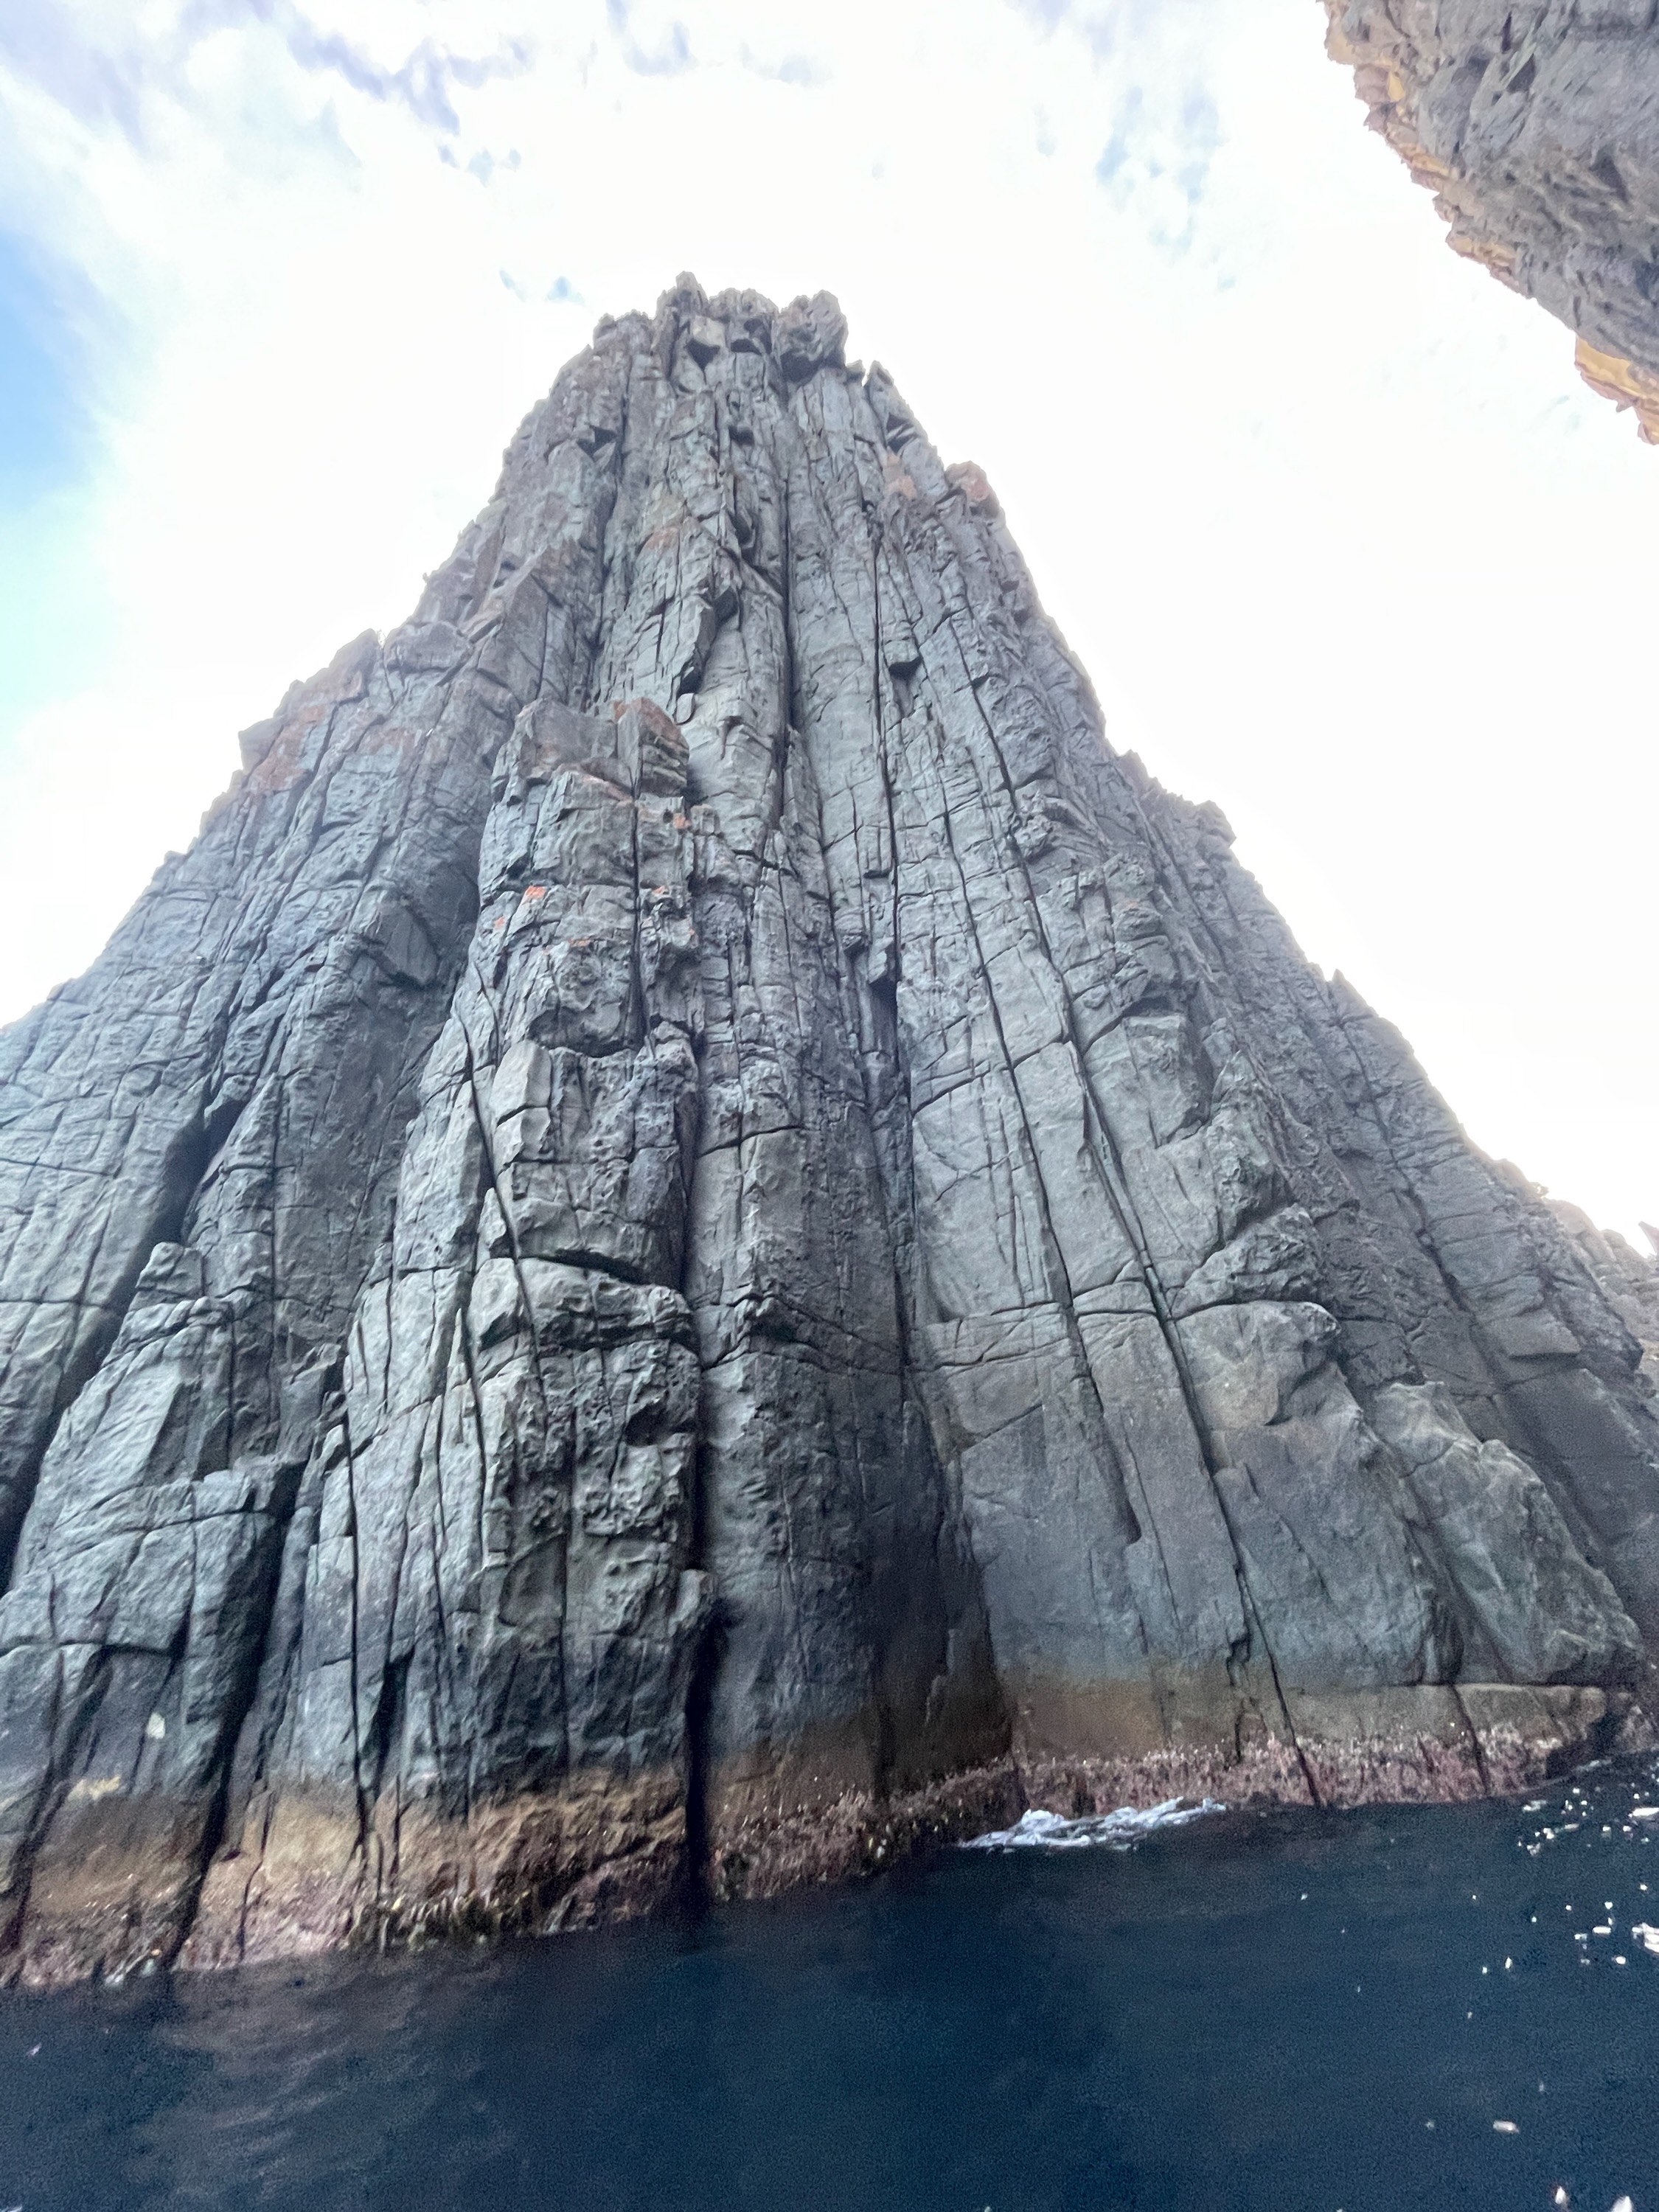
Candlestick SE Face (not visible from Cape Hauy)
T Smith and H Jackson alt Jan 2025
Arete on north east corner of the Candlestick. High crux.
Danny Wade Jan 2019
Tyrolean-Mitre Rock to Cape Hauy
An expedition by the CCT in April 1967 landed Reg Williams, John Moore and Alan Kellar at what Reg WIliams named ‘Thank Christ Ledge’. See sketch. A 20m grade 16 pitch led to the summit from the ledge. The epic is documented in an article in HWC Tramp no.18 (Jan.1968 pp43-55). ‘The Candlestick Circus’ by Tim Christie.
Reg Williams, John Moore, Alan Keller 1967
The north side of the Candlestick. First ascent for a ABC TV program “Sportsnight’, now on a 30-minute video (available on youtube). Five pitches. Swim across to the north side of the Candlestick (see topo), solo or aid climb ~8-10m to a ledge and rig a Tyrolean. Three further pitches lead to ‘Thank Christ Ledge’ where the classic Mitre Rock- Mainland Tyrolean landed the 1st ascent party of the Candlestick in 1967. A 20m grade 16 pitch leads to the summit from here.
Note: The swim has been avoided by tossing a homemade grappling hook on polypropylene cord across to the Candlestick and slowly lowering to the ledge at the top of the 1st pitch. Time consuming and not for the faint hearted due to the chance of a massive pendulum and collision back on the mainland cliff.
M. Tillema, L. Wood, G. Kowalik 1975. Alternative grappling hook access: C.(Basil) Rathbone, C.(Ditto)Rathbone June 1977
Alex Hartshorne & John Fisher 2019
Pitch 1 & 2 Drew Fenton & Brad Miller, 5th Jan 1998
Alex Bog and Chris Wallace (01/2020)
Possibly many people. Climbed as described by Xinyu Zheng, Sabine Pratt Hunziker and Dave James. 02/01/18
R.Williams., M.Tillema, C. Hocking, L. Closs (CCT 1971)
The obvious direct line to the summit up the middle of the Candlestick when viewed from the mainland following a steep vertical chimney crack system, Start on the right side of the large ledge, right of the Original Route.
Climb with some difficulty into the base of the chimney and continue to the top of the Candlestick. The initial intimidating offwidth overhang is ‘gr.16/17 with holds in the right places’. Although the route looks like cracks and chimneying, it makes much more use of wall holds than it might seem from a distance. “An enjoyable climb, although maybe a bit too old school for today's generation”- Lyle.
L. Closs, T. Williams, S. McDowell (1981)
David Gray and Sebastien Meffre, April 1997.
Cliffs Facing the Candlestick and Totem Pole
These are the cliffs located near the end of the track at Cape Hauy.
Steve Monks, Adrian Laing, May 2006.
Adam Demmert, Neil Monteith, 3 Jan 2006.
The Monument (The Monolith)
This large sea-stack is just off to the south of Cape Hauy (clearly visible from the track) was first climbed in 1970 by a Climbers' Club of Tasmania group. This sea-stack is much less popular than the others in the area, perhaps due to the fact that it is not as dramatic looking and is only about 50m high. However, since it is about 100m off shore, it is not any less of an mission to reach the top. Indeed, the tale of the first ascent is yet another grand CCT epic spread over a few attempts.
Prior to the successful attempt, Mendelt Tillema had already swam out to the stack, though his companion (Peter McHugh), who planned to follow in a rubber dingy was not able to make it out to the stack due to the swell. Mendelt swam back to shore and the attempt was aborted. The next time, Mendelt again swam (trailing a rope) to the prominent ledge on the NE corner of the stack. Mike Emery and Ray Lassman tied in the middle of the rope and followed, while Col Hocking held the other end and waited on the mainland should things get messy. McHugh contributed to proceedings by tumbling down the cliff as the start of the day, leaving blood stained rocks as markers for the path to the sea.
From the ledge, the team took the prominent chimney in the corner. This was an 80ft (or 25m) pitch at a grade of "VDiff" (now considered about grade 12-ish), and then a scramble to the top. Upon erecting a cairn they donated some green tights for a flag, though it appears these have long since blown away.
Most (all?) subsequent ascents have utilised a vessel of some sort; either a kayak, or a motor boat (including the second ascent, where they hitched a ride out to the stack on a fishing boat, and flagged down another boat to get a lift back a few hours later!). These days, the sea-stack is perhaps best approached by a kayak launched from Fortescue Bay on a calm day; unless you like swimming, that is.
The route starts from a prominent ledge on the NE corner of the stack and climbs via a prominent chimney in the corner until the angle relents enough to scramble to the summit. Descend by abseil. Mendelt Tillema, Mike Emery, Ray Lassman and Col Hocking.
Easter 1970.
Stefan Karpiniec, Phil Robinson, Oct 1974.
Munroe's Bight Cliffs
There are expansive cliffs on the south side of Cape Hauy, stretching all the way to Cape Pillar. So far, only the most accessible buttresses have been climbed on, and further left from Forgotten Columns the rock rapidly deteriorates and turns to siltstone. The cliffs here are described from climbers left (Cape Pillar) to right (Cape Hauy).
These are the easiest cliffs to access near Cape Hauy as the walk is significantly shorter than to the end of the Cape. There are some very high quality, rather exposed, multi-pitch routes that have rapidly become quite popular among solid trad climbers (grade 20-25).
Forgotten Columns
Two imposing buttresses stand proud at the left hand end of the Big Scary Shady Cliff. These are the Forgotten Columns. The position and climbing is great, and the rock quality is for the most part, remarkably good (not shedding scales or having friable rock like many of the other mainland cliffs in the area). The cliff is warm and well-protected from westerly wind and doesn't really seep, which makes for pleasant year-round climbing. The cliff goes into shade around midday. Easterly winds turn this cliff into a real nightmare, so avoid if forecast unless you’re looking for a character building experience. The cliff is steep and pitches are often demanding, and combined with this is some immense exposure. This is probably the tallest sea cliff at the Cape, and there's about another 80m of exposure below the base of the cliff down the slabs below to the sea. If you've pulled your ropes, walking out isn't really an option, so be confident in your climbing and/or aiding abilities when choosing your route, or fix an escape rope.
Approach:
Routes are easily done as a day trip from Hobart. It’s a 1 hour walk from the Fortescue Bay car park to the top of the cliff. Follow the track to Cape Hauy for about 45 minutes until reaching the junction of the Cape Hauy and Mt. Fortescue (Three Capes) tracks. From here, refer to the map. There is a small rocky clearing above the buttresses to gear up, as indicated on the map. The buttresses are easy to find from the edge of the cliff and part of the adventure is in the approach. Please don't form tracks, erect cairns or remove vegetation, and be sure to utilise any rocky terrain on your approach wherever possible. Please note that the Three Capes Track is one way only (Northbound direction).
No seabird or peregrine nests have been noted to date, however be mindful of bird breeding sites and season (August to December) and the unlikely potential for nests on belay ledges. If you start getting sqwuaked or find a nest, please retreat and alert the crag stewards.
Gear:
Check the route descriptions for additional details, but a rack of wires and a double rack of cams #0.3-#3 (BD) is the standard rack for the cliff. If planning to pull your ropes rather than fix a line, a single 70m rope will cover you for the abseils, sometimes on stretch so take the usual precautions to avoid abseiling off the ends! Take a short rope and ascender to fix off the top section of the Forgotten Column buttress, you'll need 15m. There are abseil anchors located on boulders at the top of each buttress to prevent inadvertent damage to trees and vegetation. All belays are DBBs unless indicated otherwise.
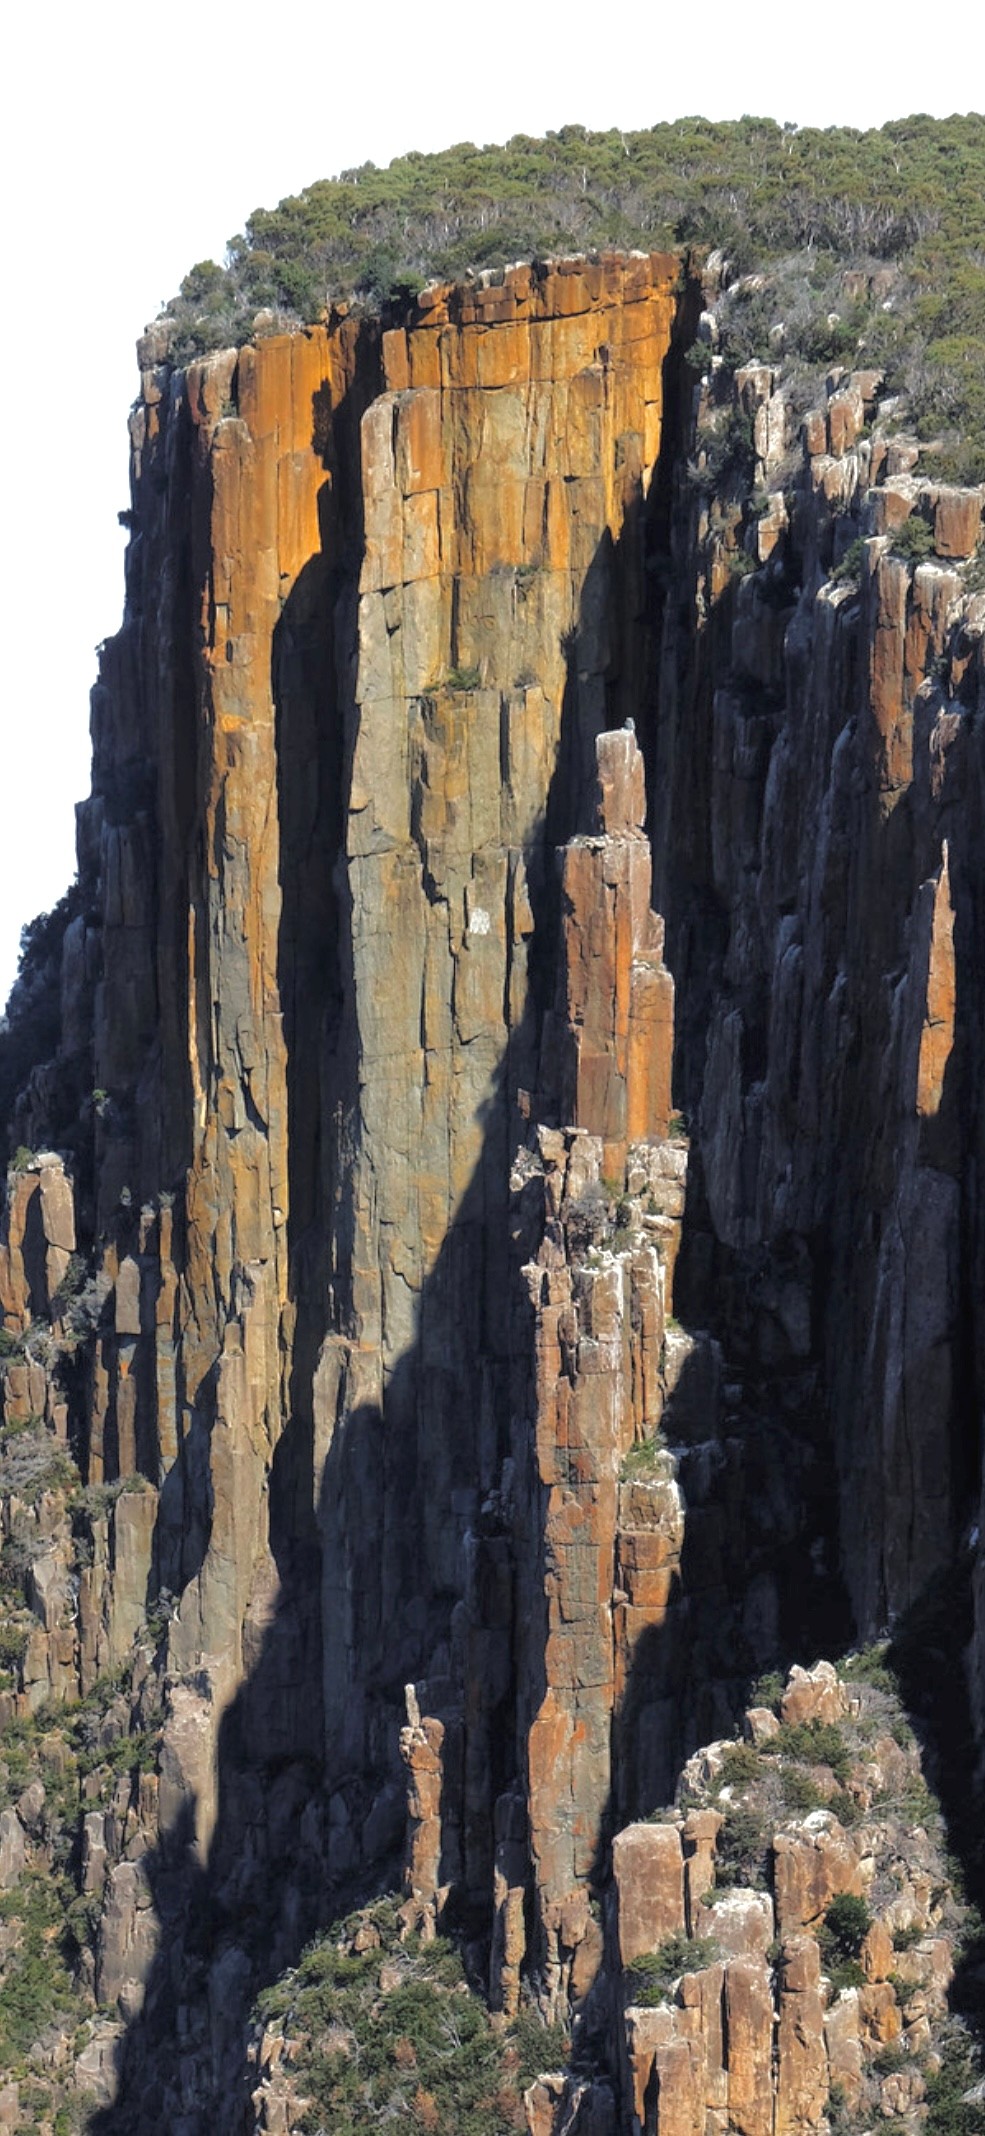
Forgotten Columns
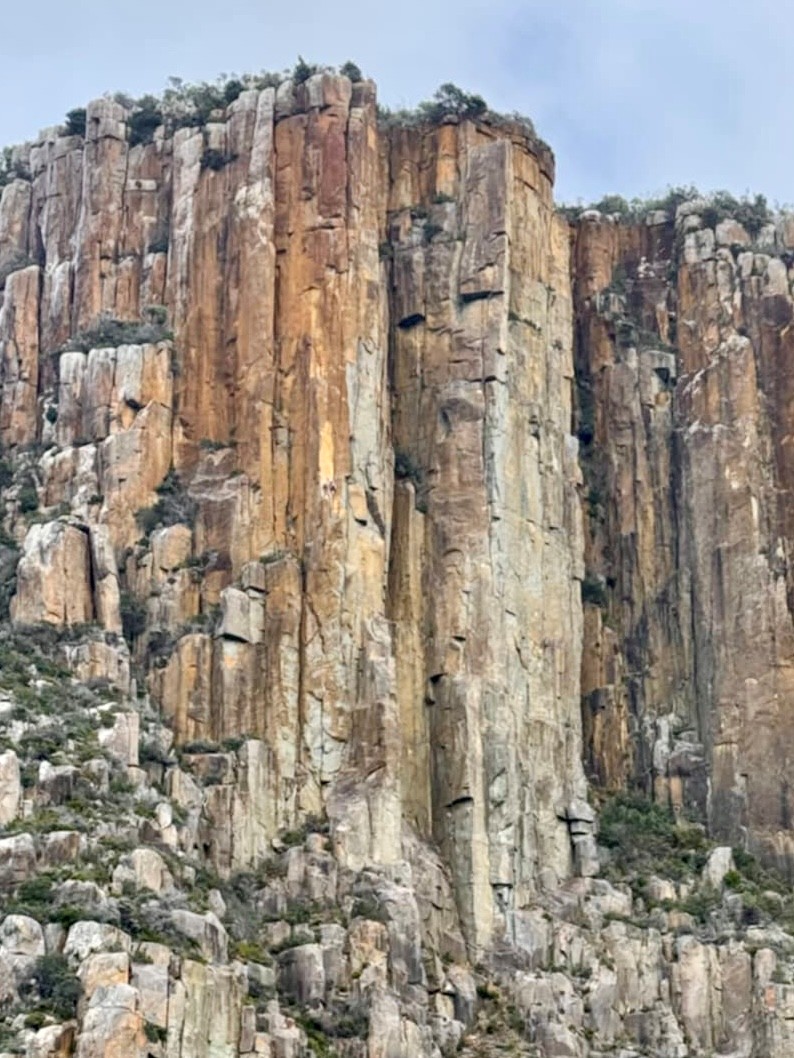
Forgotten Columns
Teenage Hand Model Buttress
The LHS, orange coloured buttress. Sustained, pure splitter cracks are the name of the game here. Tape-up.
Alex Hartshorne & Jon Leighton 2026
FA - Fraser L-R, Christoph Speer, March 2025. FFA - Fraser L-R, Aaron Galligan, April 2025
Christoph Speer, Jemma Herbert & Fraser L-R, October 2024. 1c by Fraser L-R & Samson Stensletten.
Closed Project
The corner and thin crack on the front of the buttress, right of THM.
Project - Fraser, Chris and Hamish
Pumpy jamming and laybacking up the gently overhanging orange wall. Cams from #0.4 to #2, with extra hand-sized pieces. Locate an anchor on a boulder on the north side of the buttress, and abseil 28m to a DBB on a pedestal of rock below a roof. The top crack sometimes takes minor sandy run-off from above, but a quick brush on the abseil-down solves this annoyance.
Hamish Jackson, Shumita Joseph, Christoph Speer, March 2025
Up Compartment Syndrome to the rooflet, then break-out right up the punchy finger crack for 10m until it rejoins CS for the upper hand crack. The crack sometimes takes minor sandy run-off from above, but a quick brush on the abseil-down solves this annoyance.
Jem Clemens and Hamish Jackson (team effort), May 2025
Forgotten Column
The RH buttress with the prominent arete. The rock on this buttress is more featured, which provides for some great varied climbing, as opposed to the very regular splitters on the other buttress.
Access:
Fix a short (15m) rope off at a boulder directly above the buttress and abseil down beside the pillar onto the top of the buttress proper. Locate an abseil anchor in a corner over the cliff edge and pull your ropes from these. DON'T abseil off the anchor on top of the buttress next to the pillar or your ropes will get stuck. Ascend the short fixed rope or solo the chimney for the escape pitch.
Christoph Speer, Hamish Jackson & Fraser L-R, September 2024
Closed Project - Fraser
Christoph Speer & Fraser L-R, January 2025
Fraser L-R, Christoph Speer, January 2025
A long open corner line to the right of the stepped section of the buttress. Locate an anchor to climbers right from the clearing at the edge of the cliff. You’ll need to fix a static rope or leave some gear at the obvious belays to get down (60m). Pre-clip the first U.
From the DBB, gymnastically climb up the blunt arete until you reach a thin crack. From here, bridge and jam your heart away to the top. Possible to do as a mega 60m pitch, or break at 30m or 45m with trad belays.
Fraser L-R, Nick Carter, April 2025
The Big Scary Shady Cliff
The rap into the blue fin is the clearing where the small point and monument line up. Please don't leave fixed anchors, bolts, cairns or tracks and refrain from removing vegetation no matter how tempting it might be.
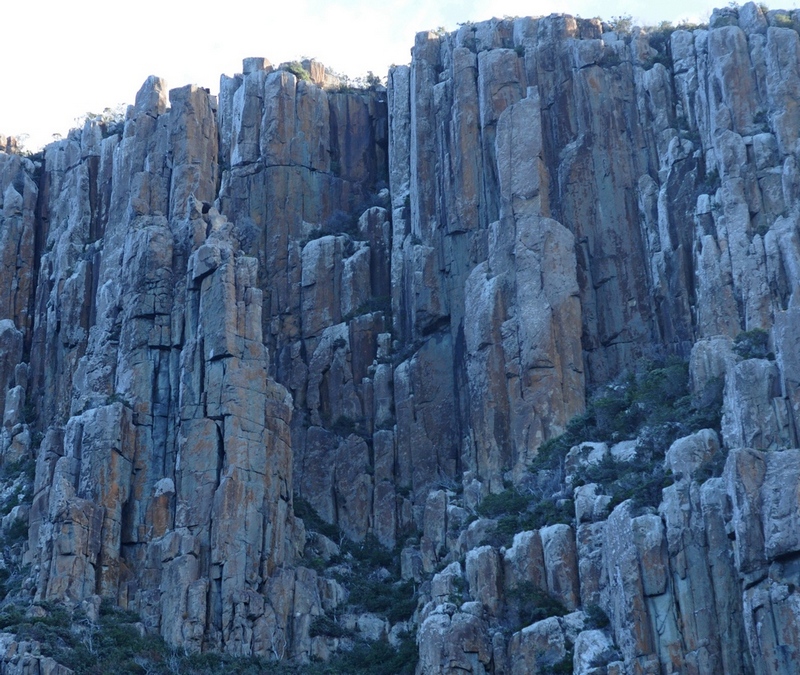
The Big Scary Shady Cliff
Wide cracks on to the fisherman’s shoulders, final block to summit remains unconquered and the prize of stealing the fisherman’s hat.
DJ and Daz June 2017
DJ and Daz alt June 2017
Wide crack direct start to the fin.
DJ and Daz June 2017
Thin left hand line. Disappointing flares.
Alex Hartshorne and Rosie Hohnen November 2017
Wide stemming chimney between mainland and Blue Fin. Start on right hand side of fin. Jug from summit.
DJ and Daz alt June 2017
The most photogenic of towers, visible from the Cape Hauy track.
Daz July 2017
Freed on TR, beautiful pillar but climbing quality not worth bolting.
Alex Hartshorne Nov 2017
The Shnaggle Tooth
Climb crack to summit, stand on top.
Daz & Katherine Tattersall March 2018
The Shnaggle Tooth is accessed by turning south onto track at the top of the first set of steps on Cape Hauy as you come out from the dip. Follow the track till it ends after 50m then wander down hill another 50m and look over the east side of the spur to see the Shnaggle Tooth.
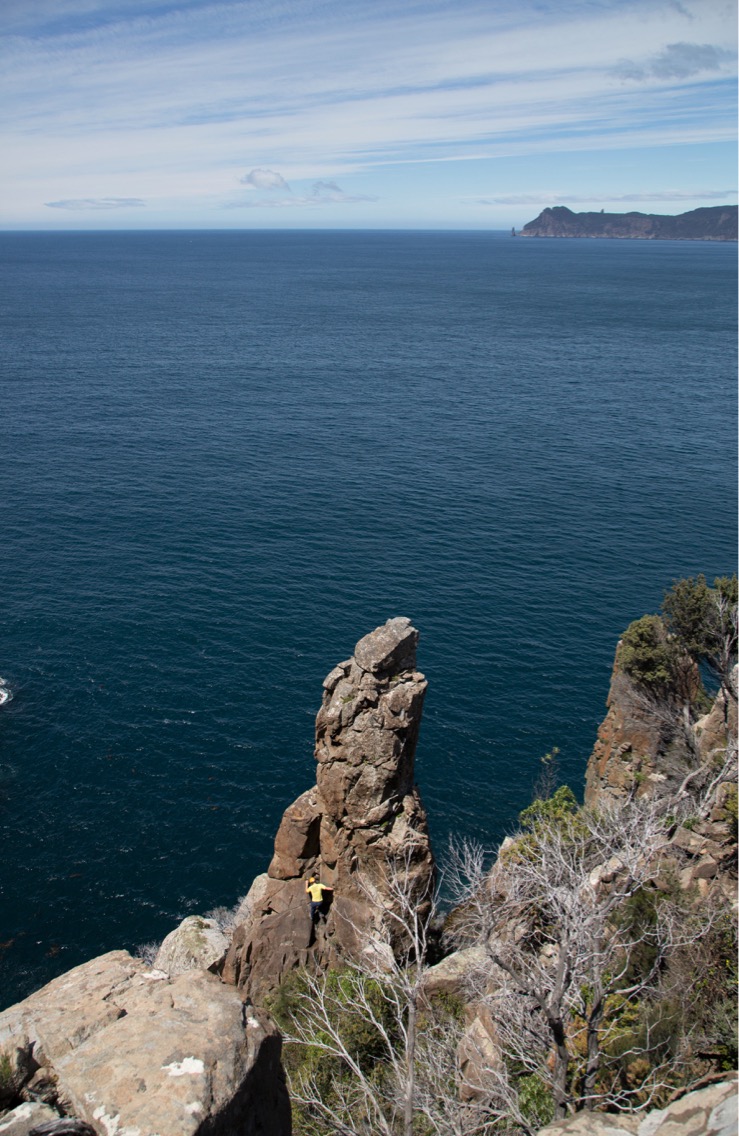
The Shnaggle Tooth
The Safe House Crag
Unlikely to have seen any repeat ascents. Situated on the near a small inlet about 0.5 km from the end of Cape Hauy, back towards Fortescue Bay. Discovered in March 1989 after a huge swell aborted a Candlestick attempt. To get there, leave the Cape Hauy track at the ridge as you come up from the dip going out to the Cape proper. Walk along the ridge line to the coast (downhill from the ridge the scrub is horrendous!). As you get to the coast you have to bash through some pretty thick stuff for maybe 100m 'til you arrive at the crag. (Editor's note: a boat sounds like a good alternative). Routes are from L to R. The hard looking arête makes a good point of reference.
The face/seam L of the arête, bombproof wire protection and very nice climbing.
Evan Peacock, Mar 1989.
R and around the arête is a nice looking corner.
Evan Peacock, Mar 1989.
The next route to the R, excellent face/finger crack climbing.
Evan Peacock, Mar 1989.
Next line to the R.
Steve Ford, Mar 1989.
R and around the corner from SOA is a small roof, climb this.
Steve Ford, Feb 1990.
Starts in the corner immediately right of MS. Some lay-away moves bring you some bridging then the top.
Evan Peacock, Feb 1990.
Starts in the wide crack about 5m R of PIW.
Evan Peacock, Feb 1990.
A bit further R is a corner, it looks very nice and, dare I say it, is rather obvious. It's bristling with runners and is an excellent route.
Evan Peacock, Mar 1989.
Fortescue Bay Area
This section of the guide covers the cliffs and crags within the sheltered area of Fortescue Bay itself.
Outer Limits Crag
An excellent crag, full of steep, clean lines on mostly excellent water-washed stone. Routes are between 20-30m high, with the climbing focused on steep cracks, a few hard aretes and the odd face climb. There is limited scope here for those climbing below grade 20, and it is predominately trad.
This cliff is located on the NE facing coast just outside edge of Fortescue bay, so the climbing is pleasant year round with a lot of sun in winter and then shade from midday in summer; spooge doesn't seem to be an issue either. The cliff also well protected from S or SW winds so offers a welcome respite from the winter / early-spring blues!
Access:
See map for location. Walking in from the Cape Hauy track (45 min total walk) is possible as the terrain is generally rocky. Don't leave any cairns, tape or an indication of a path from the Cape Hauy track. Climb a route at the RHS to escape, or fix a rope and jumar out.
Access by boat / kayak takes about 20 minutes paddling from the boat ramp. There are decent landing locations depending on conditions, and somewhat protected zawns either side of the crag for anchorage. Check swell and wind-wave conditions carefully before setting out (NE >0.5m can be tricky). Alternatively, hassle a fisho for a boat ride out (6 packs of beer seem to work well as currency).
There is very limited to no phone reception at the crag.
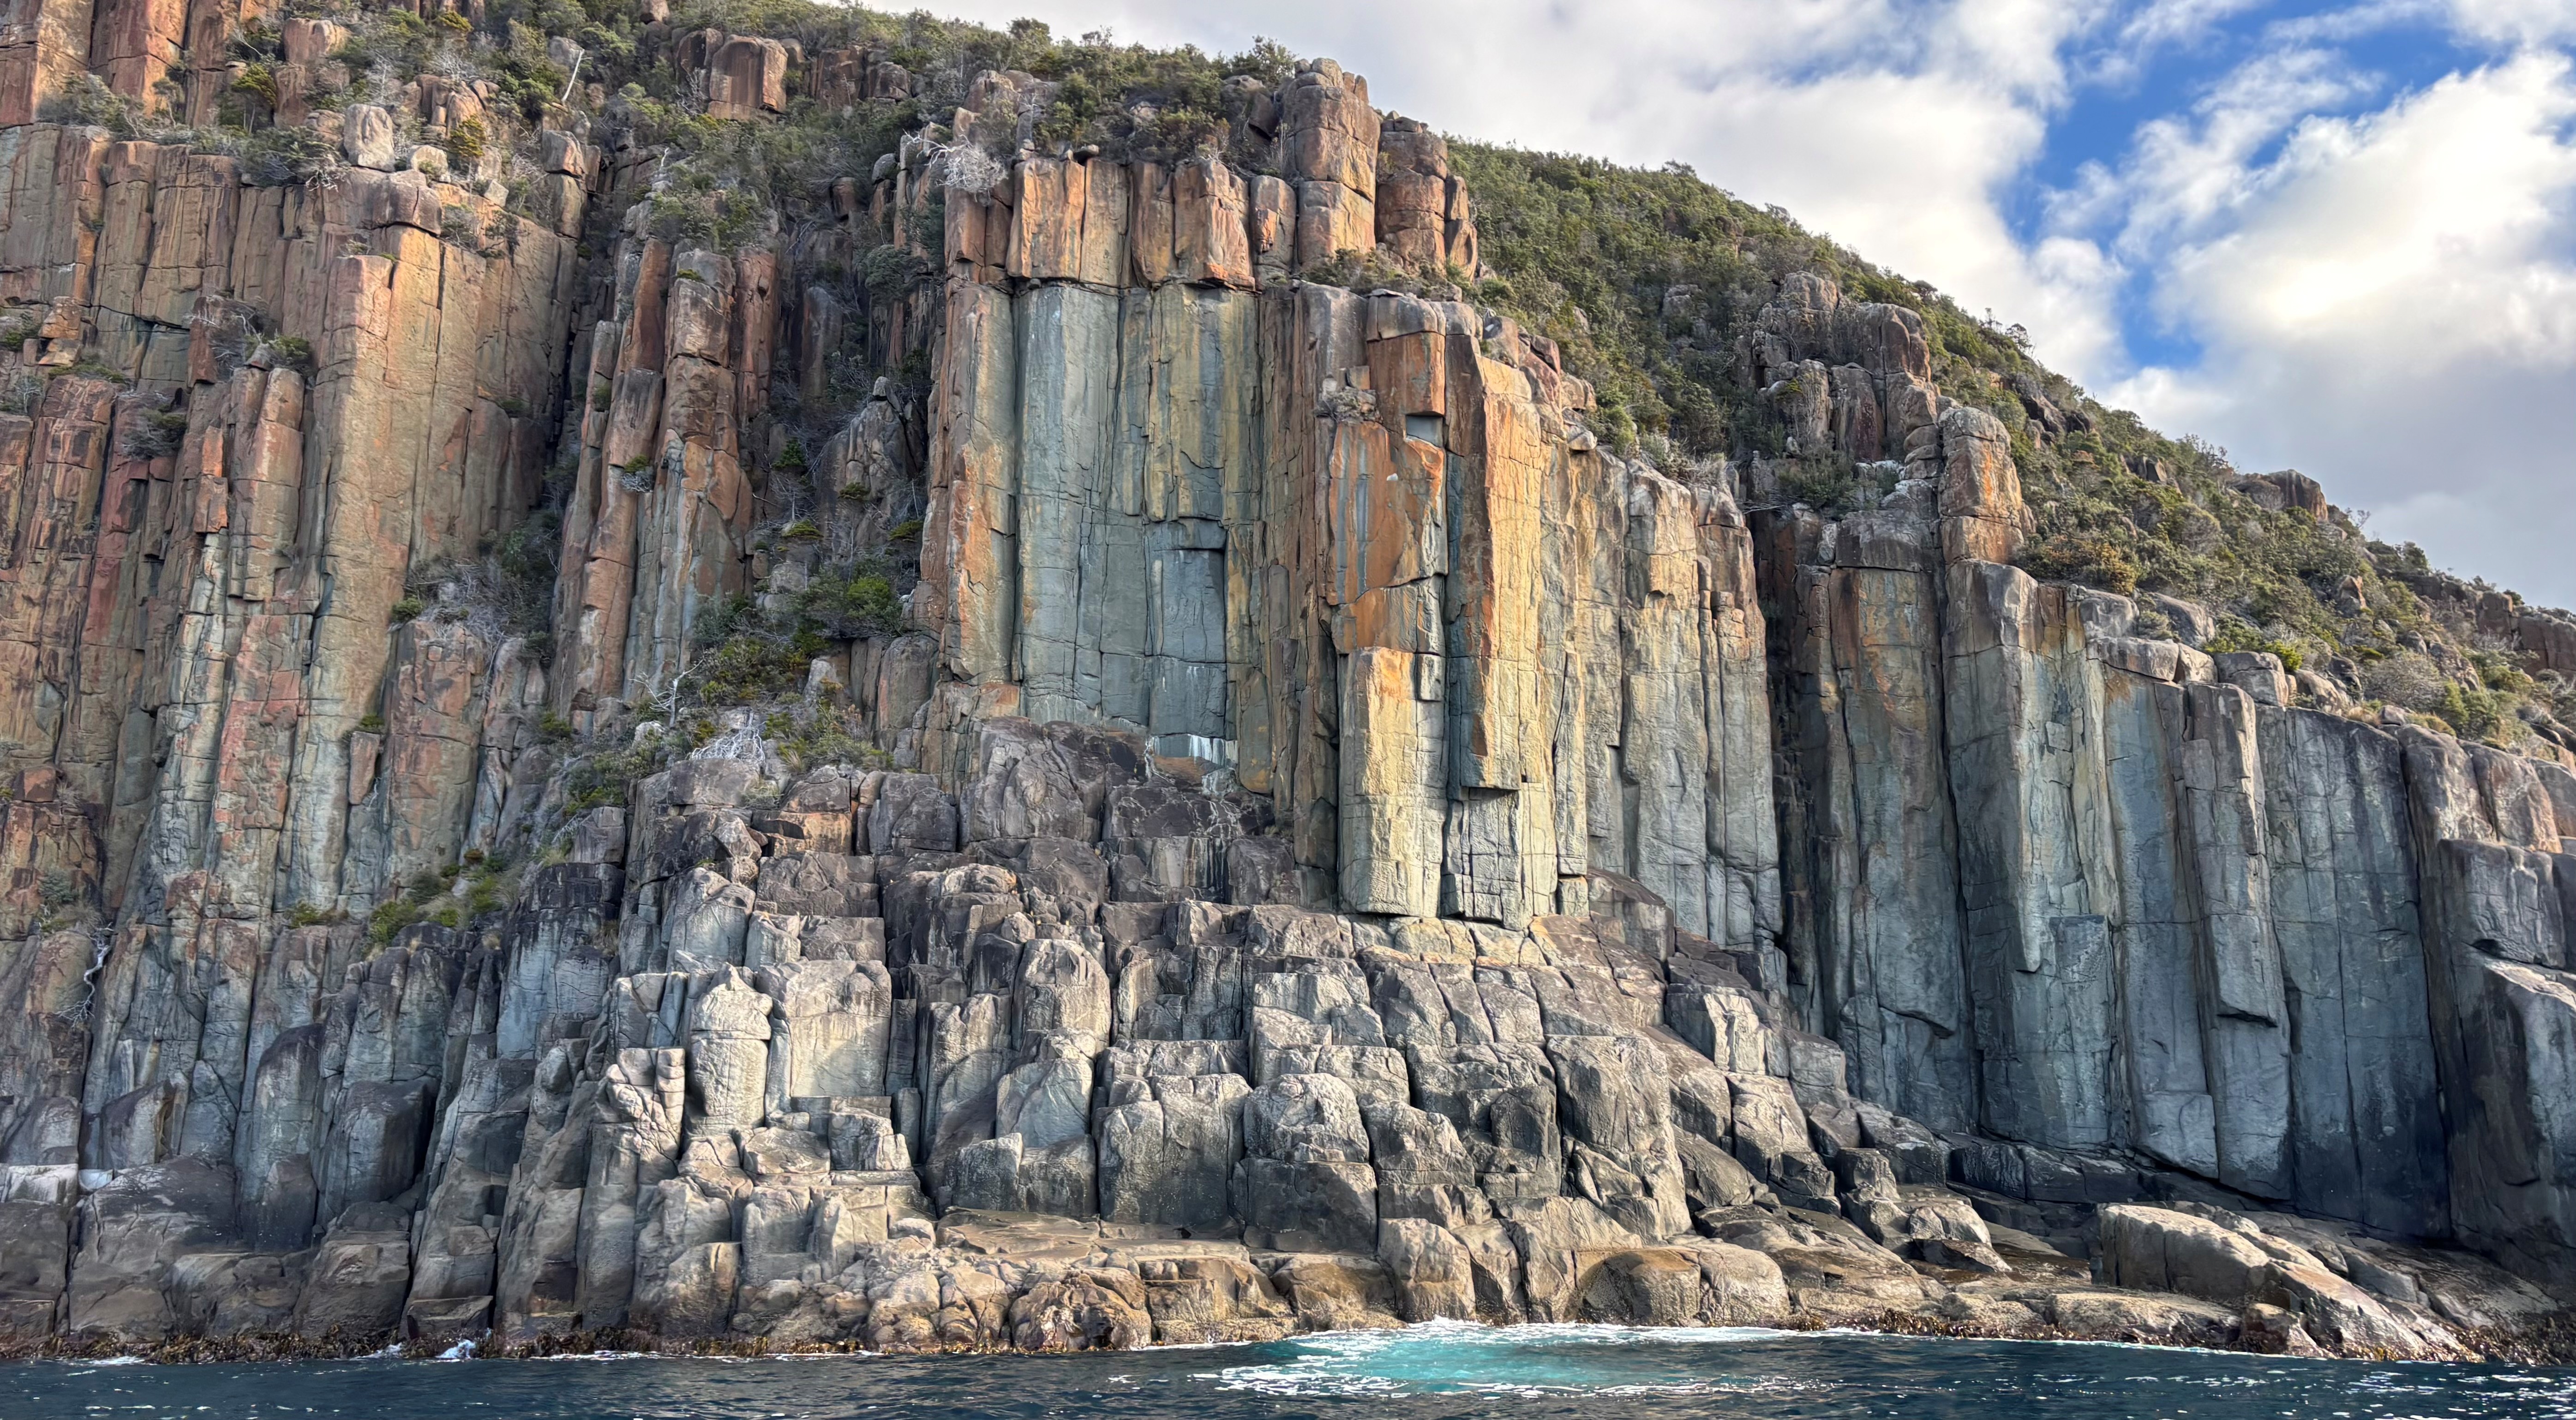
Outer Limits Crag
- ★★48.Sweetcrets22
- ★★49.Pepino19
- ★★51.Muffin Research Kitchen (Mr. K)19
- ★52.Schrodinger's Cupcakes19
- 53.Closed Project
- ★54.Outside the Oort Cloud19
- ★★55.The End20
- 56.Closed Project
- ★57.Unidentified Frying Objects19
- ★★58.Somnium Lunari20
- 59.Closed Project
- ★60.Looking for Space20
- ★61.Basic Instinct20
- ★★62.Sigourney Weaver23
- ★★★63.Outer Limits21
- ★★★65.Hyperion28
- ★66.Slippy19
- ★★67.Star Fox20
- ★68.The Shrike26
- ★69.Into the Grey Zone25
- ★70.Tram Tracks and Tinfoil Hats21
- 71.Warp Speed20
- 72."Chickens in Choppers project" - Closed
- ★★★73.Bovine Freedom22
- ★74.Xenomorph22
- ★★★75.Cows With Guns27
- ★76.Idle Hands19
- ★77.Wake Up, Sheeple22
Muffin Research Zawn
The climbs at the far left of the crag are accessed from some comfortable platforms near the lovely little zawn. Access from the main amphitheater is via a grade 2 scramble down the ledge system.
Great climbing and protection. Tackles the intimidating crack through the roof just left of Pepino. Follow the crack, making use of the featured slab on the left to a stance below the roof. Jam through this and continue up the twin crack system to finish via a thin-hands crack on the left. You can also finish up the groove to the right at grade 21, but this is not as good.
Christoph Speer, Martin Brown, Chris Lang, Jan 2026
Long and varied, great positions, excellent pro and some fantastic rock along the way. Start up the face or mini-tote and follow the tricky groove. At ledge, follow the superb face holds up the prow to an obvious rest about 2/3rds up. Hand traverse left here, then follow the finger/hand crack to the top of a small pillar. Step left to shared DBB with Sweetcrets.
There are multiple worthwhile variants for the end of this route, including going to the Mr.K anchor, but the one described above is the best value.
Chris Lang, Christoph Speer, Martin Brown (team effort), Dec 2025
The most coveted pinnacle on the peninsula, now fun-sized.
Chris & Chris, Dec 2025
Sustained and balancey. A steeper start up crack leads to sustained interest up the featured slabby wall above. Take 11 quick-draws, and a couple of hand-sized cams for the start.
Christoph Speer & Chris Lang, Dec 2025
Chris Lang, Christoph Speer, Nov 2025 (p1) & Christoph Speer, Martin Brown, Jan 2026 (p2)...MC2
The line up the wall. Closed Project.
Lang and Hartshorne
Outer Limits Pavilion
These are the routes within the main crag area in the East facing amphitheatre.
The clean looking crack with a horizontal tree at the top. Best approached by starting up the base of 'The End' to the platform on the left, then walking a few meters up this to the base. Fine climbing. Sling/rap from the tree to descend.
Áine Nicholson, Chris Lang, March 2026
The smooth crack left of the arete. Jamming, finger locking, and face climbing through all the sizes. Take a #4 and don’t be put off by the intimidating (but straightforward) wide start.
Christoph Speer, Hamish Jackson, Shumita Joseph, December 31st 2025
The arete. Closed Project.
Chris Lang
Dim Sim Corner. The square corner groove at the left end of the main crag. The technical groove leads to a short-lived thin hands crux.
Christoph Speer, Hamish Jackson, Jem Clemens, August 2025
Sustained right leading finger cracks in an open corner. 5m from the top, a funky-tricky traverse right leads to the ledge and anchor.
Hamish Jackson, Jamie Spencer, and Johannes Kepler Sep 2025
Closed Project
Steep line 3m R of Somnium.
The finger crack on the East wall. Up groove to ledge, then follow the finger crack to about 3m below the top. An obvious step left leads to a finish up the shallow corner past a wedged spike of rock. Takes copious 0.2 & 0.3 sized cams. The obvious direct finish up seam goes at 24, but is unfortunately very contrived.
Christoph Speer, Chris Lang, Nov 2025
The massive groove is trickier than it looks, then tackle the exposed twin cracks above. Exit right to ledge.
Hamish Jackson, Jamie Spencer, Sep 2025
These are the routes within the main area in the centre of the crag, forming a small right facing amphitheatre.
Premo climbing, and rock. And now it is well protected too! (sparse gear on FA).
Start at U 2m left of OL. Face and thin crack to ledge. Step off ledge to the right and up, weaving your way up cruxy face above; finish left passing disconcerting but solid blob to ledge 4m from top (anchor as for BI).
Hamish Jackson, Cameron Duff, Chris Lang, Christoph Speer & Shumita Joseph, Sep 25
Stunning. The long, enticing corner on excellent rock. Go for it at the top.
Hamish Jackson & Christoph Speer, Aug 2025
Arete 1m R of Outer Limits
This was TR, but ends up being too close to OL
The eye-catching orange arete. A slightly awkward start up the short hanging corner and crack leads to lovely technical and sustained climbing to the top.
Jem Clemens & Hamish Jackson, Nov 2025
Start up the finger crack as for Starfox, but hand-traverse left half way up to finish up a nice hand crack.
Chris Lang, Christoph Speer, Sep 2025
The lovely open corner line, continuing direct up the sustained finger crack to the DBB.
Chris Lang, Christoph Speer, Sep 2025
Crack on right to slope ledge, then v6 arete climbing.
Alex Hartshorne 2026
Fused techy start (BR) in alcove leads to goey crack climbing above. Great climbing that unfortunately gets a bit sandy without traffic.
FA Hamish Jackson 25 MO & FFA Jem Clemens (Pink Point), Nov 2025
The prominent twin crack line. Punchy steep jamming up the tram tracks.
Christoph Speer, Chris Lang, Shumita Joseph Nov 2025
These are the routes to the right of the gully.
Up the crack system just right of the gully/chimney. Good interesting climbing, small cams are handy. The U was installed post-first ascent, foregoing the need to rely on a nest of dubious RPs above the ledge. Be mindful of some loose rock.
Chris Lang, Christoph Speer, Nov 2025
"Chickens in Choppers project" - Closed
Arete below anchors - 3m left of Bovine freedom.
Eleanor + HJ + JC 2026
The calves demand reprieve. Very sustained and technical laybacking / bridging up the aesthetic thin corner. Gear is plentiful and very good when you look for it (small-medium wires and micro-cams essential).
Hamish Jackson, Jem Clemens & Christoph Speer, August 2025 (upstarred by repeat ascent teams!)
These next routes are in the small alcove at the far right that is most often a really comfy spot to hang, but occasionally can be subject to waves if there’s NE / E waves. Shared anchor above Xenomorph.
Aliens all the way from the UK. Sustained interesting climbing up the right facing scooped corner. Getting into (and out of!) the scoop is quite amusing.
Cameron Duff, Christoph Speer & Hamish Jackson (team effort), Sep 2025
Sustained techno climbing up the immaculate thin-flaring-splitter. Crankin finish up right. Pack an uzi. (Is substantially easier since autumn 2026 when a large hold appeared mid-crux, but still 27).
Hamish Jackson, Jamie Spencer & Jem Clemens late 2025,
Consistent jamming up the left facing corner, with a tricky exit.
Christoph Speer, Rach Chong, Cameron Duff, Jai Friend, Sep 2025
The twin cracks just right of Idle Hands. A bouldery start leads to easier face climbing to the top. Good wires and small cams for protection.
Christoph Speer, Cameron Duff, Rach Chong, Jai Friend, Sep 2025
The Sunny Gym
The original crag in the bay area and with the shortest access was first explored by Pete Steane in 1995, and previously known as Fortescue Bay Crag. A quiet, sunny heat trap, adjacent the sea and with a pleasant rock platform at its base. The crag is about 15-20m high and has some good climbing, primarily on cracks and flakes. The rock quality is generally good, though some of the lines have a habit of becoming a bit sandy. The cliff faces North, and is a warm winter crag, particularly if the sun is shining and the SW winds are blowing. Located on a point, the crag is very exposed to any wind from the West, North and East.
Starting at Fortescue Bay, follow the Cape Hauy track for about 10 minutes from the jetty to a seat and sculpture. Rock hop straight down easily from here for ~100m to the top of the cliff through the bush (5 mins). Abseil in from anchors located above the main wall or at the left-hand end of the crag. You can also scramble in/out (grade 8) at climbers left, but this is not recommended with a pack on.
Please note - consensus amongst crag stewards is that no more lower-offs/abseil anchors should be installed at this crag to retain its character.
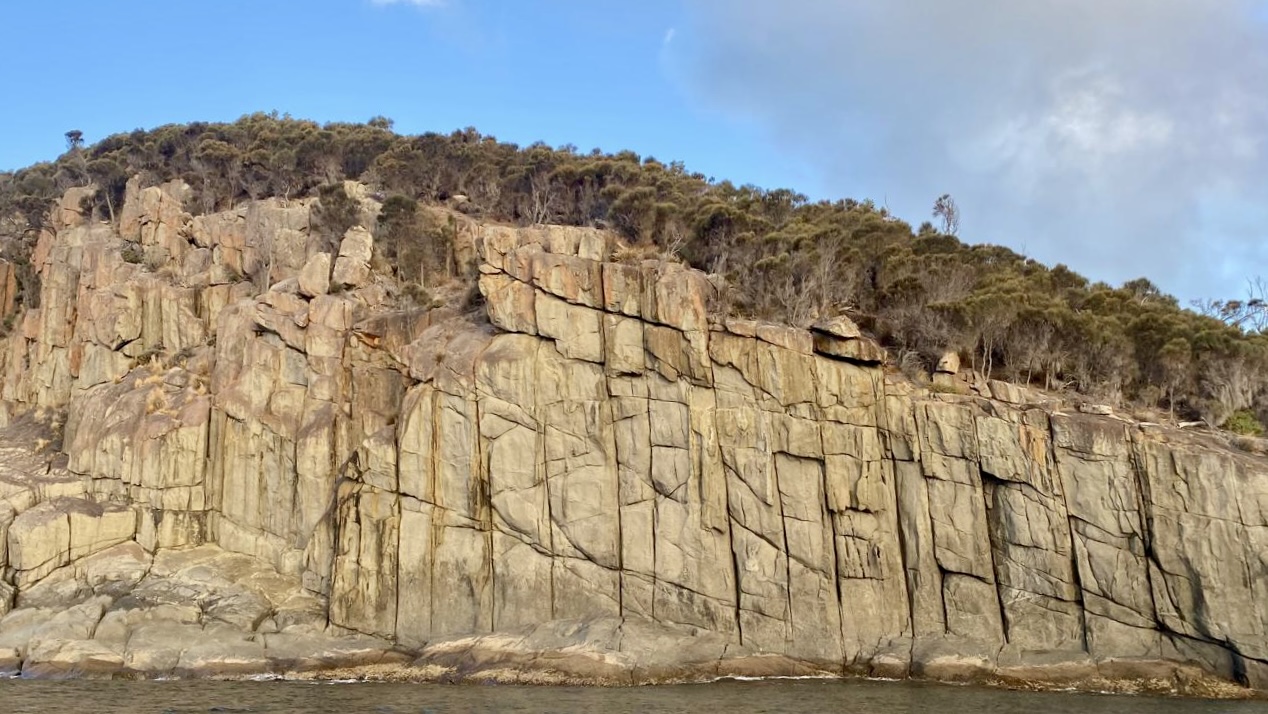
The Sunny Gym
- 82.Eeeeee (The Dolphin Noise)16
- 83.Croissant Crack24
- 84.Jai's Route14
- ★85.Form Over Function19
- ★86.Style Over Substance19
- 88.The Rhyme of the Ancient Mariner20
- ★89.Kelpie17
- ★★90.Truth or Dare24
- ★91.Full Moon Delights17
- ★★92.Nameless by Douglas19
- ★93.Jesus Without the Nails23
- ★94.Thank Christ for Bass Strait18
- ★95.Windscape19
- ★★96.The Emissary22
- ★97.Blythe Star18
- ★★98.Lonesome Dove21
- ★99.The Devil's Mariner17
- 100.Shirley's Route16
- 101.Sunny Gym17
- ★102.Exit Route16
- ★103.The Other Exit Route17
- ★104.Ooooooo (The Octopus Noise)19
There are some deep water solos off the left of the crag - listed below.
The striking arete south of Wet Nurse, easy climbing to a high crux.
Michael Lehmann, Feb 2023
At the left end of the cliff climb the sharp arête, starting from the ledge on the left which is gained by abseil.
Nick Hancock, Ken Palmer Mar 2004.
The blunt arête gained from the right.
Nick Hancock, Ken Palmer Mar 2004.
These climbs start at the very far left of the crag before the ramp falls away into the ocean.
At the furthest point climbers left, abseil down the chimney chasm to a ledge above the water and climb out.
Ed Maddison & Benny Plunkett, Feb 2023
The crack from the sloping ledges, furthest point climbers left (above Hang 5). Up the obvious crack system to the top.
Kiera Schulz & Michael Lehmann, Feb 2023
Nice climbing but a bit flakey. The very thin crack cutting the buttress at the far left of the sloping ramp. Take some very small cams plus a #2 and #3.
Hamish Jackson, Christoph Speer, June 2025
These next climbs are on a separate wall left of the main wall.
Up the pleasant corner, then follow the line above traversing right to belay from the anchor.
Jai Friend, Eugene Hnschell, July 2025
Pinch, kneebar and jam up the unique crack/scoop in the middle of the wall. Well-protected with small-medium cams. Finish up easy slab and line above to the anchor.
Christoph Speer, Hamish Jackson, June 2025
The nice technical finger crack in the shallow corner. Up the tricky crack, then slab, then surmount the block on its RHS at the top to the anchor.
Roger Parkyn, Nov 2008.
The sloping ramp between Style and Rhyme..
SpongeBob SquarePants
These next climbs finish onto a sloping ledge. Cam belay at the top of the sloping ledge. Scramble up the back through a chute to exit onto the top of the main wall, or to the abseil anchor above Style Over Substance to climbers left.
The short thin line on the arete near the left end of the main wall. Finish at the main sloping ledge above.
Pete Steane, Sep 1995.
The pleasant hand crack just right of The Rhyme of the Ancient Mariner, finishing up to the right and onto the sloping ledge.
Doug Fife, Sep 1995.
Bold, sustained climbing up the incipient seam, culminating in a committing crux at the top! Boulder up the face right of the seam then move left to the crack at 4m.
Hamish Jackson, Jem Clemens, June 2025 (climbed on-sight, not as a head point!)
The twin cracks with some bridging in the middle. Good sustained climbing.
Steven Holdway, Stephanie Das, August 2025 (may have been done earlier but not recorded).
These next climbs finish on a good ledge system above the main wall. Rock anchors, trees or use abseil anchor to belay.
Superb. Up the crack and rib/flake just left of Jesus Without the Nails, with an engaging face climbing crux to reach the ledge. Finish up the left facing corner.
Doug Fife, Sep 1995 (named posthumously)
Pinch up the fin just left of TCFBS via 7 glued carrots and a thread. Easier if you use the flake on the left at the start.
Nick & Heather Hancock, Jun 2011.
The highest line on the wall. Jamming and layaways with a wide but easy finish.
Pete Steane, Jun 1995.
The line immediately right of Thank Christ for Bass Strait. Flared jamming to start. At the top, step left into Thank Christ for Bass Strait. Direct finish looks quite feasible.
Bob McMahon, Jun 1995.
Exciting trad climbing. Start at Blythe Star but find seam on left up to undercling flake, left through this (spicy but easing). Up flakes trending left at second horizontal (crux), to the top via more flakes and huecos (save a #1 for top horizontal). Double rack plus a couple extra 0.2-0.4 range and either long draws or double ropes as used on FA.
Hamish Jackson, Jem Clemens, Christoph Speer, June 2025 (flash, not head point FA)
A deep crack to start (better to use the face holds). Up the crack using a variety of face holds on offer.
Pete Steane, Sep 1995.
One of the better lines here. Up the flared crack with assistance from the enormous flake to the left, then blast through the headwall and up some more cool flakes and cracks to the top. Very well-protected despite appearances - take some micro-cams and medium sized wires. Tree belay.
Christoph Speer, Hamish Jackson, June 2025
Interesting and thought provoking climbing up the unique flake features. Protection is good in the horizontals along the way - a well-placed #3 camalot in the middle behind a flake provides adequate protection at the crux.
Hamish Jackson, Christoph Speer, June 2025
A short barnacle filled gutter separates the higher Main Wall from the smaller wall further right. Short, fun climbing at the grade. Belay from good trees on the rock ledge above.
Bridging up the open corner.
Shirley Zheng, Dave James, Tim Whelan, June 2025
Just right of Shirley's Route, nice jamming up the hand crack leads to a slightly loose finish.
Pete Steane, Jun 1995.
Corner crack, finishing through the roof. Pleasant.
Michael Jackson
Jamming and face climbing up the crack line, with a long move at the top. Hard for the grade.
Arnold Schwarzenegger
The punchy crack line at the right of the crag before the water.
FA - Jai Friend, 2024. FFA - Christoph Speer, Bonnie MacAdam, July 2025 (and sandbagged might I add!).
Canoe Bay Crag
A popular little crag only a short walk from the Fortescue Bay camp-ground, hosting the easiest climbing in the area. There are large wave-cut belay ledges facing the Hippolytes and Cape Hauy to bask-on, and it's a magic spot to climb & swim on hot summer days. There is still some loose and/or friable rock on some of the lines, but it has mostly departed now with traffic. The crag goes into shade in the afternoon, but pleasant climbing can be enjoyed year round. Routes listed with a ≈ symbol are best climbed when the tide/swell is low.
Access is from the Canoe Bay walking track (the same one that goes towards the Moai). From the car park, head North along the beach, then follow the track to Canoe Bay for ~15 minutes. The cliff is split into two by a gulch, so is divided into a South and North cliff, each with a separate access. Please take great care of the vegetation and practice minimal impact on your visit.
South Cliff
The South Cliff gets more sun than the North Cliff and has a nice big amphitheatre of rock to bask on. Just before you hit the very top of the hill, approx. 100m before the highest point, cut-off down on the obvious track to your right passing a large fallen tree lower down. Continue through the bush down to the waters edge. Rock-hop around the water-line towards Canoe Bay and you will come to the southern crag.
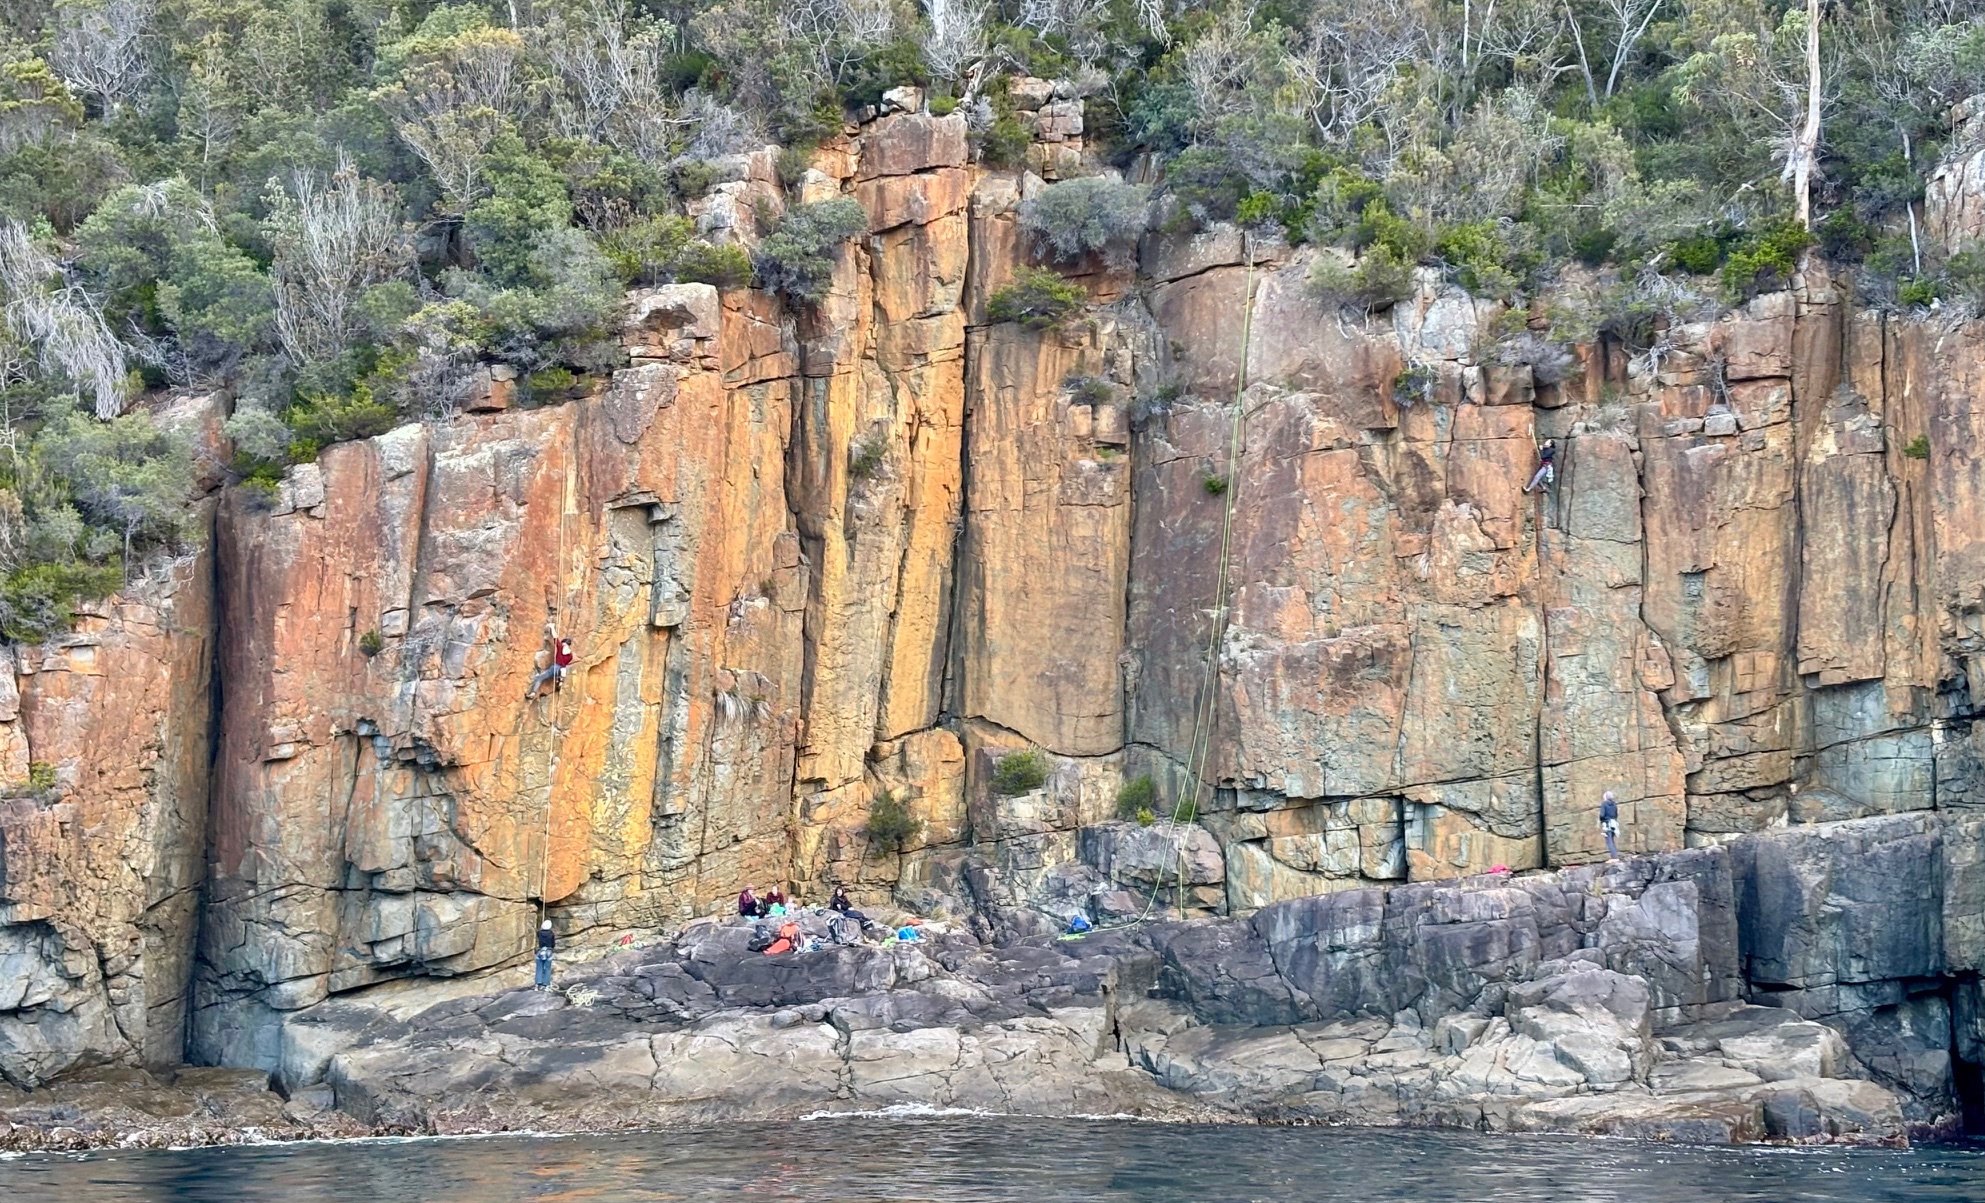
Canoe Bay - South Cliff
- 106.The Jolly Roger15
- 107.Piracy14
- ★108.The Kraken18
- ★109.Davey Jones’ Locker18
- ★110.Parlay18
- 111.Sea Legs19
- ★★112.Rum on the Rocks23
- ★★113.The Peg Leg20
- ★114.Phishing19
- ★115.The Sirens Call16
- 116.Three Sheets to the Wind19
- 117.Treasure Chest18
- 118.Blistering Barnacles15
- 119.Abandon Ship17
- 120.Peppercorn Crack19
- 121.Pillage & Plunder17
Up the twin cracks in the first little alcove on the left, just before you approach the main crag near the waterline. Belay on shrubs and walk-off left through the scrub (crux).
Christoph Speer, Rach Chong, Nov 2022
These climbs start from the little alcove.
Pleasant face climbing on big holds. Start in the middle of the wall and trend left and up the groove past some cam pockets to the arete, then move back right and up following the diagonal crack.
Roger Parkyn, Christoph Speer, Oct 2022
Jug hauling. A good easier route or warm-up.
Christoph Speer, Daniel Peacock, May 2024
Jam up the steep hand crack to the bush, then make an exciting step across the groove to finish up the final few metres of Davey Jones’ Locker. Take a #4.
It is possible to bail left before the traverse at easy grade 17, but the traverse is not to be missed.
Christoph Speer, Cameron Semple, Roger Parkyn, Oct 2022
The watery grave. Chimney, stem and jam up the line.
Zack Lazatin, Jemma Herbert, Nov 2022
Good arete and wall climbing. Start in the middle of the face below the undercut and head directly up past the flake and arete on its left side.
Christoph Speer, Roger Parkyn, Nov 2022
The next climbs start from the large rock amphitheatre.
Thoughtful climbing up the open corner. Small / medium wires and cams with a single U in the middle provide good protection to the top.
Christoph Speer, Roger Parkyn, Nov 2022
The well-chalked, overhanging finger crack. Up the line, moving right to the flake halfway. Cross back left and climb the face past a U to finish up the corner (save a BD #0.5). The crack goes direct at 24 if you don't use the flake.
Christoph Speer, Roger Parkyn, Cameron Semple, Nov 2022
Steep. Up the crack with help from the arete to the small roof. Pull left under this and traverse across the featured face, and finish as for Rum on the Rocks. Save a BD #1 for the traverse and #0.5 for the top corner.
Christoph Speer, Roger Parkyn, Cameron Semple, Oct 2022
The slabby wall left of The Sirens Call. Follow the left-hand edge of the flake to some balancy moves reaching a jug pocket, then head left and up across slab until you can move back right to gain good holds to finish.
Christoph Speer, Jai Friend, Oct 2022
Pleasant jamming up the eye-catching crack. The leaning block is keyed-in but take care. A BD#4 for the top is useful.
Christoph Speer, Jai Friend, Oct 2022
Not bad. Crank through the roof (crux) and up the face to the ledge. Then follow the thoughtful arete to finish on its left side and mantle delicately to finish. Use a locker on the first U.
Christoph Speer, Roger Parkyn, Nov 2022
Sustained climbing up the unusual pocketed face, with some balancy moves at the very top. Has some average rock in places, but actually climbs quite well.
Christoph Speer, Roger Parkyn, Nov 2022
Well-protected climbing up the highly featured face and crack.
Christoph Speer, Jai Friend, Oct 2022
Up the blocky crack/face, plug some gear in the horizontal at 2/3rds height, then abandon ship and do a memorable traverse left (crux) to finish up Blistering Barnacles.
Christoph Speer, Zack Lazatin, Nov 2022
Nice climbing, but the crack is a bit gravelly. Up the LH wall to enter the bottomless hand-crack, then steep laybacking and jamming to the top.
Christoph Speer, Roger Parkyn, Oct 2022
Sustained bridging and finger jamming up the wide-angle corner. The spike is keyed-in but take care.
Christoph Speer, Roger Parkyn, Oct 2022
North Cliff
Towards the bottom of the hill coming into Canoe Bay, cut right down to the waterline through the bush and traverse the shore towards the South, heading away from Canoe Bay. There's a careful sea-level rock hop required at the last section to get to the crag. If the tide/swell comes up during your visit, it's possible to escape back to the track by climbing a grade 6 exit scramble right of 'Bogans in Boats', then walking shortly through the scrub back to the track.
Alternatively look out for a cairn (2026) ~1 min below the high point on the Canoe Bay track. This leads down on a faint route to the DBB above Anchovy Arete and an 18m rap. Useful if the sea is high and the lower access is not possible.
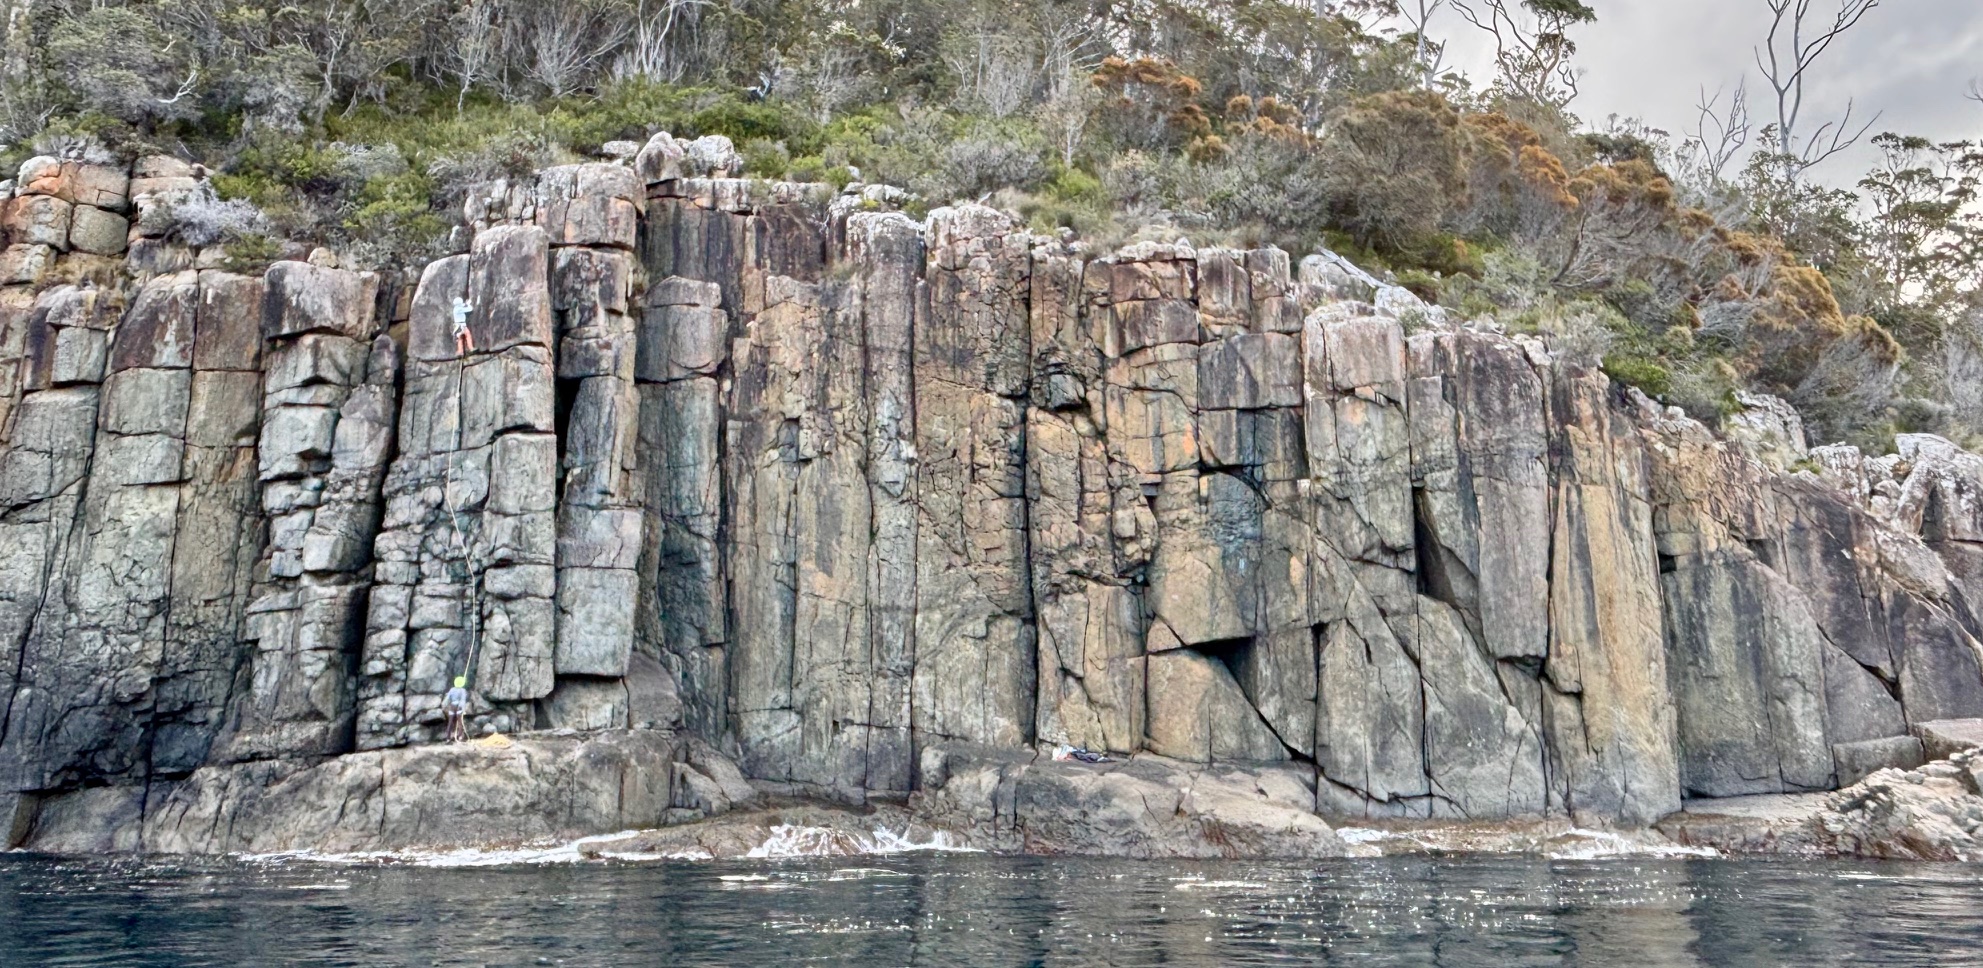
Canoe Bay - North Cliff
- 122.My Son Niko17
- ★123.Just Right17
- 124.Just Because8
- ★125.Smooth Sailing15
- ★126.The Bow17
- 127.Maiden Voyage13
- 128.Coco Pops10
- 129.Bridge Over Troubled Water14
- ★130.Zodiac20
- ★131.Lost Bounty18
- ★132.Swallowing Tommys Nuts17
- ★133.Changeling19
- 134.Pissing in my Kayak16
- 135.Misadventures at Sea16
- ★136.Lucky Charms22
- ★137.Delicious Fish19
- ★139.Salt Flakes16
- 140.Captain Crunch16
- 141.Seafood Extender21
- ★142.Anchovy Arete18
- 143.Chips Ahoy20
- ★144.Piña Colada Perfection19
- ★145.Rinse, Repeat17
- ★146.Mussel Memory25
- 147.Highball Boulder Problem24?
- 148.French Canadian Canoe Corner14
- 149.Bogans in Boats13
The next three climbs start off the far left of the crag right above the water. Easy to build an anchor for the belayer with small/medium wires and cams.
Companion route to Just Right. Up through the bulge as for Just Right, then traverse left across the wall following the line of holds into the next crack line. Follow this to the top and step right to the anchor.
Christoph Speer, Jai Friend, June 2023
Memorable climbing above the water. Starting on the far left of the crag where the ledges peter out, belay in a small undercut (medium wires) and bridge straight-up through the intimidating bulge to enter the engaging crack to the top and anchor. Some thoughtful moves over the block at half-height.
Fraser L-R, Christoph Speer, Dec 2022
Halfway between Just Right and Smooth Sailing is a thin crack. Up this and the proceeding juggy staircase above which ends on a small pillar. Step right above the void and belay/abseil from the anchor on smooth sailing. Quite a good ramble.
Amps, Christoph Speer, Jan 2024
These next climbs are located on a nice belay platform at the obvious arete (The Bow)
A nice climb at the grade. Just left of the arete, start-up the corner / hand-crack on good holds, then traverse left into the crack and follow this to the top. There is a good variant to the left at grade 14 which goes up the face at the start, meeting the upper crack above.
Christoph Speer, Gina Sorensen, Dec 2022
Insecure, thought-provoking climbing with some great positions. Climb up the arete on its RHS to the top. A range of cams, long slings and two Us provide good protection.
Christoph Speer, Liam Mangan-Smith, Jan 2023
Good fun. A 3D subterranean experience climbing through the crack-line and deep chimney, just right of the pointy blocky arete. Belay at top on ledge and abseil-off using the Smooth Sailing anchor.
Alex Lawson, Christoph Speer, Nov 2022
The wide corner/chimney left of Bridge Over Troubled Water.
Fraser L-R (solo), Jan 2023
The next four climbs are the tallest at the crag - drop down the ledge from near Changeling to access.
Good for the grade. Jamming and bridging between the wide corner and finger crack which can become a little grunty if good footwork isn't employed. Traverse right across the ledge at top to belay from the anchor and abseil-off.
Christoph Speer, Fraser L-R, Dec 2022
Layback the shallow groove to a rest, then follow the crack to a small rooflet. Blast through this onto the juggy face (two Us) to finish on the ledge. Protection in the groove is good albeit a bit intricate. Take wires and plenty of finger sized cams. Abseil-off from Lost Bounty.
Christoph Speer, Jai Friend, Nov 2022
Crank up the sustained face and cracks to a stance, then continue up the absorbing and steepening thin crack line to the top.
Christoph Speer, Alex Lawson, Nov 2022
Quality finger and hand jamming. Step right to anchor.
Henk Morgans, Jayd Blunden, Dale Cokley, Thomas Cramer, Jan 2016
These next climbs start from the pleasant sloping ledge.
Juggy and sustained face climbing featuring some bizarre huecos. Layback the flakes (crux) to a stance, then follow the intermittent cracks to finish up the steep face to the top. Take small / medium wires and finger sized cams for the middle.
Hamish Jackson, Christoph Speer, Nov 2022
Nice bridging and face climbing up the featured open corner and crack-line, stepping left to lower-off at the top. Take care with the rock quality at the top - would get a star if cleaned!
Jayd Blunden, Thomas Cramer, Dale Cokley, Henk Morgans, Jan 2016
Nice climbing up the featured crack / face on interesting water-washed rock. Walk-off right and abseil from the top of Buffet Buttress. Originally started from the corner to the right, but better if climbed direct. Take care with the rock quality at the top - would get a star if cleaned!
Henk Morgans, Jayd Blunden, Dale Cokley, Thomas Cramer, Jan 2016.
Feeling lucky? Pleasant climbing up the well-protected crack-line and flakes leads to a steep and challenging headwall. The crux at the top is protected with a U, and is climbed direct.
Fraser L-R, Christoph Speer, Jan 2023
Technical and hard for the grade. Climb to the horizontal break from the left, with tenuous moves leading past the two Us just left of the arete (crux). Continue up the finger crack and finish right.
Christoph Speer, Fraser L-R, Jan 2023
The original start to the finger crack on Delicious Fish. Climb Salt Flakes to the first rooflet, then traverse left to the finger crack and finish up this, as for Delicious Fish.
Christoph Speer, Jai Friend, Nov 2022
Great climbing up the flakes and cracks, with a neat finish. Well-protected and a good lead for those at the grade.
Hamish Jackson, Christoph Speer, Nov 2022
Good climbing up the corner just right of Salt Flakes. Adequately protected, but requires some thought at the crux (rooflet). Step left at top to finish as for Salt Flakes.
Fraser L-R, Christoph Speer, Dec 2022
The next few climbs finish on a pleasant rock ledge at the top of the buttress. There is a DBB set-back from the cliff edge to belay and abseil from. This buttress is swell and tide affected - climb at low tide with a low swell.
The fingery direct start to Anchovy Arete, climbing the stepped crack below the ramp. A bold start. First piece goes in at 3m.
Fraser L-R, Christoph Speer, Dec 2022
A small climb that’s big on flavour. Start up the handcrack, then move up the interesting left-trending diagonal crack system until you can climb the face and arete above. Gear is a bit sparse just after the traverse until you reach the crack.
Christoph Speer, Fraser L-R, Dec 2022
Up the crack and into the compartment, then make your escape through the awkward v-groove chimney. Jam through the roof and finish up the crack to the top.
Fraser L-R, Christoph Speer, Dec 2022
Up the easy face and crack trending left into the undercut. Step right into the crack-line on the face and layback and finger jam your way up with good protection.
1 part white rum, 2 parts pineapple juice, 1 part coconut cream (half sugar / half coconut milk) - add ice, blend & serve.
Christoph Speer, Fraser L-R, Dec 2022
Lovely. The perfect, water-washed hand-crack with a face climbing crux at the top.
Christoph Speer, Jai Friend, Nov 2022
These climbs are the first you'll come to as you scramble around to the crag from the North.
The thin, sustained, technical, fun (but slightly contrived) arete up the black streak. Keep out of FCCC. Will shred fingers.
Fraser L-R, Jan 2023
The thin crack.
The obvious corner crack. Awkward jamming and bridging up the inward flaring crack-line. Hexes or large nuts are useful.
Christoph Speer, Fraser L-R, Dec 2022
Pretty damn worthless. Next small corner right of FCCC. Hand jam up the corner crack to the ledge, then finish up the finger crack. Trad belay and walk-off.
Christoph Speer, Lachlan Mckenzie, Feb 2021
The deep and dark chimney on your right just before the rock-hop to the main crag. Climb the chimney and exit via the hole in the top between the huge boulder. Easily protected.
Fraser L-R (solo), Jan 2023
There are some boulder problems at the start of the approach to the crag (about 4-5m high) that may be worthwhile.
Bivouac Bay Crag
A nice crag with a good selection of routes on water-washed stone. The crag is just over an hours walk from the Fortescue Bay campground, a 15 minute walk away from the Bivouac Bay campsite, or a 15 minute kayak from the boat ramp. The crag faces South and doesn’t get much sun, so it’s perfect for warm days.
Access is relatively simple, and best approached by kayak. There are good landing locations right next to the crag if the swell is low, which it usually is. This approach makes for a great day out.
If walking; at the small bay just South of Bivouac Bay proper, two meters past the small rocky bridge, cut from the track and head easily down the small gully/dry creek bed to a stony beach. Walk Southwest (towards Canoe Bay) along the shoreline for around 5 minutes until you see a small cairn at the tree line. Start heading uphill past this and follow your nose through the open scrub until it leads to an obvious descent gully. Down this and walk to the right (facing the sea) to the main cliff. Take care of tiger snakes in summer.
Please take great care of the vegetation and practice minimal impact on your visit. Be wary of how you store your food. The resident raven knows how to open zips, and has a penchant for power bars.
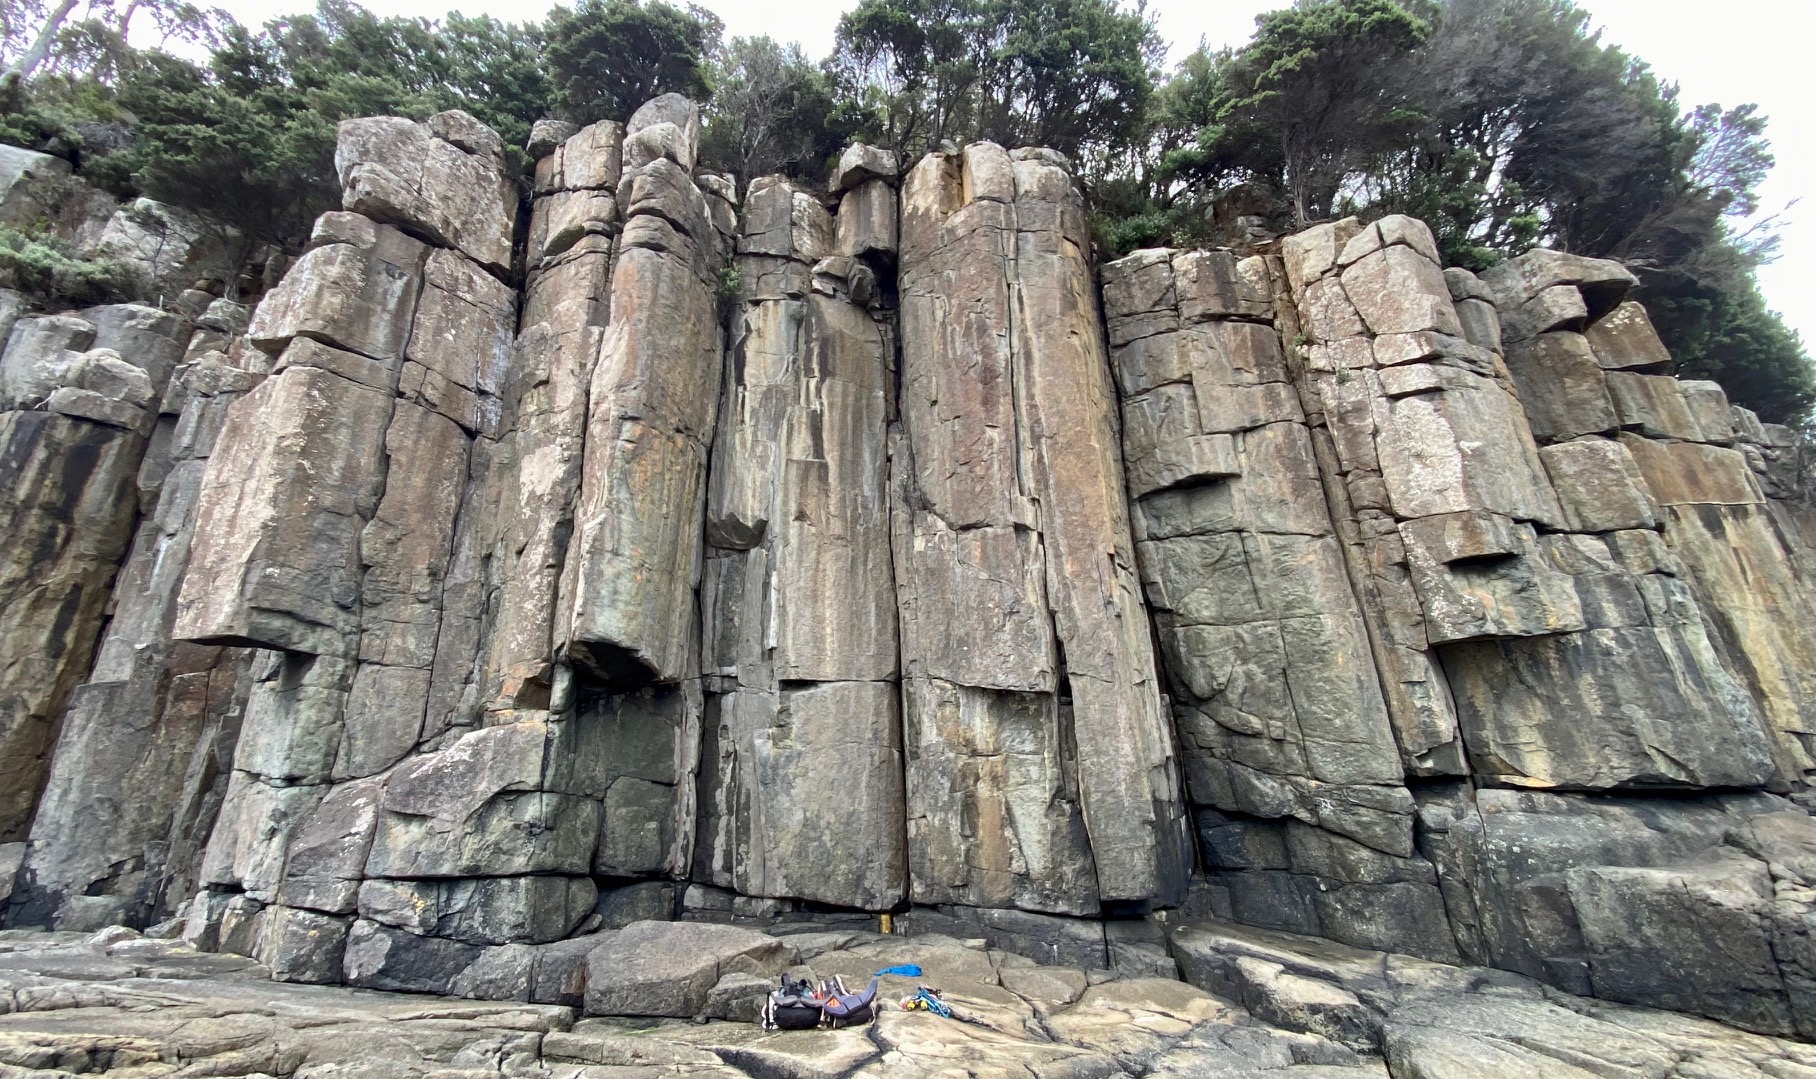
Bivouac Bay Crag
Need extra adventure? At the very far left of the crag, further on from the main lines is a prominent arete. The left side hides a perfect hand crack. When scramble/traversing to the base of the climb, a #2 cam will help if roping up when crossing the small inlet. When you get to the base of the arete climb 4m to a comfortable belay platform at the base of the climb. Peek left to start up the hand crack. Traverse right at the cave to a good belay ledge. Descend via tree abseil.
Langy and Christoph, October 2025
Not sure how the developers of the crag missed this soaring line. The easy angled corner to the L of don’t take my baby. Veer R at top to belay/rap from tree
Carl Hansen, Matt Miller, December 2024
Nice climbing up the box groove, with a convenient tree to rap-off at the top.
Chris Lang, Alex Doyle, March 2024
It's definitely cake! Take the committing line through the left of the enormous roof to the face crack and face to the top. Rap off a tree near the top. Somewhat spicy (but safe) topout if going to the true summit, or bail left to the tree early to skip it.
Micro cams (.1 and .2) and a small (yellow) offset nut or cam recommended.
Chris Lang, Alex Doyle, March 2024
The striking flake / off-width. Jam, layback and struggle up the prominent line to a lower-off. Take a couple #4 and #5 cams. Quite unique, and not bad for this sort of thing. Make sure to extend your cams with slings to prevent a rope-cutting incident.
Christoph Speer, Martin Brown, Chris Lang, March 2024
The crack/groove just right of the flake, traversing left to the anchor at the top.
Chris Lang, Alex Doyle, March 2024
Mixed route with good moves and great pro. Start underneath the roof, into the crack on the left of arete. Step right onto the arete when possible, where three camo U's guide you to the anchors. It's possible to start 5m up using the ramp but why would you?
Chris Lang, Áine Nicholson, March 2026
Very entertaining climbing. Steep jamming with a neat bulge a half height. Take a #4.
Christoph Speer, Martin Brown, Chris Lang, Alex Doyle, March 2024
The thin face between the Illusion Delusion and Blank Canvas has been top roped, and considered too close to the cracks for consideration as a separate route.
The appealing hand crack in the groove.
Chris Lang, Christoph Speer, February 2024
The very attractive clean crack in the centre of the buttress. Heartbreaker at the top.
Christoph Speer, Martin Brown & Chris Lang, March 2024
Superb technical climbing up the arete.
Chris Lang, Christoph Speer & Martin Brown, March 2024
The corner crack. Take the left crack and step across to the main line (19) or go direct (18).
Chris Lang (left variant), Christoph Speer (direct), February 2024
Consistent, powerful climbing up the middle of the face and through the small roof.
Chris Lang, Martin Brown, Alex Doyle, Christoph Speer, March 2024
Awkward then pleasant hand jamming up the groove crack to the top. Variant start to the right through the roof at grade 18.
Chris Lang & Christoph Speer, February 2024
About 25m from the descent gully towards the main cliff, is a nice looking finger crack - about 5m left of a stepped left facing corner. Up the engaging crack, with a tree to abseil from at the top.
Christoph and Langy, October 2025
Cape Nola
Cape Nola has a range of attractions, most notably The Moai - perhaps the most achievable of the three spires. You can either walk-in to do your chosen route(s) in a day from the car park, or as a more relaxed trip by camping at the Bivouac Bay camp-site. There is good water access and a toilet here, along with tent platforms.
- The Moai is ~10 minutes’ walk away from the camp-site.
- The Golden Pillar a further 10 minutes from this.
- The Bivouac Bay crag is about a 15 minute walk away from camp.
Cape Nola Main Wall
Approximately 100m south of the Moai (towards Cape Huay) is an amphitheatre of cliffs up to 70m high. A handful of trad and mixed routes have been done here, most of which finish well below the top where the rock quality deteriorates drastically. The rock on the established routes is generally good, with weathered cracks, underclings and pockets. Unfortunately there are many areas of atrocious rock, especially in the top 15m, dictating that most routes are single pitches finishing at bolted rap anchors. There is a good ledge under the entire cliff, 5m+ above the ocean and the cliff gets morning sun. The Moai is an easy scramble north from the base of the cliffs and can be combined into a fun day out. A standard double rack of cams and wires is generally sufficient, although the longer pitches take lots of gear if you want it.
Access:
Rap in as for the Moai and scramble south along the shore for 100m. Climb out via the Moai escape route.
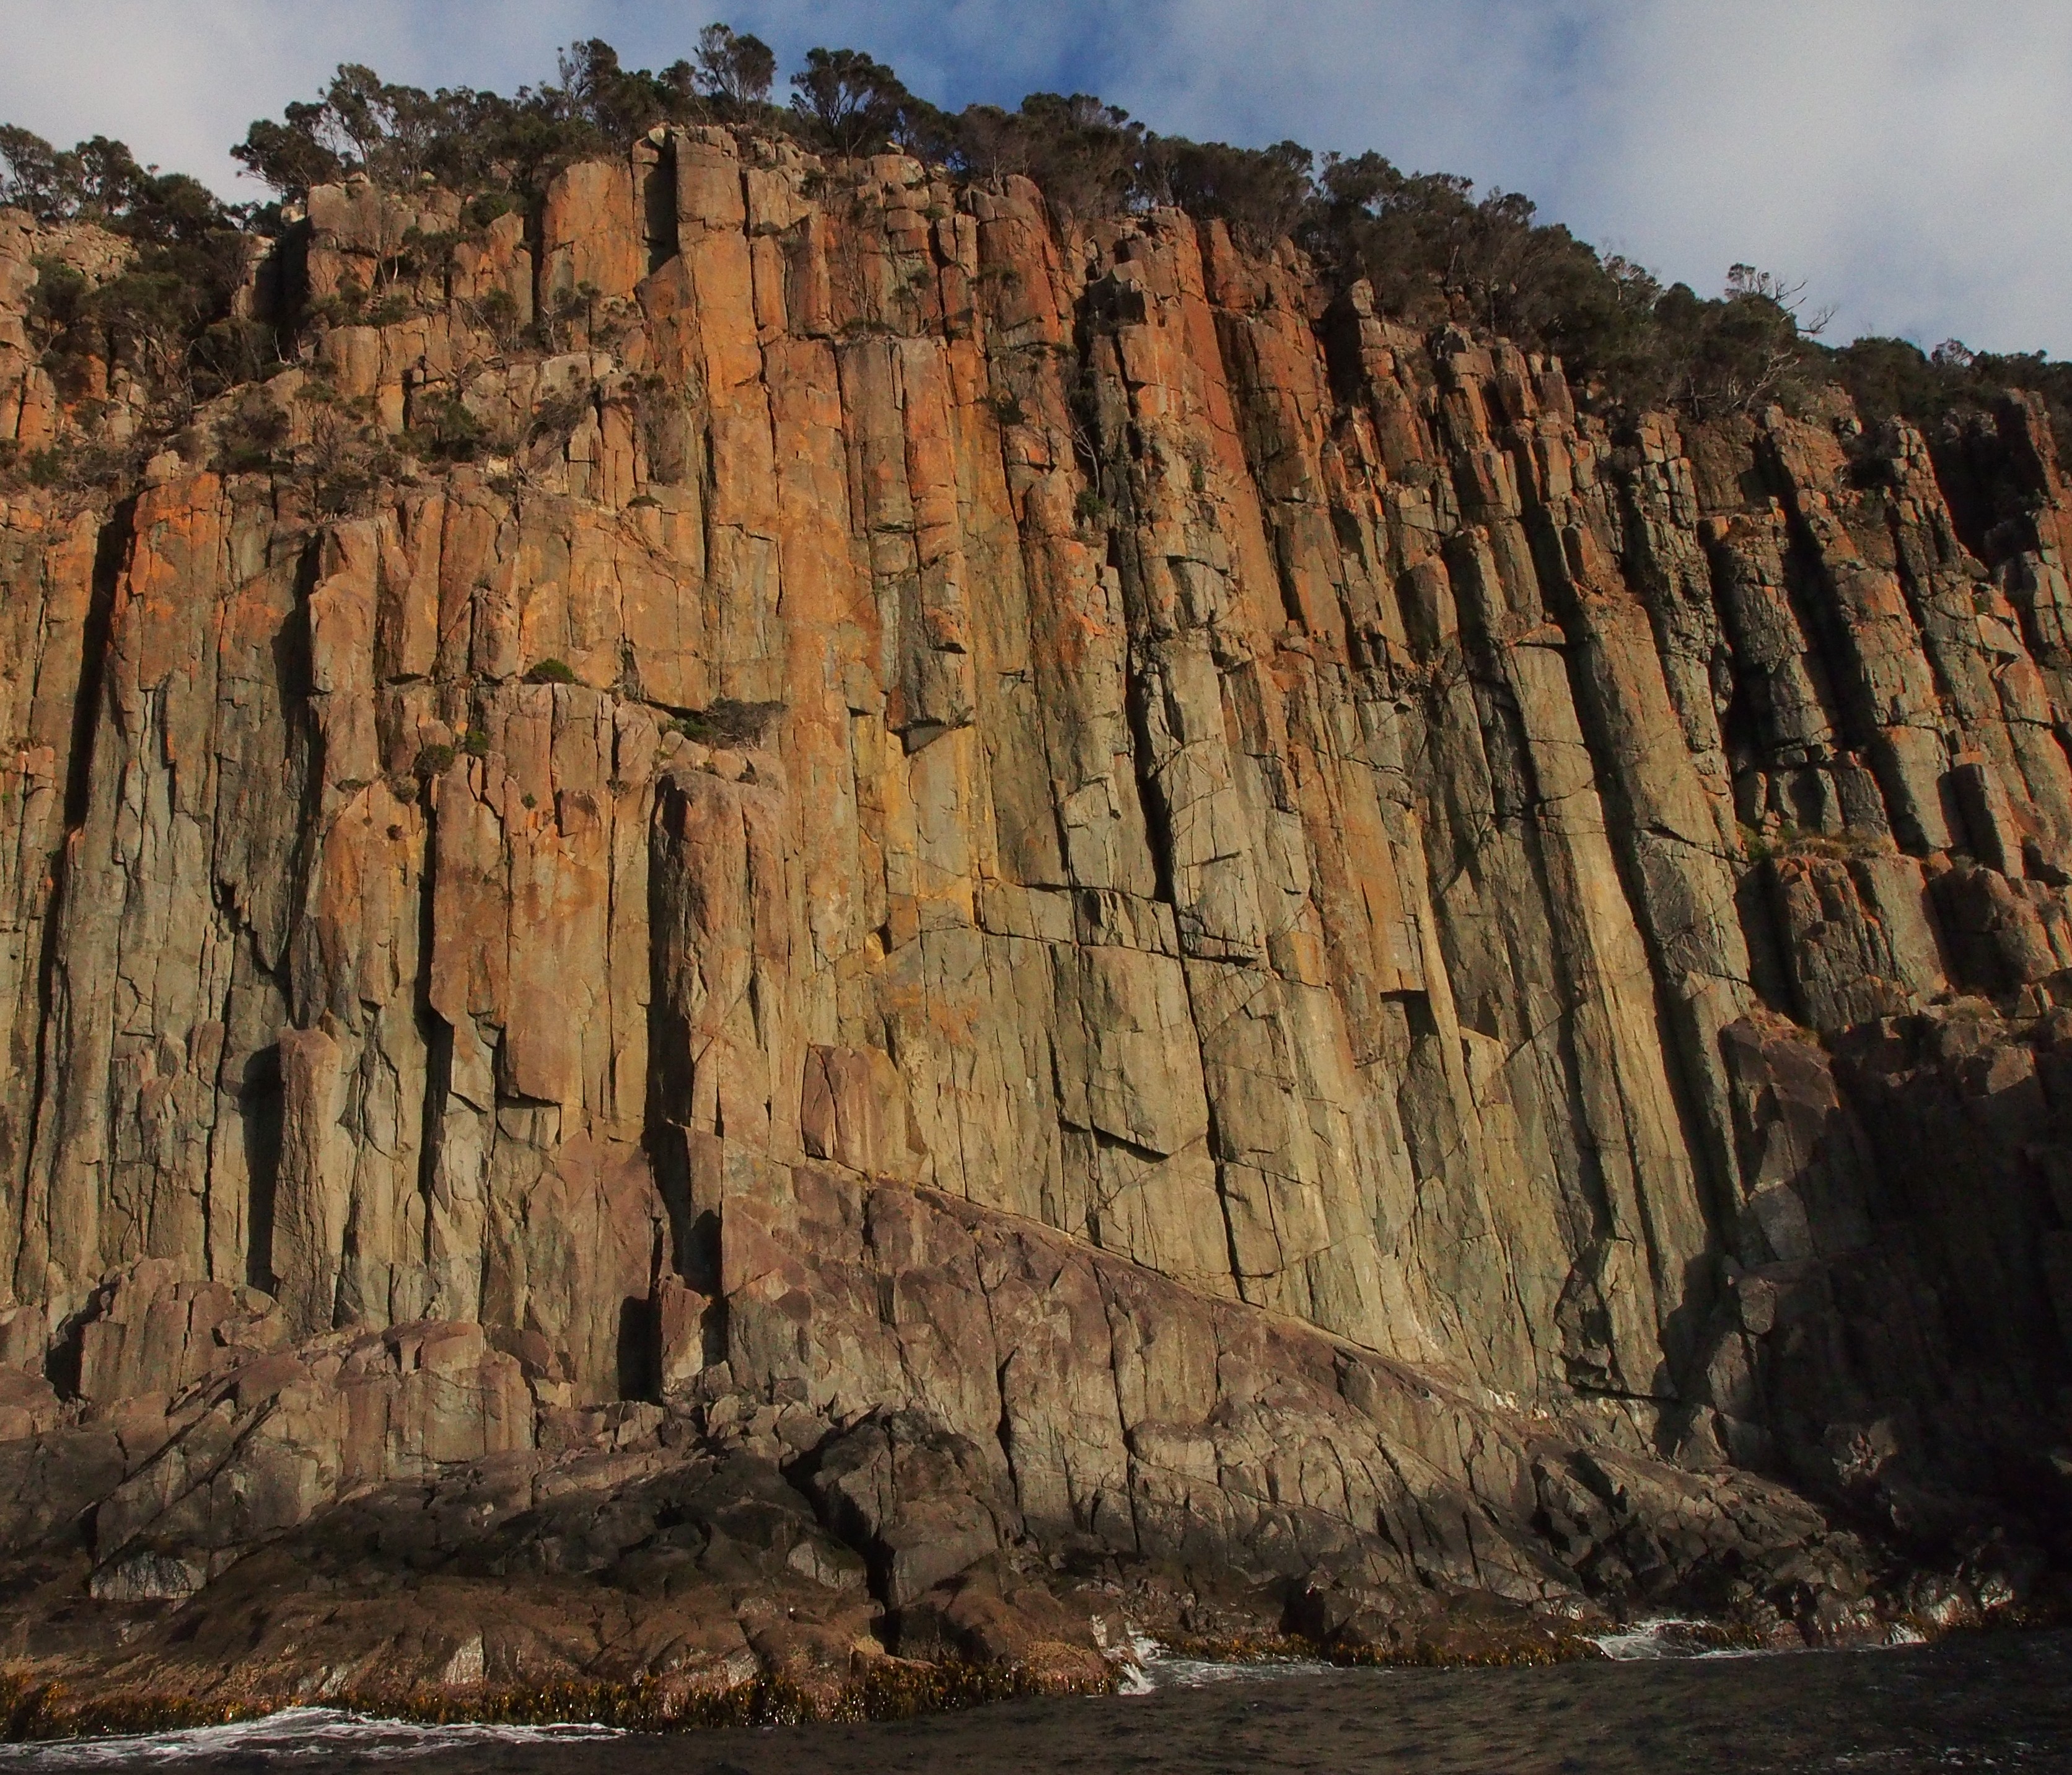
The first routes are located on a steep, clean wall at the far LH end of the cliffline before it becomes a series of broken ledges. Scramble around the base of the short buttress at the LH end of the main cliff (Ratsak) to access another platform beneath some obvious cracks.
Excellent jamming up the left hand crackline past a tricky bulge, finishing up the left trending finger crack to DBB. Highly recommended.
P. Eberhard & T. Fulton, Dec 2024
The next crackline R is another excellent excursion. Strong jamming with good rests leads to a difficult finger crack. Step right at the top to DBB.
P. Eberhard & T. Fulton, Dec 2024
A must do for the area. About 10m R again is a short offwidth leading to steep R facing corner and square rooflet. Climb the crack and corner to the roof. Pull around the roof on the R and into the groove with a FH. Up with difficulty until the thin crack on the left is reached. DBB.
P. Eberhard & T. Fulton, Dec 2024
20m further R is a scooped crackline on the front of the short buttress you scrambled around to access the previous routes.
Interesting crack climbing up the scooped line with a hard move gaining the slab at the top. DBB.
P. Eberhard & T. Fulton, Dec 2024
Thrutch up the sandy offwidth to a rest at the flake. Continue up the lovely twin cracks and exit left onto the slab. DBB as for Ratsak.
Eberhard, Riaz & Fulton, Jul 2020
The next routes start at the LH end of the main cliffline.
Climb the twin cracks past some ledges until faced with a hard move to gain the broken ledge. DBB.
Riaz, Jamson & Fulton, Jul 2020
Follow the crack up the shallow R facing corner to a tricky finish. DBB as for the previous route at the ledge below the big roof. Beware of the loose blocks at the belay ledge.
T. Fulton & R. Jamson, Jun 2020
Garn Cooper, Feb 1995.
Steep finger crack right of GHC to DBB at the ledge.
P. Eberhard & J. Riaz, Jul 2020
The wide crack about 10m R of Garn's Horror Climb passing through the R side of a roof then climb straight up the crack to the ledge.
S. Edwards, Feb 1995
Blank face with 3 FH leading to a roof and crackline. P. Eberhard
The LH line passing the huge square roof with a FH in the corner below the roof. Two pitches. P. Eberhard, T. Fulton
The next few routes are on the shorter south facing buttress at the RH end of the cliffline.
Start up the right leaning slab to a ledge. Climb the layback flake and fist crack above to DBB.
P. Eberhard & T. Fulton, Jul 2020
Vicious little finger crack in the smooth wall right of Cut the Mustard. Take small wires for the slab above.
T. Fulton, Jul 2020. FFA: P. Eberhard & E. Simpson, Nov 2024
A worthwhile introduction to jamming. Large cams are useful. Walk off.
T. Fulton & P. Eberhard, Jan, 2021
Next crack line R. Some thin moves to start, then lovely jamming to the top.
P. Eberhard & T. Fulton, Jan 2021
The Moai
The Moai completes the trilogy. No aid, no swim, just quality routes - uncompromisingly modern in style - in a wild and scenic location. The Moai is a lone column of dolerite beside the sea, north of Fortescue Bay. Amidst the walls of rock along the coastline it stands apart, resting upon an altar formed by a rock platform, like a discontinuity in the time-space continuum. Its spiritual significance is obvious. Rock is not simply the medium for the sport, as only climbers know, the rock is sacred and the Moai is a shrine to the Rock Gods - a place of worship. (Editor's note: Moai is the name of the monoliths on Easter Island, pronounced "mow"-"eye")
To get to the Moai, walk along the beach from Fortescue Bay and onto the track to Waterfall Bay. About 1 hour 30 minutes of walking takes you to Bivouac Bay (good camp site with toilet). From Bivouac Bay, continue along the track for about 10 minutes until the crest of the spur is reached; there are two sawn stumps (approx. 40cm diameter) on the track here. Another 20m (approximately) along the track a small cairn marks the route to the abseils. Additional cairns and faded yellow (i.e. white) tape marks the route. Finally, climb around a large boulder to reach the abseil anchors (a U and a chain-link about 100m from the track). The first abseil is 15m (grade 16 if you want to climb back out). There are then two more of similar height off trees (these two can be done together as a 50m abseil and are about grade 12 if you're climbing out). Alternatively, a 60m rope fixed from the top anchors will just reach the bottom. From the bottom of the abseils it is relatively straightforward to scramble down to the rock platform. At most times, the rock platform is unthreatened by waves, but in certain heavier swell conditions waves do occasionally sweep across. Take care if the sea is rough, especially on the scramble to the platform.
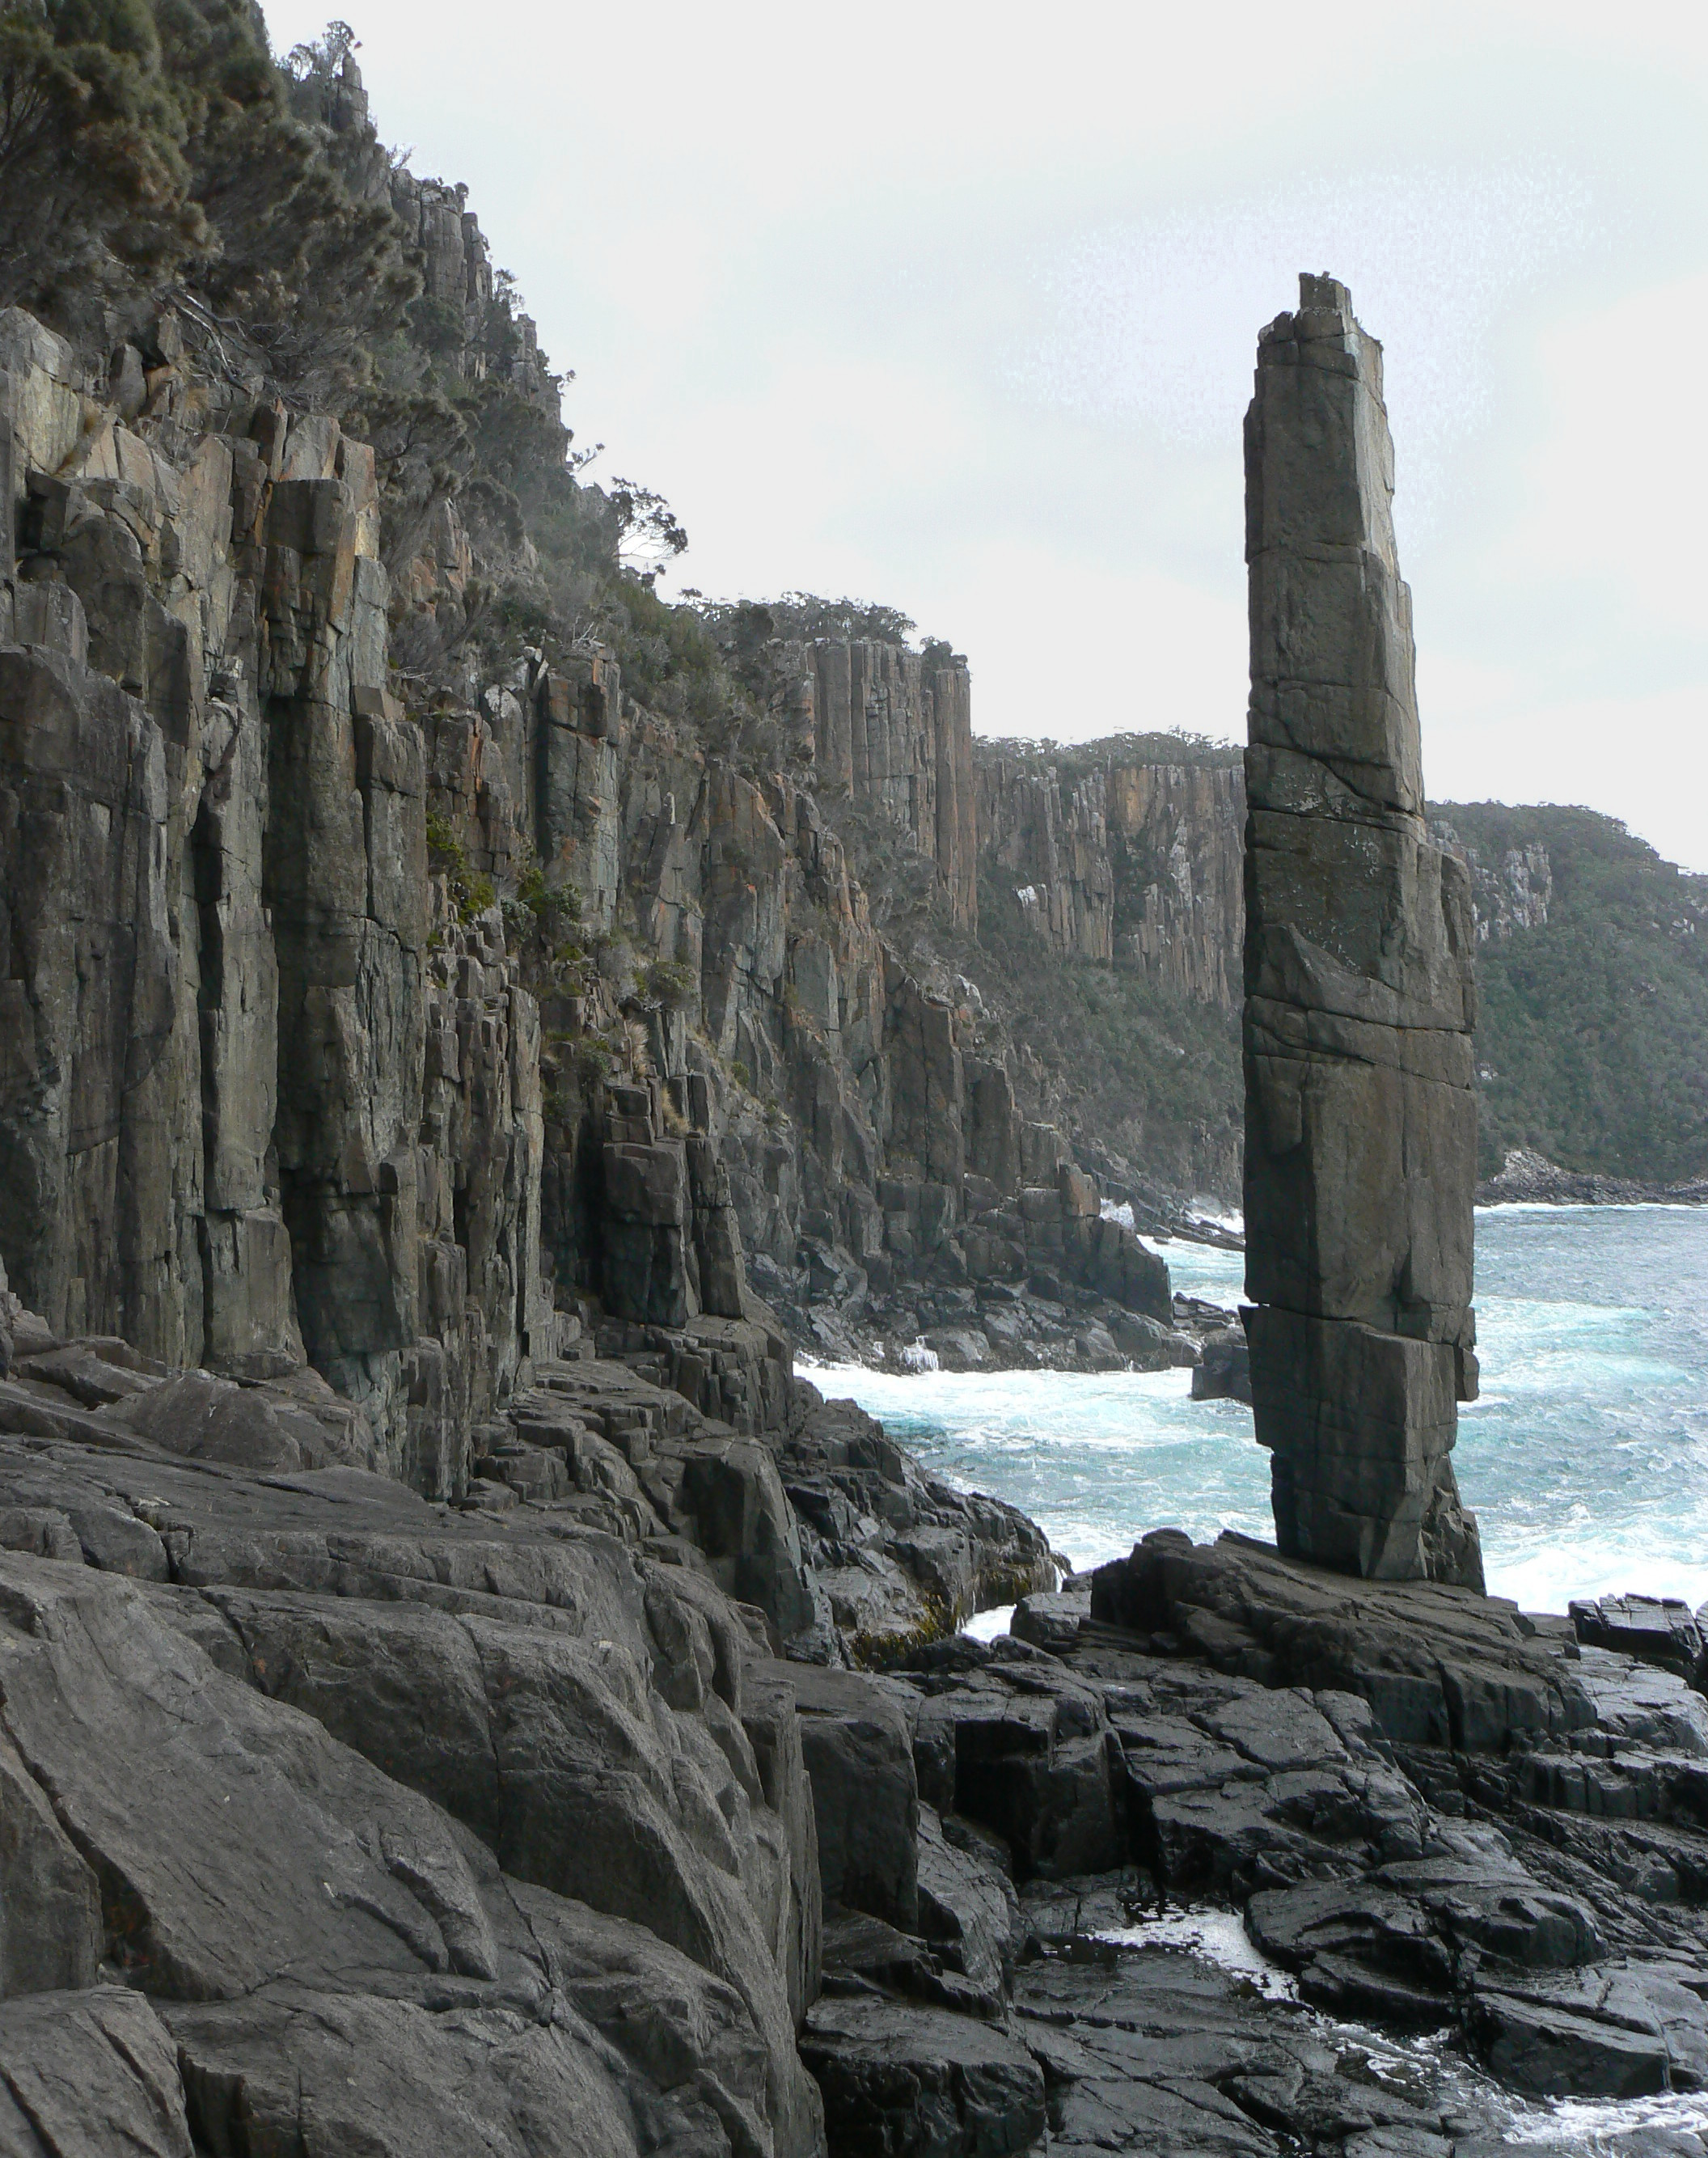
The Moai
Start in the short chimney (at the left-most part of the base that has easy access). Steep but juggy climbing leads to the belay ledge (rap anchors). Good natural gear.
Stephan Eberhard, Oct 1994.
Widely regarded as a classic of Tasmania for this grade. Two U's lead towards a flake: go either directly to the flake or go left up and back right to it. There are then cracks to a ledge half way up the Moai; well protected with mid-sized cams. This ledge is where Burning Spear finishes; anchors here allow this first half to be done as a grade 21. Of course you may as well continue up the arete above and give it a go. There's a sting in the tail - hint: go very slightly left of the second-to-last U.
Historical note:
The second half of this route was originally named "Burning Spear pitch 2" however the style is much more consistent climbed as described, which is what most people do, so the name was changed accordingly.
Roger Parkyn, Dec 1994.
R.Parkyn, G.Phillips, Sep 1994.
R.Eberhard, R.Parkyn, Aug 1994.
Moai Mainland Wall
On the cliff facing the Moai (i.e. part of the mainland) there are several pleasant routes. To get to them scramble down past the small cave at water level and up onto the ledges above. The first three routes all start from the same ledge (looks slopey from the Moai). There is a rap anchor above Thunderstruck.
Finger crack in the middle of the face. Starts at sea level. Great climbing up a lovely line. Gear from .2 to 1 camolot.
Rap anchors at the top.
Kim Laddigies and Garry Phillips Jan 2019
The continuous finger crack.
Sam Edwards, Oct 1994.
The hand crack two metres R of The Firing Line. There is a rectangular block that sticks out near the top.
Sam Edwards, Oct 1994.
The zig-zag (thunder-bolt) crack about 20m R of Mr Whippy. A quality route with rap anchors at the top.
Garry Phillips, Oct 1994.
The twin cracks in a short chimney two metres R of The Hands of Chaos.
J.Morgan, Oct 1994.
The Golden Pillar
Located about 10 minutes’ walk further along the track from the Moai turn-off is a large orange arete (GPS code FTS010), visible from the track at the first lookout you come to. This is a big, exposed cliff, and starting your route at the lonely ledges below is cathartic. For the full experience - pull your ropes! But don't underestimate the serious nature of climbing here, walking out from the base would be a real PITA. Although the routes to date have been extensively cleaned, The Golden Pillar is known for having much friable and loose rock. Potential routes to the right of the Golden Pillar have been investigated, but the rock quality starts to deteriorate significantly, reminiscent of a box of cornflakes.
The Pillar is located only a few metres from the track. Use the abseil anchors at the top of the cliff for getting down to the routes - check the individual route descriptions for details.
Be wary of how you store your food. The resident raven knows how to open zips, and has a penchant for power bars.
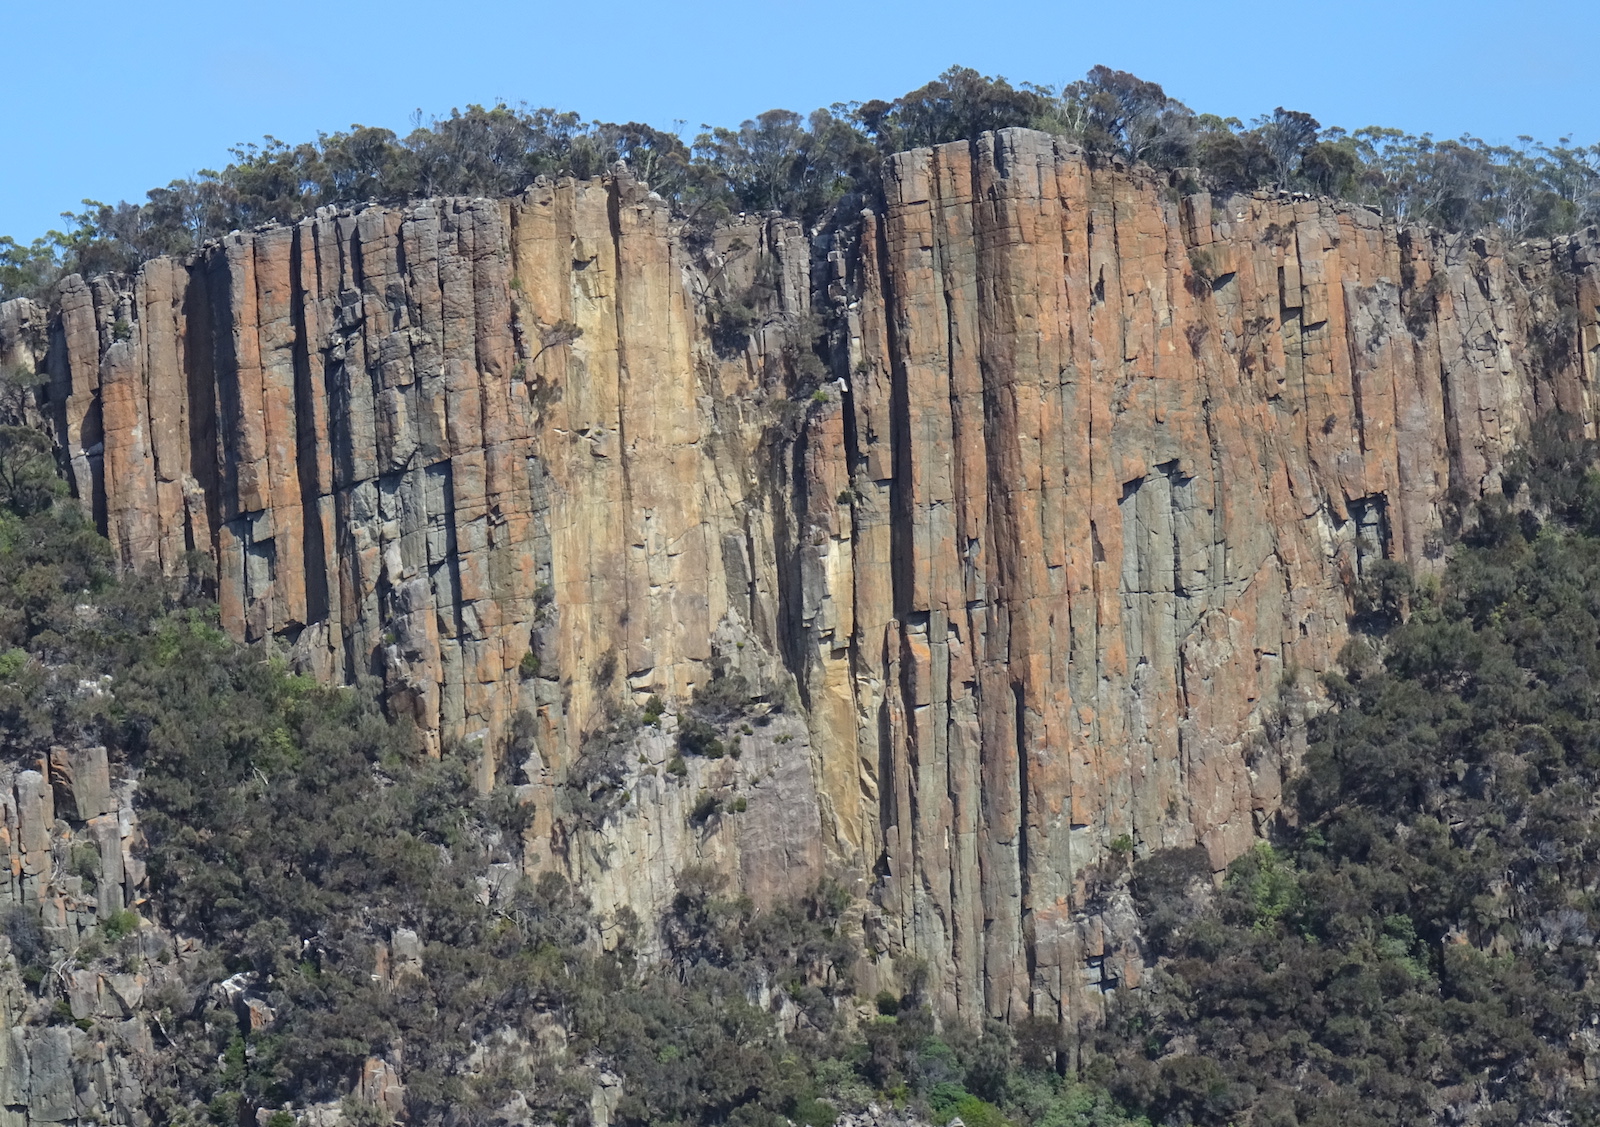
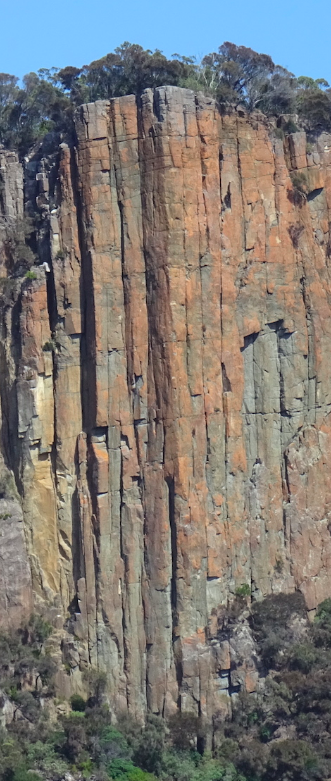
Golden Pillar Area
Great climbing straight up the face in a very exposed position. There are two cruxes. Take 11 quickdraws + anchor material.
Abseil 25m from the DBB near the arete, to a small ledge with DBB.
Chris Lang, Christoph Speer, Jan 2024
An incredible pitch. Abseil 30m from the DBB at the start of ‘The Secret Ingredient…’ to another DBB below a roof on a sloping ledge. Climb through the roof on its right and into a finger / hand crack. Follow this until the Us appear, trending left and climb the side of the arete to the anchors. Finish up either ‘The Secret Ingredient…’ or start the traverse into ‘The Pud Life’ to exit.
Recommended gear; cams #0.3 to #2 with extra #0.4 and #0.5, a black offset nut, and at least 9 quick draws.
Chris Lang, Christoph Speer, Jan 2024, (first pitch from ground by Tom Baanders - not recommended!, Mar 2024)
Some choice quotes from the first ascentionist:
"Climbed a choss first pitch from the ground (kayak access)...wouldn’t recommend."
"...some of the worst rock imaginable... it's quite impressive how bad some of the sea cliff Dolerite can be. It looks compact and then just sheds scales."
"the rock quality is filthier than a nightclub bathroom"
Despite the sage words, the kayak approach may mean the pitch is worth repeating. Take a triple rack including big gear (#3 & #4) if you want it to be a bit more pleasant.
Tom Baanders, Sarah Groth, March 2024
A stunning adventure for the grade that will test the resolve of both the leader and second. Sustained and well-protected - take care of some friable rock. Recommended gear: Wires and double rack of cams, with a single #4 and triple #2 and #3. Access as for ‘The Secret Ingredient…’.
From the belay ledge, clip the low U to the right and traverse 2m right to jugs and the base of a hidden hand-crack. Follow this to a stance at a small ledge with a roof. Traverse airily right again for 2m to gain the base of another hidden clean crack. Follow this and the face above to the top. Either traverse right at the lip to gain the DBB or top out and belay from the tree (please protect the bark).
Chris Lang, Christoph Speer, Dec 2023
Christoph Speer, Chris Lang, Jan 2024
Steve Monks and Steve Findlay, Feb 2003.
The Thumbs
Access to date has been via kayak, paddling north from The Moai. Grid Ref 79650, 26100 on the TasMap Hippolyte sheet.
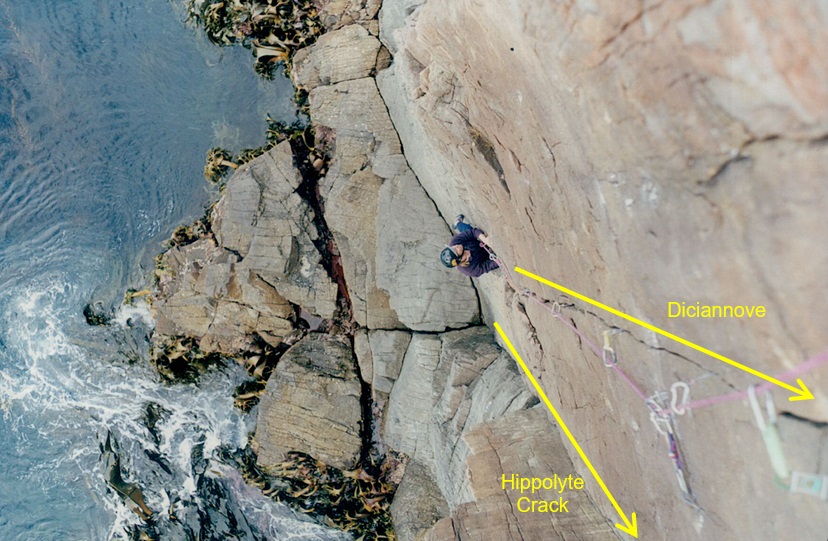
A clean bulging corner, just north of point. Climb the hand crack in the corner.
David Gray, Carol Hurst, November 1997.
Thin face crack a few metres L of Hippolyte Crack.
David Gray,Carol Hurst, November 1997.