
Rocky Tom
 30m
 Sunny
 Sandstone
Introduction
Rocky Tom has a couple of great boulders on good rock. The downside is the uphill walk for access.
Access
Access to Rocky Tom requires a 10 minute drive and a half hour walk. The traditional access was via Flagstaff Gully, but the quarry owner now discourages this. Today the best approach is via Geilston Bay. Turn right off the East Derwent Highway on to Golf Links Rd, then left onto Fairfield Rd. Follow this to the end, then right on to Geilston Creek Rd. Follow this to the end where there is a sign for "Pilchers Hill Bushland Reserver". Park back down the road a bit where there is room, take care not to block the road or driveways.
From the sign take the well made track, following the signs for the "Geilston Gully Circuit Track". After about 800m of walking along tracks and fire-trails, a new, well-made, walking track heads uphill to the left, just before the fire-trail goes over the second of two little bridges. Follow the walking track up the hill until it hits a fire trail. Follow this steeply up the hill for a minute to where it flattens out at a saddle between two hills (Seager Saddle). The hill up to the right is where the Rocky Tom cliffs are (marked on the map as Caves Hill).
Both the Ark and Menagerie boulders can be reached by heading up the hill on a walking track off the fire trail shortly after reaching the saddle (-42.823756, 147.374035). Approx 200m later the Ark will appear on the right of the track. After walking slightly past the block a path to the boulder will be found on the right (-42.823065, 147.376285). Continuing straight (and keeping left on flat ground) for another 50m or so will find you at the Menagerie.
GPS
The Ark Front
The Ark is 50m or so down and right from the base of Lone Tower. It faces down the hill and can be hard to find. Best accessed from The Menagerie boulder as it is more prominent when approached from downhill.
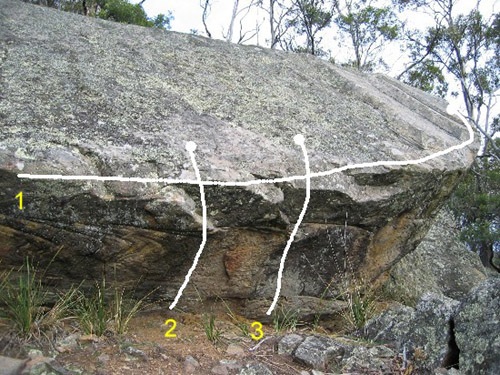
L-R traverse along lip to finish up 4 or 6.
Sit start on slopers below large jug at chest height. Up to jug and up onto slab.
Sit start on two handed edge. Up past slopers to good hold over lip. Pull onto slab.
The Ark Side
The Ark is 50m or so down and right from the base of Lone Tower. It faces down the hill and can be hard to find. Best accessed from The Menagerie boulder as it is more prominent when approached from downhill.
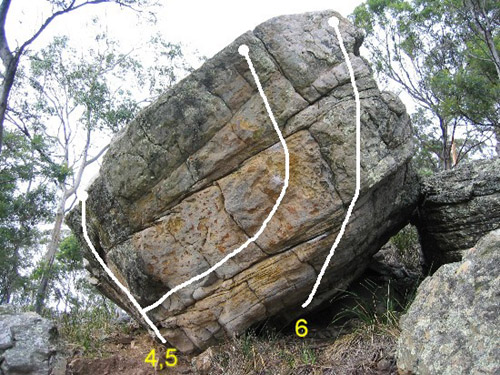
Sit start 3m right of 3 on small edges. Up to good holds at head height. Dyno for lip then pull onto slab and into groove. Probably better as a V4 stand start, as the sit is pretty awkward. An alternate sit with RH edge and LH undercling removes the awkwardness around the block.
Start as for 4, move right on small holds, dyno for lip, mantle onto slab.
Start 2m right and down from 4 on lip of low overhang. Up powerfully through the bulge to finish up the highest part of the boulder. A great problem.
Sit start on the flake in the cave to the right of Victory in Thebes. Up through bulge.
The Menagerie Front
The Menagerie boulder is directly below Excalibur buttress 100 metres or so and is clearly visible from this area. Many eliminates / variants exist on this boulder so only the main problems have been documented.
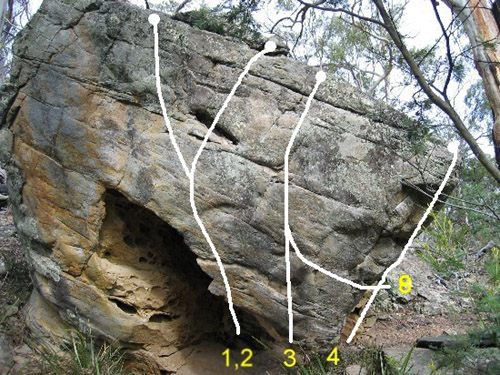
Unnamed
V1(SDS)Up around left from the bottom face is a bit of a bulge. Sit start, then follow the lichen free holds to the top.
Unnamed
★V4/5(SDS)The line just right of the arete, starting at the big flat hold, up to the highest part of the boulder. Keep on the R face. Starting to the R at the flake and moving left is an alternative start.
No longer extant, the loose flake broke. Start as for 2, move left onto loose flake, dyno for lip.
Undercling to large slot then straight up and onto slab.
Straight up on small holds to finish right of 2. No holds on 2.
Arete behind tree from sitting start to hard mantle. A great problem, but the landing is a little dicey, bring a couple of mats. Follow the arete directly - a bit easier if you pike and move right to top out.
The Menagerie Side
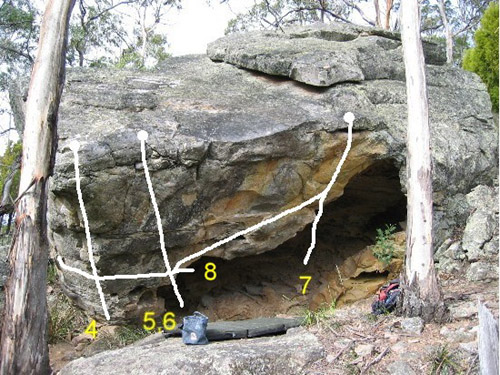
Sit start with feet on hanging pedestal. Pull up for small edges dyno for good holds and pull onto slab. Variation finsh: Traverse the lip to finsh for 7.
Start as for 5. Traverse right to incut edges, up to large slot then up onto slab (ie. finish as for 7). Many variants / eliminates exist.
Sit start under small cave on good holds. Straight up to slot via good holds. Mantle onto slab.
Rhino-Utan
★★V5(SDS)There is a problem starting as for Orang-Utan but climbing up through the roof to finish as for Rhinocerous, avoid ledge below on the uphill side, feet in the roof and downhill.
E. Robson, 2012?
Start as for 5. Move left and around arete to finish as for 3. Crux is past arete.
Seams Roof
Start on huge hold at rear left of roof. Climb out to lip then right past holds on Seams Direct (climb) to large jug. Move down and right to finish on Slavery (climb)
The reverse of 1. Starting form Slavery (climb). Quite different to 1.
Start on holds just right of 1. Move right then straight out to lip along thin crack. Jump off or finish as for 1.
Start as for 3. Traverse right at a lower level than 1 past underclings to small holds. Dyno to large jug on 1 to finish.
Start on undercling at rear of roof. Move out to small holds to finish as for 4. Keep feet well of the cave floor on problems 4 and 5. They should be on the white rock.