Tyndall Range
 2-3 hours, steep uphill
 Mixed sun and shade
 Slabby to past vertical conglomerate up to 300m
Acknowledgement
By Kim Robinson, Adam Donoghue
Introduction
Climbing in the Tyndall Range is only in its infancy: it will no doubt be the scene of some more hard and long free and aid routes for the next generation. It's a fantastic area for a walk, some great camping and offers unique climbing in a picturesque setting above a 1km wide lake. The climbs here are all hard earned; with the approach, logistics of getting to the base, and the challenge of getting back up all contributing to a good sense of satisfaction...post ascent.
It worth considering the fact that all the longer routes here are abseil in and climb out - so it is a NOT great place to do your first multi-pitch adventure, as abseiling off is not really a viable option. Even the sport routes here have quite spaced bolting.
The angle is often slabby on the surrounding buttresses, while the main face feels steeper with most terrain around vertical and a few overhanging sections thrown in to add to the exposure. The rock is conglomerate and is very compact due to glaciation in the area.
Being located on the West Coast of Tasmania, the Tyndall Range is best enjoyed from November to April during a solid weather forecast. Take winter clothing and good rainwear as the weather can change rapidly - even in summer. Also a map/compass or a GPS are needed to get to the cliff. An important thing to remember here is that this is a very special spot for local bushwalkers so please make an extra effort to minimize your impact. One of the more striking things about being in the area is the unspoilt nature of the surroundings - please keep it this way.
History
Several years ago Doug Fife realised the potential of the 300m cliffs above Lake Huntley. He, with various partners including most of Tasmania's willing, tried to find a route that would go. The cliff proved a formidible challenge with years and partners passing by before a route was pioneered up the large striking corner of the main face. The route was climbed with Garn Cooper and there was a standoff between the two with regards to the naming - 'Leap of Faith' or 'Wake in Fright' - the latter referring to a broken hammock incident during the night. 'Leap of Faith' won out and set the scene that the cliff was open for business.
During this period Adam Donoghue began a long distance relationship with the direct line of 'The Healer'. The crux pitch through the amazing overhanging prow took three shifts of lead and over 15 hours to establish - such is the difficulty of new routing in the Tyndalls. Then in 2005 Adam was back with Gareth Llewellin to establish a route that indicated the potential for quality long and sustained free routes with the climb 'Deeper Water'. There are many lines in waiting, though the effort and commitment required will stop all but the die hard suffer-fest junkies out there. If establishing a new route please respect the effort and vision of the routes already established here by using natural gear where available and bolts only as a last resort.
Access
THE DRIVE: The Tyndall Range is approximately 4hrs drive from Hobart (281km) followed by 2-3hrs walk. To get there from Hobart, drive to Queenstown then follow the main road north (A10) towards Burnie past the Strahan turnoff. At 13km from Queenstown you will get to a right turn onto the B28, signed as 'Lake Plimsol'. Take this and follow it for another 11km until you reach a gravel road on the right. Park just before the gate (be sure not to block the gate). The driving is now over and the walking begins.
THE WALK: The following has been updated August 2021 in consultation with PWS in an effort to reduce direct and indirect impacts.
Walk on the 4WD road past the gate, over bridge and after about 600m turn left onto another road. After another 200m you will see a walking register box which marks the start of the track through the bush. After some mud and scrub the track follows an open and well trodden path for most of the gain up the hill. There is a reliable stream off to the left about half way up the hill just past the large boulder. At the top of the hill sidle the mountain top on button grass and cushion plants. Now it's worth taking your bearings as you need to break from the walking track and head ESE towards the cliff top camping area. The 'Leave main track here (turn left towards cairn on horizon)' (see GPS coordinates below) is about the same point as when the ridge to the left of the track becomes less steep and the walkers track starts to descend up ahead.
The plateau vegitation here is particularly sensitive and we would like to prevent new tracks forming across the plateau. As you leave the main track, head for a slight saddle and fan out as you go to minimise new tracks forming. Avoid walking on cushion plants and stick to rocky sections where possible. head SSE for 5 mins past the cairn on the saddle to the small tarn. When approaching the tarn you can see peak '1037' (on map). There is a large white quartz boulder on the left shoulder of the peak and camping area is just past this boulder. From the turnoff to the cave should take 20-30 minutes.
Camping
In general as climbers we should try not to promote other user groups coming off track to this area so be careful with your use of social media, ie think twice before sharing your off track camping in the area.
Most climbers stay near the cliff top a couple of hundred metres back from the cliff edge (see camping area GPS point). Where possible camp on firm surfaces off the sensitive vegetation.
Please don't collect or burn firewood as it's prohibited in this area. There are numerous small tarns for water nearby the cliff top. Take care to ensure that you don't wash anything directly in these tarns. If camping under overhanging sections of cliff remember that rain may not wash away things so it's well worth walking away for #1's.
For #2's in this area the first and preferred option in an alpine environment is to bring a poo tube, some doggy bags and pack it all out. For the good but less preferred method see the section below - you might be able to climb hard but do you know how to shit in the bush? How to Make Poo Porridge The supreme method for minimum impact pooing involves a technique called 'Poo Porridge' or 'PP'. The alpine environment here means that if you dig a shallow grave and use excessive loo paper that chances are it will still be there in 2 years time... not pretty or hygenic for other users. Most climbers technique of shoving a rock on it won't cut it here, it is easy for animals to disturb it and surface water easily carries the parasites and bacteria to other water sources. 'PP' has been proven in studies to breakdown in a fraction of the time by mixing soil nutrients through the poo. * Step 1: Find a site 100m or more from camp, and downhill from water. * Step 2: Dig a hole with a nut key or rock 10 to 15cm deep (the top 20cm of soil has the best nutrients for breaking down poo). * Step 3: Clinch your business deal. * Step 4: Now for the porridge bit, it sounds a bit ugly but this bit is strangely satisfying. Grab a stick and mix dirt well through the poo, the more mixed the better (it will even look less like poo after this simple trick). You can now put the remainder of dirt on top and leave stick poking out to warn others, by the time the stick falls over it's safe terrain. * Step 5: Ideally carry the paper used out in a ziplock bag - it's light and takes much longer to breakdown than the poo itself. However it you choose to leave the paper, mix it well with the porridge and pee on it if you have a reserve tank (this speeds up the breakdown process).
Crag Steward
Rock climbers please contact the Cliff Steward (southwest@climbersclubtas.org.au) if you have any queries or concerns regarding social or environmental impacts of rock climbing at this crag. Do not email regarding general travel, seasonal advice, or lost property - this is not the Steward’s role. If you have important safety information to communicate (e.g. risks due to recent and large rock falls) please also consider updates on thesarvo forum, facebook group and/or online guidebooks as appropriate. Please copy in cct@climbersclubtas.org.au if you feel you have a high level concern which may imminently impact the crag or climbing community.
Non-climbers, other users, land managers: please also contact cct@climbersclubtas.org.au if you have important climbing related queries at this location.
GPS
Mt Tyndall
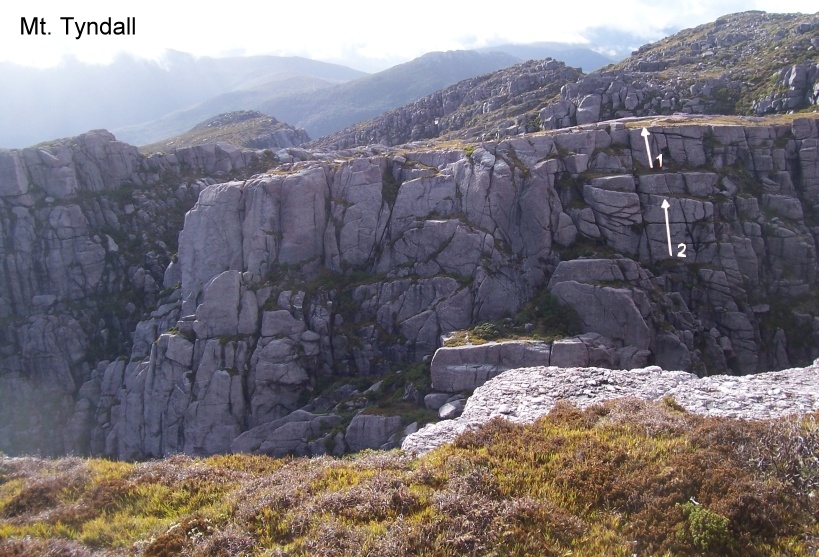
Either abseil off DBB or scramble to the base, pleasant climbing up the short wall.
Claire Hewer, Mar 2005
Scramble down to the top of the climb from the base of Bunny Ears and abseil off DBB to reach the base. Climb the wall past a couple of horizontal breaks.
Kim Robinson, Mar 2005
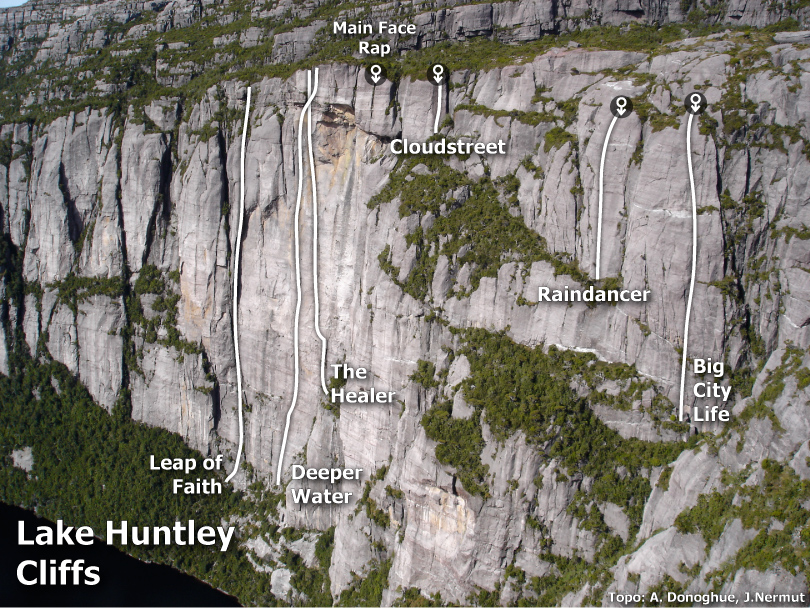
Lake Huntley Cliffs
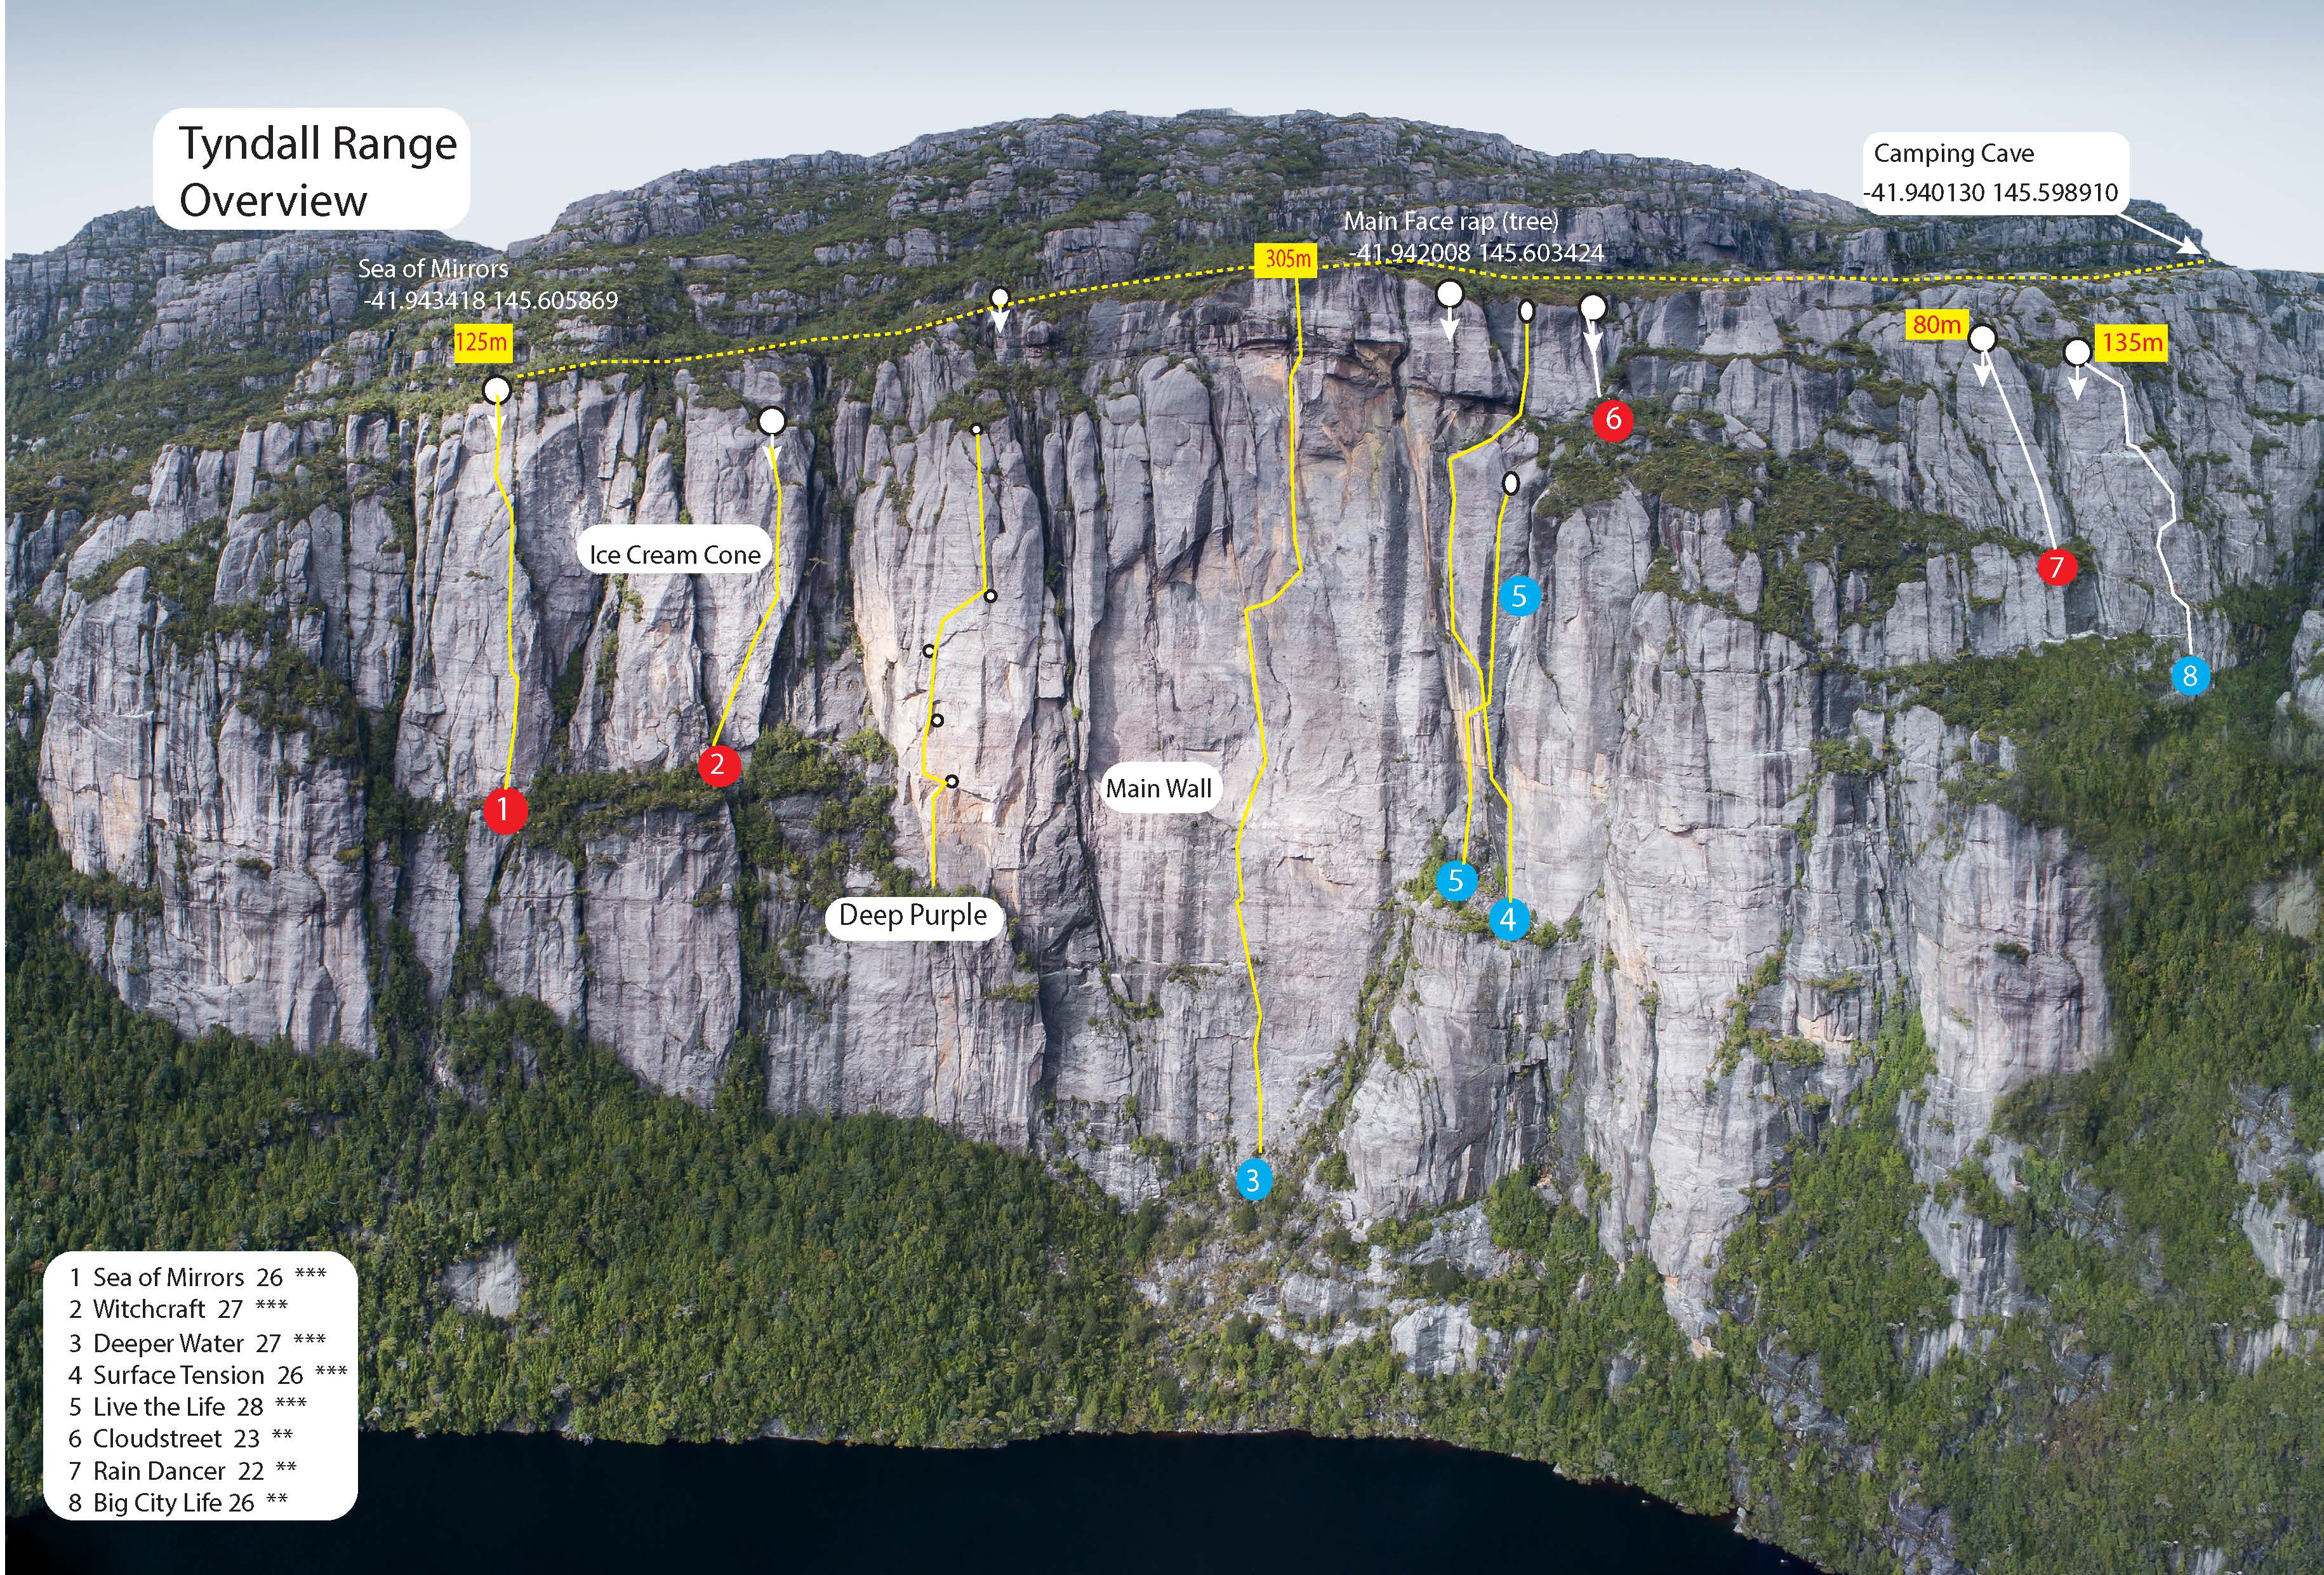
Sea Of Mirrors
★★★125m26Ingvar Lidman and Gerry Narkowicz. 13th January, 2014
Ice-Cream Cone
The Ice-Cream Cone is the cone shaped expanse of rock left of both the Barrel and the Main Face. To access the Ice-cream Cone, walk in the opposite direction of the cave, past Deeper Water, and the rough/vague track will enter some thicker vegetation. There is a pad closer to the cliff and another 10-15metres back, but both then merge together and sidle up along a cliff on the right. The track then starts to trend downhill, several hundred metres past Deeper Water. Lookout for a subtle pad on the left, which leads to a small clearing where there are two hangers on an exposed section of slab, both wide apart. If the track then sidles up a second time against the small cliff on the right then you've gone too far. If you know where you're going it's roughly 15min walk from the cave.
GPS coordinates for top of Witchcraft: -41.94329 145.60508
Witchcraft
★★★150m27/28Garry Phillips & Will Bartlett, April 2012.
Deep Purple Face
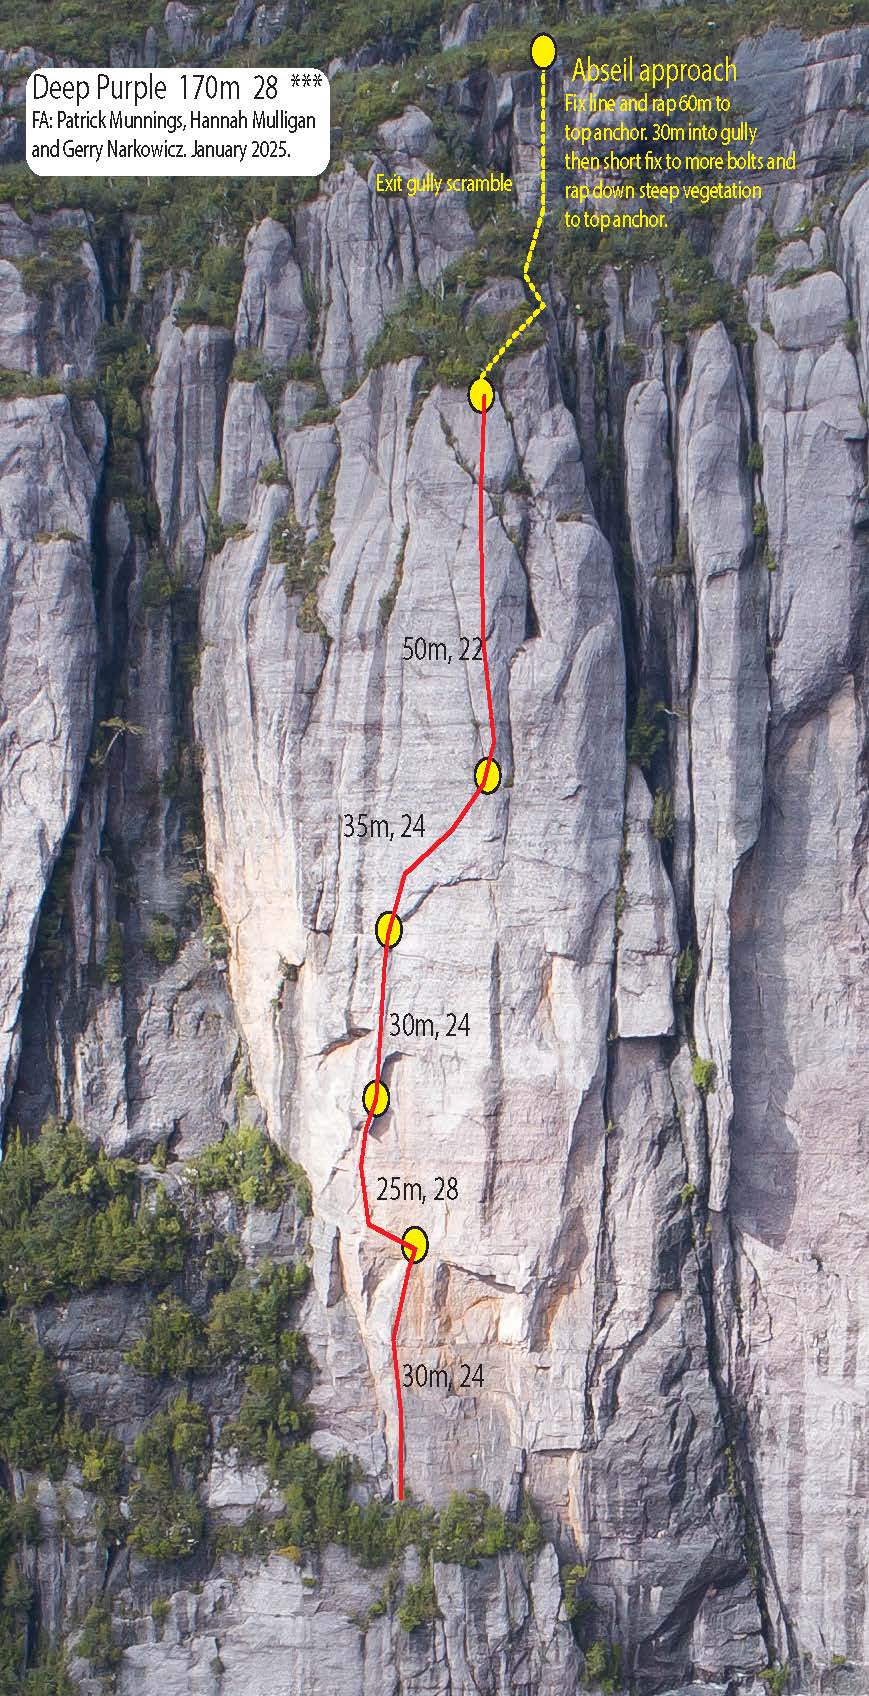
Deep Purple
★★★170m285pPat Munnings, Hannah Mulligan and Gerry Narkowicz. January - 2025
Main Face
The main face of Lake Huntley is a very impressive steep cliff up to 300m high. The following routes are on the main face on the longest continuous section of cliff in the centre of the picture above. These routes are quite serious as escape is not easy even with fixed ropes. It's not an option to scramble out as its too bushy and steep, so it's either climb or jumar out. Access: To access the main face scramble across the cliff top (follow cairns and subtle foot prints). There is a series of prows with vegetation much like a head of hair/wig. The prow just before the highest one is where the rap point is. Once you get to the position in the picture below you are close, the quartz smile marks the top of 'Cloudstreet' about 20m past this a gully where the track dips between two boulders, just up from this is the rap tree. It is a strong obvious bush (this is the anchor for the first rap), there is a purple rope tied around a branch as a marker (please leave it here). Extend the anchor with a 8m piece of rope/sling.
1. First rap is 50m, you should rap past an obvious tree right on the edge (it will be on your L facing the cliff), then next anchor is a 2 bolt chain anchor at a stance on the sloping terrace.
2. 40m rap. Trend slightly R to end up on a ledge on front of buttress (this is the 4th pitch of a climb called 'Surface Tension'. There is another chain.
3. 30m rap. Head R so that you go down R side of pinnacle, clip a bolt as a directional. There is another chain at a stance (this is the 3rd pitch of 'Surface Tension').
4. 60m rope stretching rap to the big terrace.
5. 50m rap from the edge of terrace follow rock cairns (chain) rap leftwards aiming for a ledge with chain.
6. 40m Rap to the base.
Leap of Faith
★★200m22 C3Doug Fife and Garn Cooper (with acknowledgment to Peter Steane), 16 Dec 2000.
Deeper Water
★★★305m27Gareth Llewellin and Adam Donoghue Apr 2005.
Office Hours
300mA?Starts up the obvious corner about 30m left of Deeper Water. A predominantly aid route that was established by team 'Project Dare' while training for their record breaking 41 days on the wall in Kyrgystan! No pitch by pitch details as yet.
Kent Jensen and Steve Anderton Summer 2006
The Healer
★★200m22 A3Adam Donoghue, then Adam & Alex McConnell, then Adam & Scott Camps, then Adam & Scott & Gareth Llewellin... phew. Apr 2002.
Live the Life
★★★15028F.A. J Bresnehan and G Phillips 2010 (with many thanks to Alex Lewis and Will Bartlett)
Surface Tension
★★115m25Adam Donoghue and Gareth Llewellin Mar 2008
Cloudstreet
★★★35m23ÞA well protected and enjoyable steep slab in close proximity to the main wall but with a friendly and less exposed feel. Rack: 12 draws. Rap in from the bolts 5m above the quartz smile (the quartz smile is clearly visible when going across the cliff top track). Do a super careful scramble to reach these. There is a big ledge at base with a DBB. Delicate footwork and thoughtful climbing are the order here which culminates in a good series of steep moves on the blunt arete to finish.
The top pitch of Surface Tension can also be accessed from the Cloudstreet rappel. This provides a nice companion route. To reach the belay, rap as for Cloudstreet and continue a further 5 meters down, then scramble carefully 15 meters left.
Gareth Llewellin and Adam Donoghue Mar 2008
Second Chances Buttress
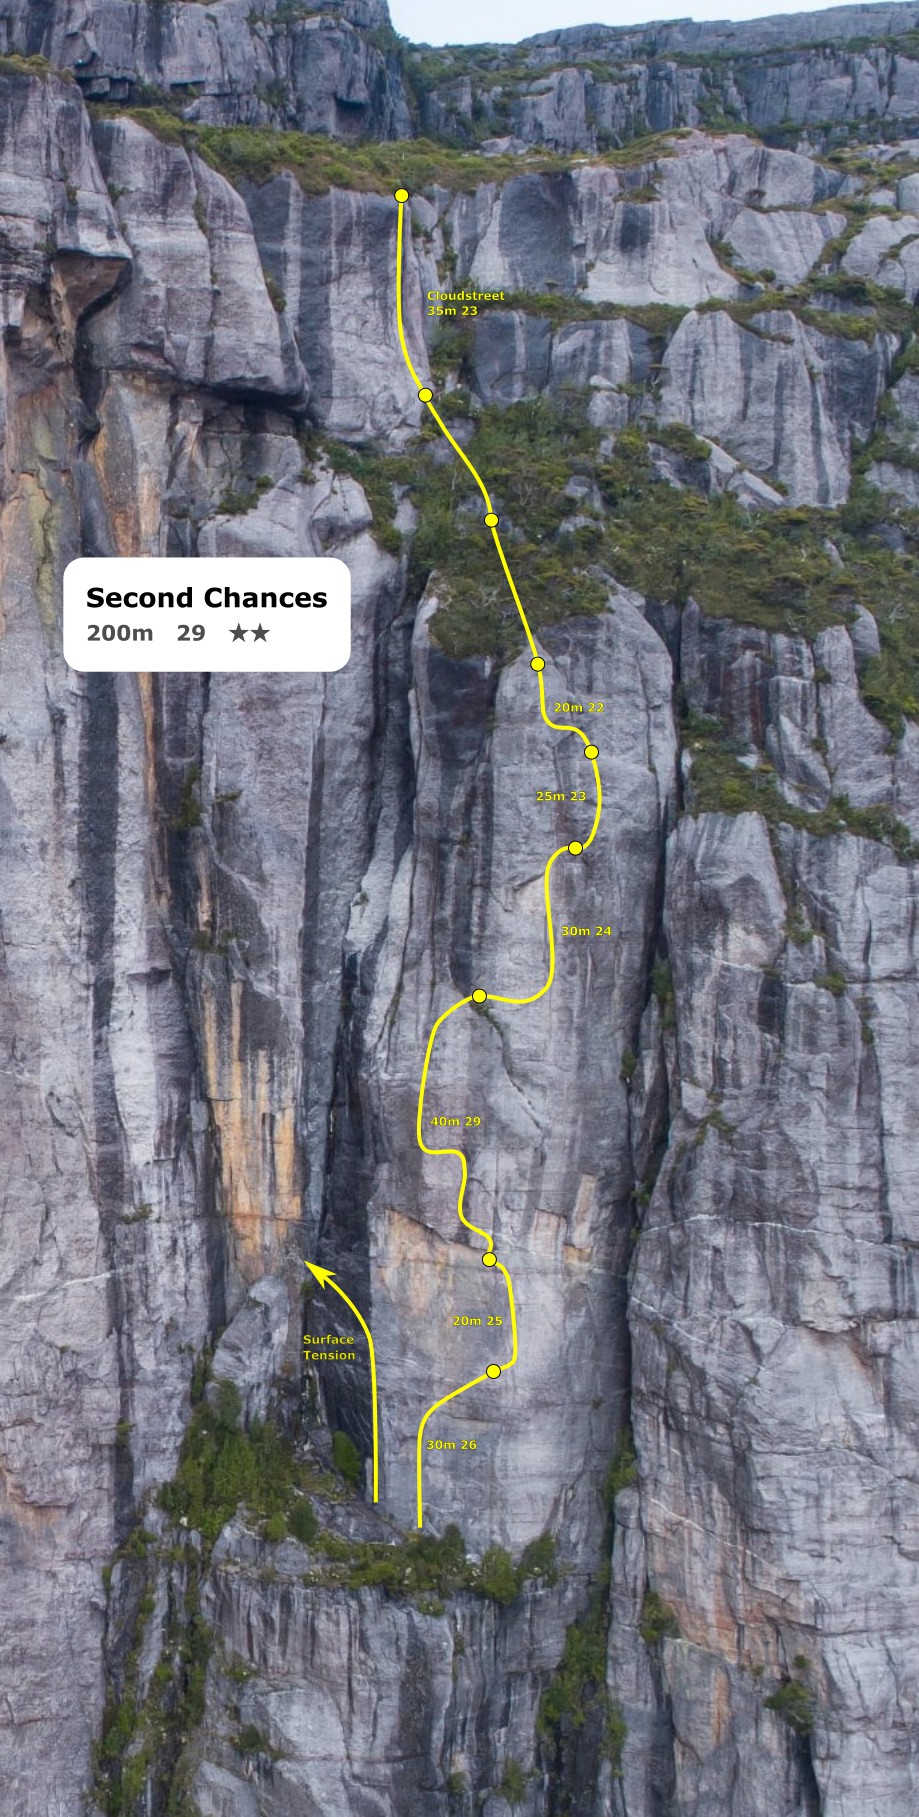
Second Chances
★★200m29Jon Leighton and Liz Oh, 2nd January 2026
The following routes are on buttresses to the right of the main face. These climbs offer a good introduction to climbing in the region.
Rain Dancer Buttress
Rain Dancer
★★★80m22ÞClaire Hewer, Kim Robinson, Mar 2005.
Big City Life Buttress
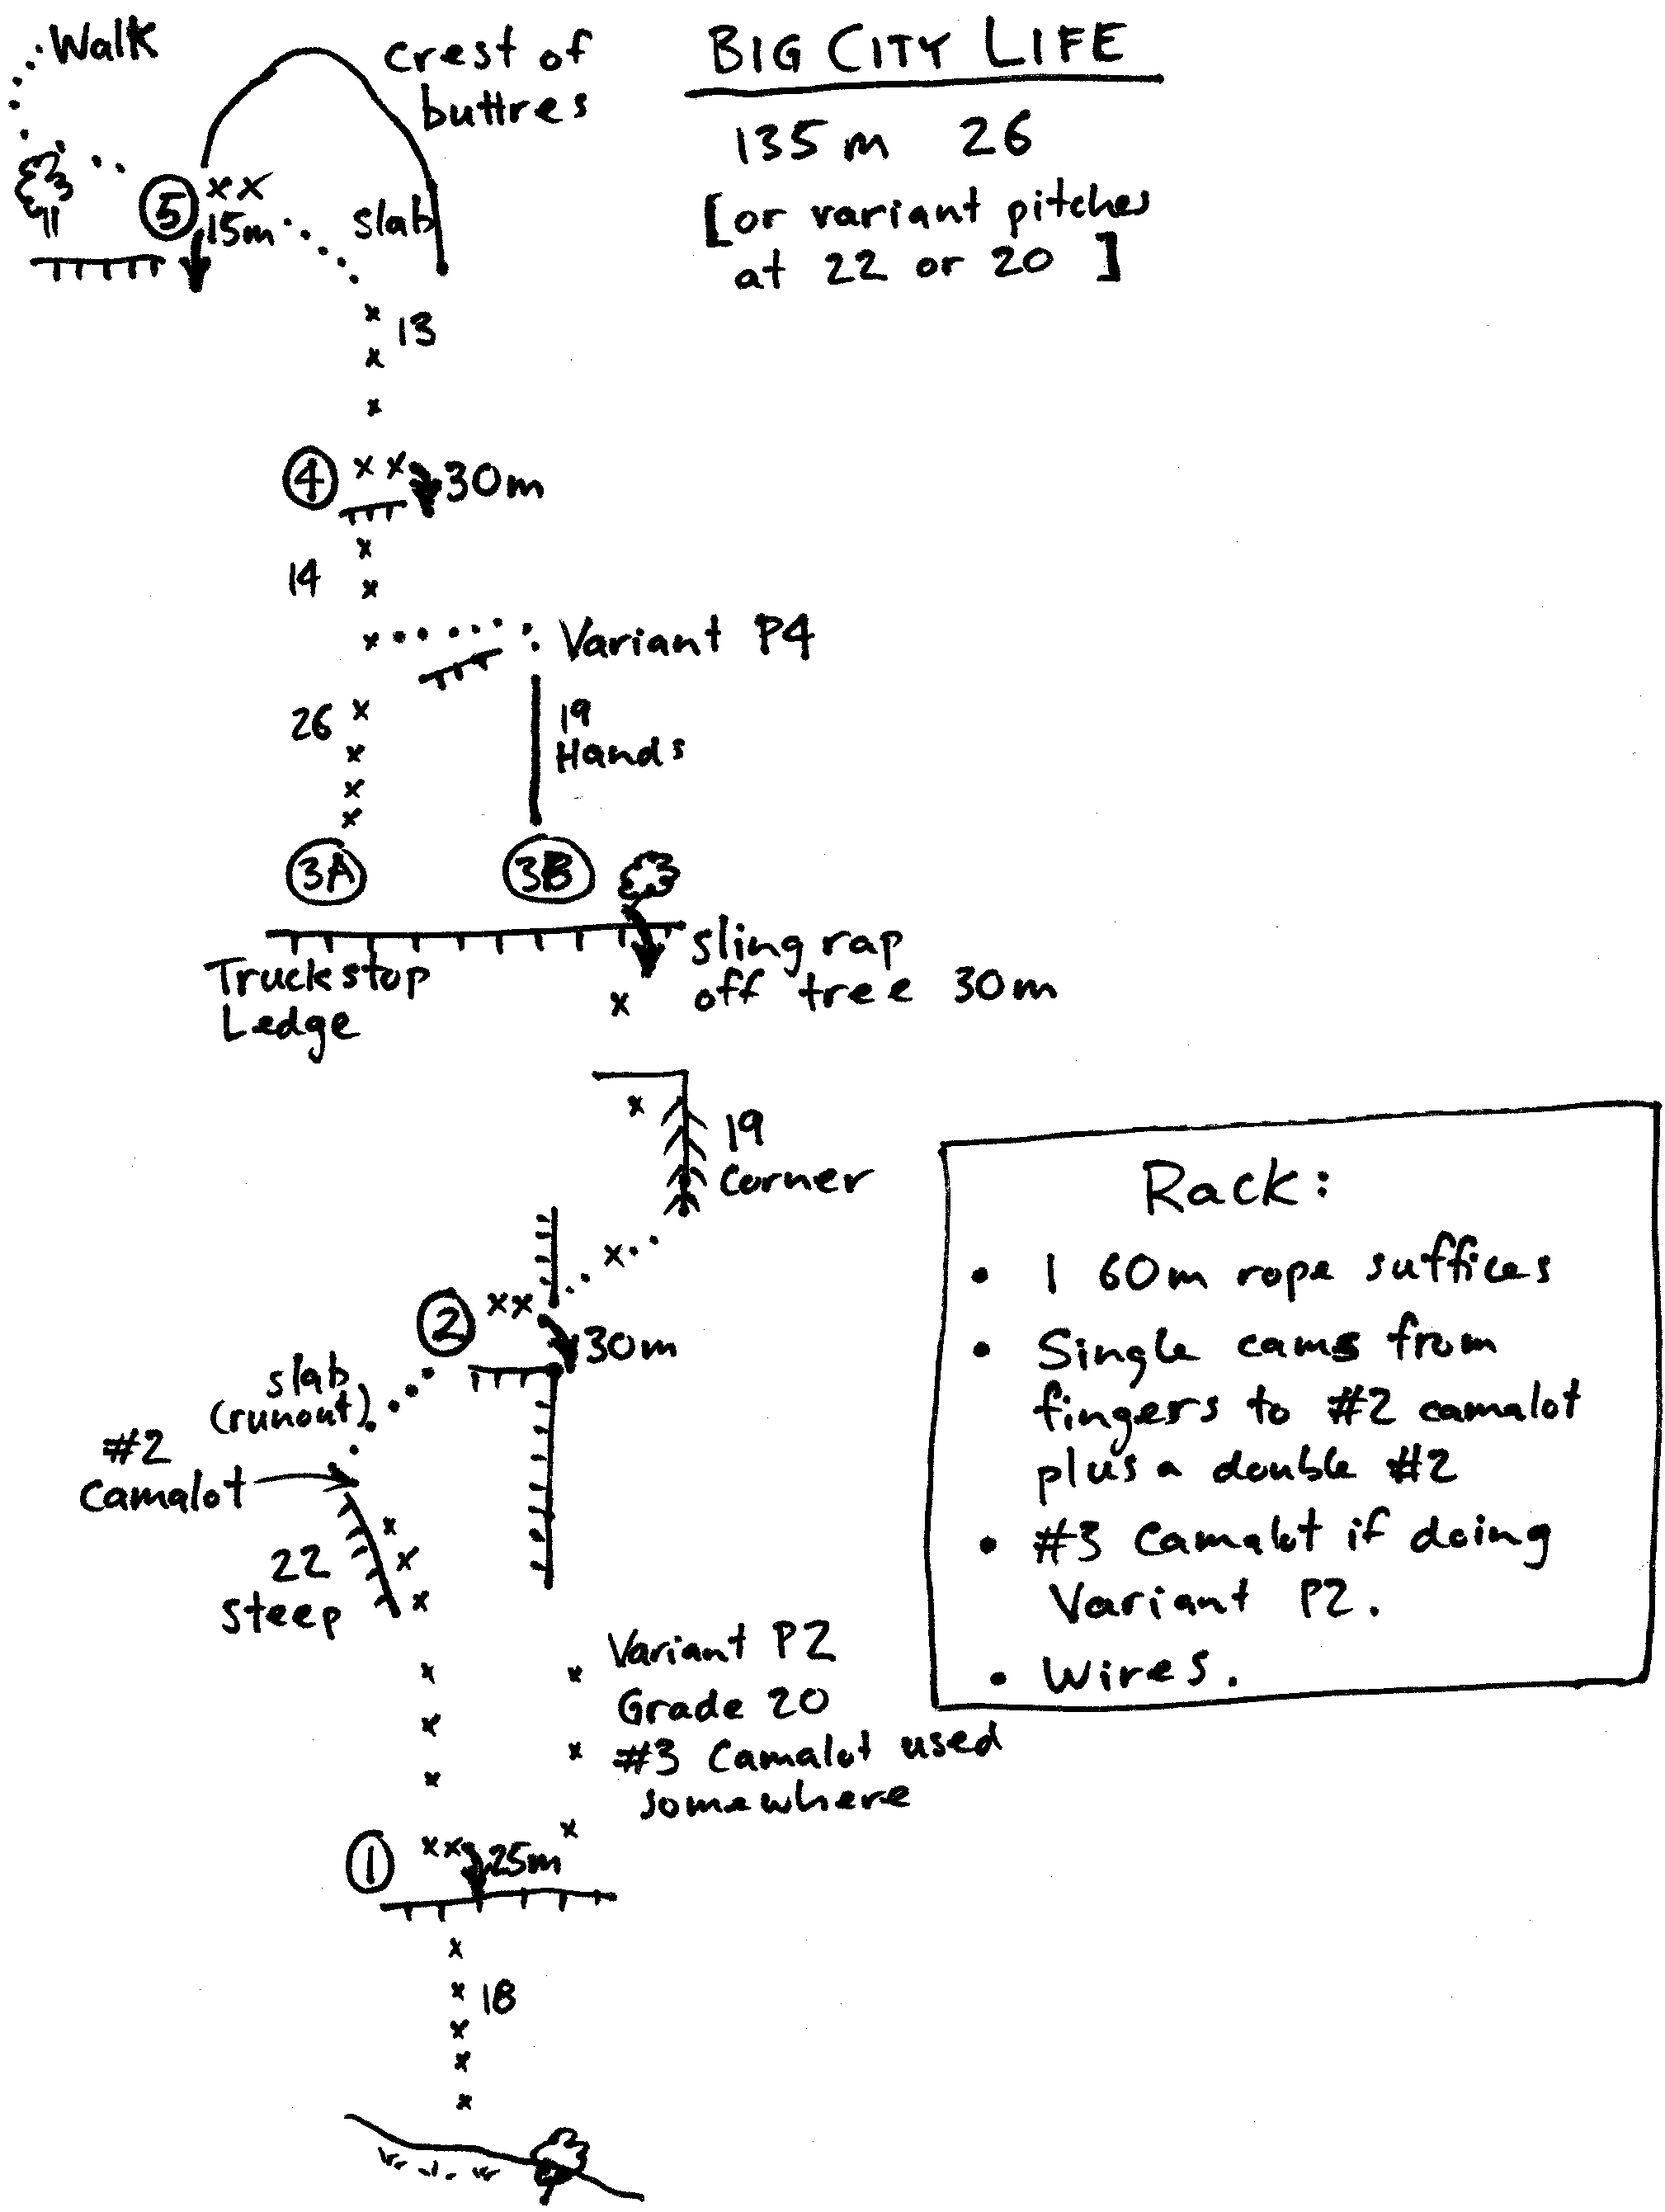
Big City Life
★★★135m26(23A0) ÞSimon Young and John Fisher, 22 Jan 2008 .
Urban Sprawl Variants
35m20John Fisher (2b) and Simon Young (4b), Jan 2008.
Feral Prow
Bleeding Ferals Prow
21Needs another 4 or 5 bolts to make it sane. Unfortunately we only brought two bolts with us! Located on end of second buttress north east of camping cave over looking the lake. This buttress has a distinct red capstone layer that is visible from above Rain Dancer (about 300m away). Walk to end of jutting buttress and locate single FH anchor bolt on last vertical rock before congomlorate ridge slabs down below. A #2 cam slot is about 5m back from this bolt anchor and should be used to backup this bolt anchor. Fix a single rope and rap 40m down the ridge to the large flat ledge (sleeps 5 if you are keen!). This is the second ledge down the route and is big enough to walk around on un-roped. Use fixed rope as anchor for belayer. The climb starts on the far left end of the ledge (facing cliff). Up left side of prow (no gear) to gain flake and marginal wires at 7m. Up flake to gain arête proper (FH). Boldly up face on the left side of the arête (crux) and trend rightwards to terrifyingly exposed position on the arête with bolt miles below and out of sight. Whittle in some poor trad behind crystals and climb jugs to small ledge. Continue up slabby arête above on spaced trad gear to top. Would be a much nicer route once retrobolted.
Neil Monteith & Hannah Lockie Jan 2006.
How Hard Can It Be Buttress
RAD : Retired and Dangerous
★★13021Vanessa Wills, David Gray Feb 2022
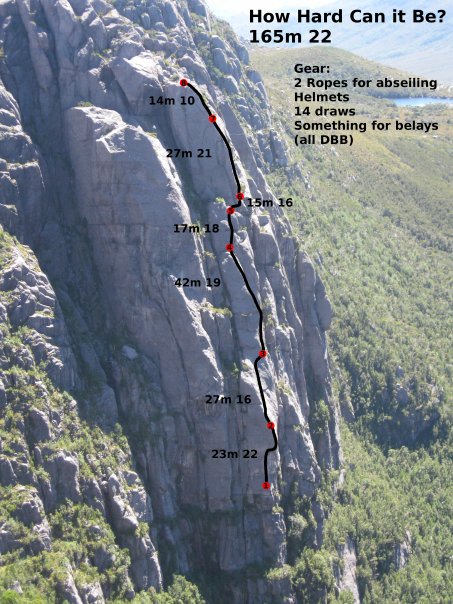
How Hard Can It Be?
★★★165m23ÞAlex Lewis, Will Bartlett 20 Feb 2010.