
Coningham
 5 min
 All day sun
 Short slabby sandstone buttresses. Mostly the climbs are toproped.
Acknowledgement
Original published in Craglets by Matt Perchard, updated by Tony McKenny and Phil Robinson 2008.
Introduction
If the size and grandeur of a crag is important to you, then Coningham is not the place to head. However, for the climber who seeks variety and a more balanced climbing experience, then this beaut little crag is definitely worth a look. Despite its small size, there are several excellent routes to enjoy. There is a good scattering of grades and styles - easy corners, steep faces, technical slabs and a mega-pumpy off-width. The picturesque marine environment and the short walk are also major selling points. The bolts are old though - user beware.
Access
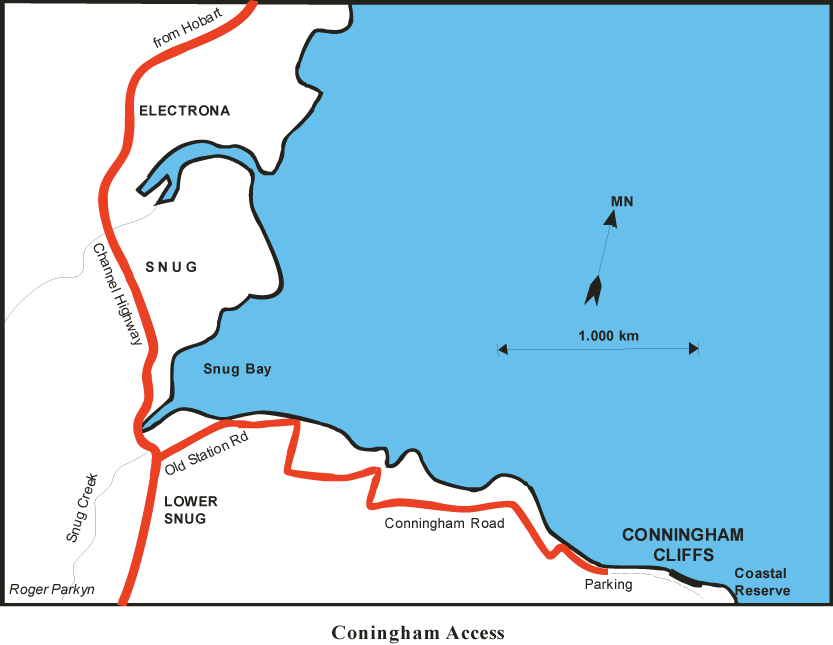
The drive from Hobart doesn't take long which makes it good for after-work climbing sessions. From Hobart, head south to Kingston via the Southern Outlet. Just before Kingston, take the right-hand lane and continue through Margate and Snug. About 1 km past Snug, the turn-off to the left leads along the shore to Coningham Beach. Park here - thirty minutes from Hobart. The walk to the crag is delightfully short. It starts at the steps leading down left by the big water tank about 25m on from the south-east end of the beach and follows the coastal path above the shore for a couple of hundred metres. Look out for an obvious eroded area on the cliff edge used by school groups and climbers, just after the second Hazard Warning sign (!) and just before the large brown Nature Recreation Area sign. It is also possible to walk along the shore from the beach when the tide is down. Otherwise you can get down to the bottom of the crag by scrambling down just to the R (as you look out to sea) of the main area.
The climbs are described from L to R.
Crag Steward
Rock climbers please contact the Cliff Steward (hobartcraglets@climbersclubtas.org.au) if you have any queries or concerns regarding social or environmental impacts of rock climbing at this crag. Do not email regarding general travel, seasonal advice, or lost property - this is not the Steward’s role. If you have important safety information to communicate (e.g. risks due to recent and large rock falls) please also consider updates on thesarvo forum, facebook group and/or online guidebooks as appropriate. Please copy in cct@climbersclubtas.org.au if you feel you have a high level concern which may imminently impact the crag or climbing community.
Non-climbers, other users, land managers: please also contact cct@climbersclubtas.org.au if you have important climbing related queries at this location.
Main Wall Area
There are two bolts at the top of the Main Wall used for belay/abseil. You may want to back them up with a sling back to a tree.
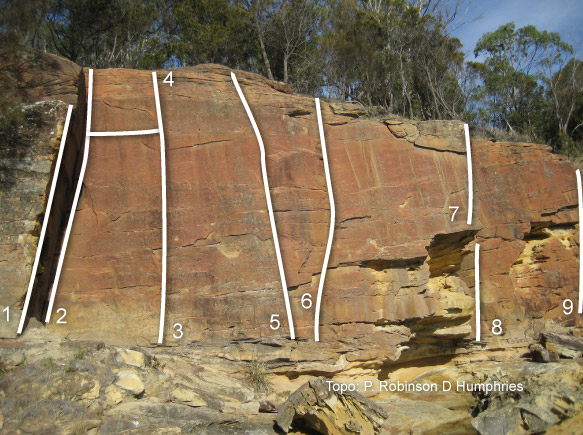
Aesthetically the best route at Coningham. Start at the LH end of the wall, to the L of the distinctive corner crack of Working In a Cod Mine. Climb the off-width crack separating the detached pinnacle from the main wall. Complete choss - even Cathedral Rock is better than this!
Nov 1981.
The corner on the LH side of the main wall. Layback and jam the corner. Watch out for the difficult exit at the top.
Nov 1981.
To the R of Working In a Cod Mine are two bolts. Climb directly up the wall to the second bolt. Traverse off L to easier rock to finish. Although a good climb, the direct finish as Shark Attack is recommended.
The direct finish to Lost at Sea. Climb the wall to the second bolt, and then keep going (crux). The crux section is well protected and takes some figuring out. With familiarity some climbs become remarkably easy - this is not one of them. You'll not find a less committing lead at the grade.
Justin Kennedy.
Further R is a beginner's corner. Unfortunately, halfway up it evolves into an expert's epic. Climb the corner, the groove, and finally the unlikely looking face past the bolt. May be a bit harder than 21….
This climb has been known as The Ultimate Answer, Brain Damage and Floating Riot - although a good climb one name should be sufficient! Start just R of Dead Memories and 5m L of the small (and dangerously flaky) cave, below two glued stainless carrots. Ascend the wall R of the cornerand continue with difficulty up the corner to another bolt and a rest. Either move straight up (preferable) or escape R to easier ground.
C.Maddock, Feb 1985.
On the extreme RH end of the main wall is an overhanging arête. Climb it… and let us know how hard you think it is!
An excellent boulder traverse can be made from the RH side of the flaky cave to Working In a Cod Mine. The initial moves through the cave are a bit fragile but it adds to the fun.
Most climbers would consider a crack filled with lagomorph’s excrement to be rather undesirable. So is this climb! The climb ascends the filthy crack around the corner R from the cave. If the climb kept to the thin finger crack on the L it might be worth doing. However, the bottom third of the corner/crack is trivial, the middle section is alright, and the top out dirty, loose and dangerous.
Nov 1981.
8m R of the flaky cave past an unclimbed wall is another arête. Straightforward at the bottom and hard at the top. Let us know the grade once you have climbed it!
Southern Area
About 120m to the south-east of the main wall further along the cliff-top track is another area of climbs. If you reach a wooden seat, go back 15m. You should see the ‘No Oxygen Needed’ corner below. One can scramble down about 20m S of this. The climbs are described from L to R. Immediately L. of the obvious corner, ‘No Oxygen Needed’, is black graffiti on the wall, “Duran Duran Rules, Okay!” The following three top-roped climbs are L of this and worth a look. Take a brush as traffic is light on these three routes.
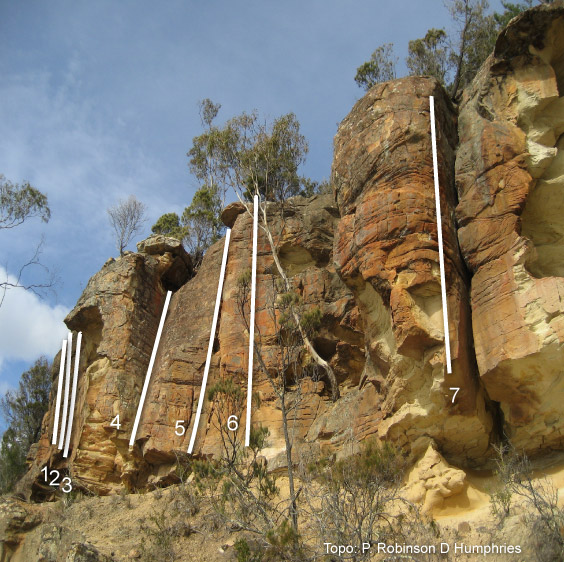
The face 1.5m L of Rules. Beware, the good holds run out at the top. More enjoyable if any lichen brushed off before climbing.
S.Scott, P.Robinson, May 2005.
The seam 1.5m L of Duran Duran. Brush before climbing.
S.Scott, P.Robinson, May 2005.
4m L of No Oxygen Needed is a thin finger crack. Climb this for 4m and on to the wide crack at the top. The bottom must have changed as it is much harder than the original grade given (15).
P.Robinson, S.Scott, May 2005.
The crack up the easy angled comer, graded 14 originally but now the bottom has dropped out giving a desperate start. Traverse delicately in from the right for an easier start (14). Climb it on finger jams and layaways.
Nov 1981
About 3m right of 'No Oxygen Needed' is a crack up the face. Climb the crack, through its widths, to a tricky move at the top. A worthwhile climb, surprisingly harder than it looks.
Nov 1981.
The face 1.5m R of S and M, a bit contrived as one can escape L or R, but worth doing. Go L of the small cave at the top.
Kim Robinson, Phil Robinson, 1998 (but likely climbed before).
A long standing problem with a strenuous and technical crux. About 15m R of Russet Wall is a bottomless, overhanging, off-width crack (sounds delightful!). Don't start here. Rather, climb the overhanging arête and face just L of the crack for a few metres. Transfer R to the LH lip of the roof and crack, then ascend this steeply to the top.
Marcel Jackson, Dec 1989.
An amusing variant that starts at the back of the aforementioned offwidth. Some unique, fruit bat-inspired maneuvers will get you past the lip, however returning to a more conventional orientation is the crux. Can be led with a big cam.
B. Armstrong, Jan 2018