
Rocky Tom
 30 min uphill
 Mixed sun and shade
 Short sandstone buttresses. In places the rock is quite good.
Acknowledgement
by Matt Perchard, topos by Peter Jackson. Originally published in Craglets.
Introduction
**THIS CRAG IS CURRENTLY CLOSED DUE TO ACCESS ISSUES, please contact the CCT for further info if required**
This crag has a high occurrence of visits by Scout groups and school 'adventure education' classes. The reason for its popularity with novices is pretty obvious when you visit, as it is one of the few cliffs in the Hobart region with a predominance of excellent easy routes. It also contains its share of good hard routes. Rocky Tom's popularity is also boosted by its closeness to town and a sunny aspect. The climbs at Rocky Tom are usually top-roped which is quite easily done (many have been soloed and, to my knowledge, no-one has ended up like Russell Chudleigh yet). Stainless steel bolts provide anchors at the top of some of the more popular routes, and trees are otherwise plentiful. However, there are few gear placements for those who would want to lead. As top-roping is the status-quo, the climbs have been graded for a top-rope ascent (whereas all other crags in this book are graded for a lead ascent). Most climbs are about 8m high and all are on sandstone.
Unfortunately, some of the top-roping bolts on the buttresses have been bashed-in or damaged in recent years, though it's still very easy to set-up top-ropes without them. Quick inspection of remaining bolts should be made prior to clipping.
Access
**THIS CRAG IS CURRENTLY CLOSED DUE TO ACCESS ISSUES, please contact the CCT for further info if required**
Access to Rocky Tom requires a 10 minute drive and a half hour walk. The traditional access was via Flagstaff Gully, but the quarry owner now discourages this approach. Today the best approach is via Geilston Bay. Turn right off the East Derwent Highway on to Golf Links Rd, then left onto Fairfield Rd. Follow this to the end, then right on to Geilston Creek Rd. Follow this to the end where there is a sign for "Pilchers Hill Bushland Reserve". Park back down the road a bit where there is room, take care not to block the road or driveways.
From the sign take the well made track, following the signs for the "Geilston Gully Circuit Track". After about 800m of walking along tracks and fire-trails, a new, well-made, walking track heads up to the left, just before the fire-trail goes over the second of two little bridges. This was not sign posted at the time of writing in 2015.
Follow the walking track up the hill until it hits a fire trail. Follow this steeply up the hill for a minute to where it flattens out at a saddle between two hills (Seager Saddle). The hill up to the right is where the Rocky Tom cliffs are (marked on the map as Caves Hill). Keep going for another 100m to the next little rise, before the track heads down hill. Turn right and head steeply straight up the hill for a couple of hundred metres to find a distinctive yellow overhanging boulder (the Ark). Keep going up and left to the hill to the cliff-line, which you will hit around Excalibur Buttress. For Shadow Buttress head south for a minute or two towards the quarry from the top of Excalibur Buttress, and sidle around the hill to the cliff.
Crag Steward
Rock climbers please contact the Cliff Steward (rockytom@climbersclubtas.org.au) if you have any queries or concerns regarding social or environmental impacts of rock climbing at this crag. Do not email regarding general travel, seasonal advice, or lost property - this is not the Steward’s role. If you have important safety information to communicate (e.g. risks due to recent and large rock falls) please also consider updates on thesarvo forum, facebook group and/or online guidebooks as appropriate. Please copy in cct@climbersclubtas.org.au if you feel you have a high level concern which may imminently impact the crag or climbing community.
Non-climbers, other users, land managers: please also contact cct@climbersclubtas.org.au if you have important climbing related queries at this location.
GPS
White Stump
From Hanging Buttress head east along the jeep track for 300m until the track heads down-hill to the R. The buttress is 30m down L. The rock on the buttress is fairly brittle, so leading is less desirable here than elsewhere. Nevertheless, it does provide very steep and strenuous climbing and provides the longest climbs in the area.
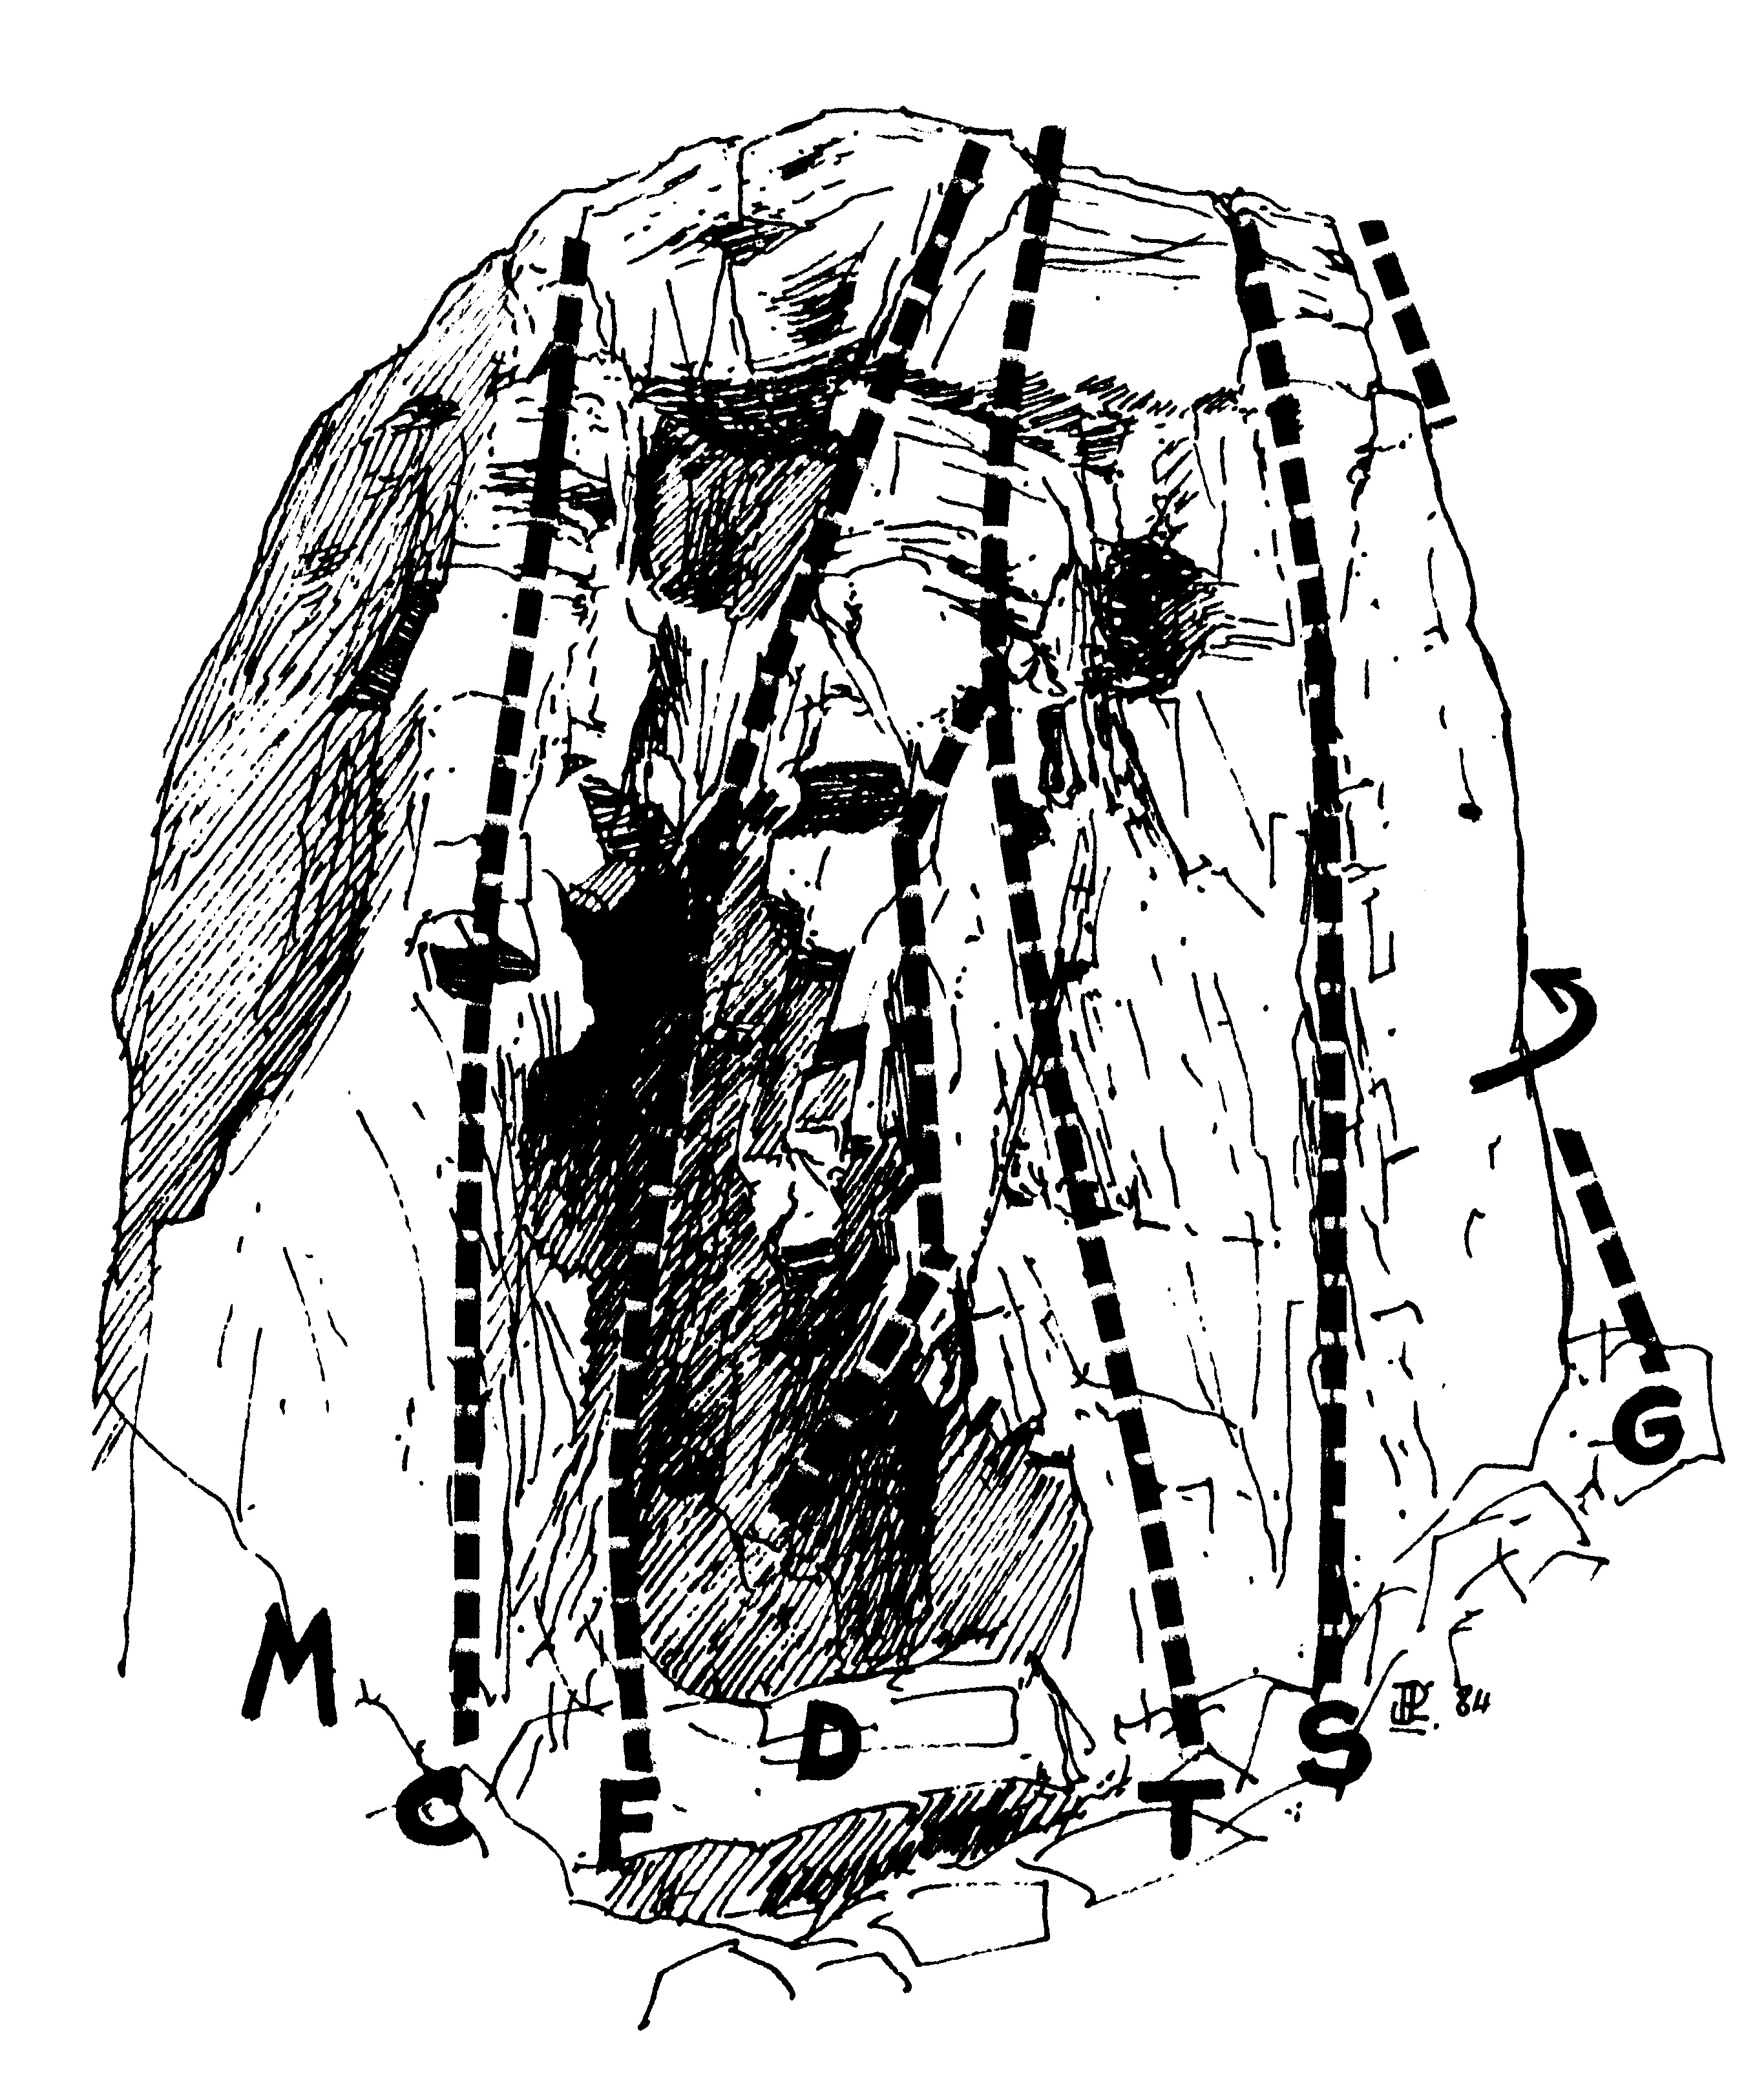
Climb the arete on the LH end of the buttress.
TR Christie, 1967.
The face halfway between the LH arete and the chimney of Funnel-web. The first moves are fairly tricky. The rest is easier but steep.
The chimney which evenly bisects the buttress. Move out R at the top.
TR Reg Williams, 1967.
A devious and rather psychologically demanding little route. Start at the base of the chimney of Funnel-web. Traverse out on small holds, heel-hook onto the face (crux) then finish up the cracks and face above.
A testing route up the face just R of Funnel-web. Steep and worthwhile, though a little loose on the lower sections.
The wall directly above the cherry tree. The difficulties are proportional to the height.
TR John Wholan, 1967.
Just around the corner to the R of Spider Wall is a gently sloping face. Start with a good orthopaedic move 2m R of the arete, then follow the good holds above to the top.
Square Buttress
The next worthwhile buttress to the R. The rock is secure, the holds small and testing, and the climbing technical. Located halfway between White Stump and Castle Walls, it is easily approached from either. Follow the jeep trail until you see the flat top of a buttress and a large gum tree 5m from the cliff edge. A metre high cave runs most of its length at ground level.
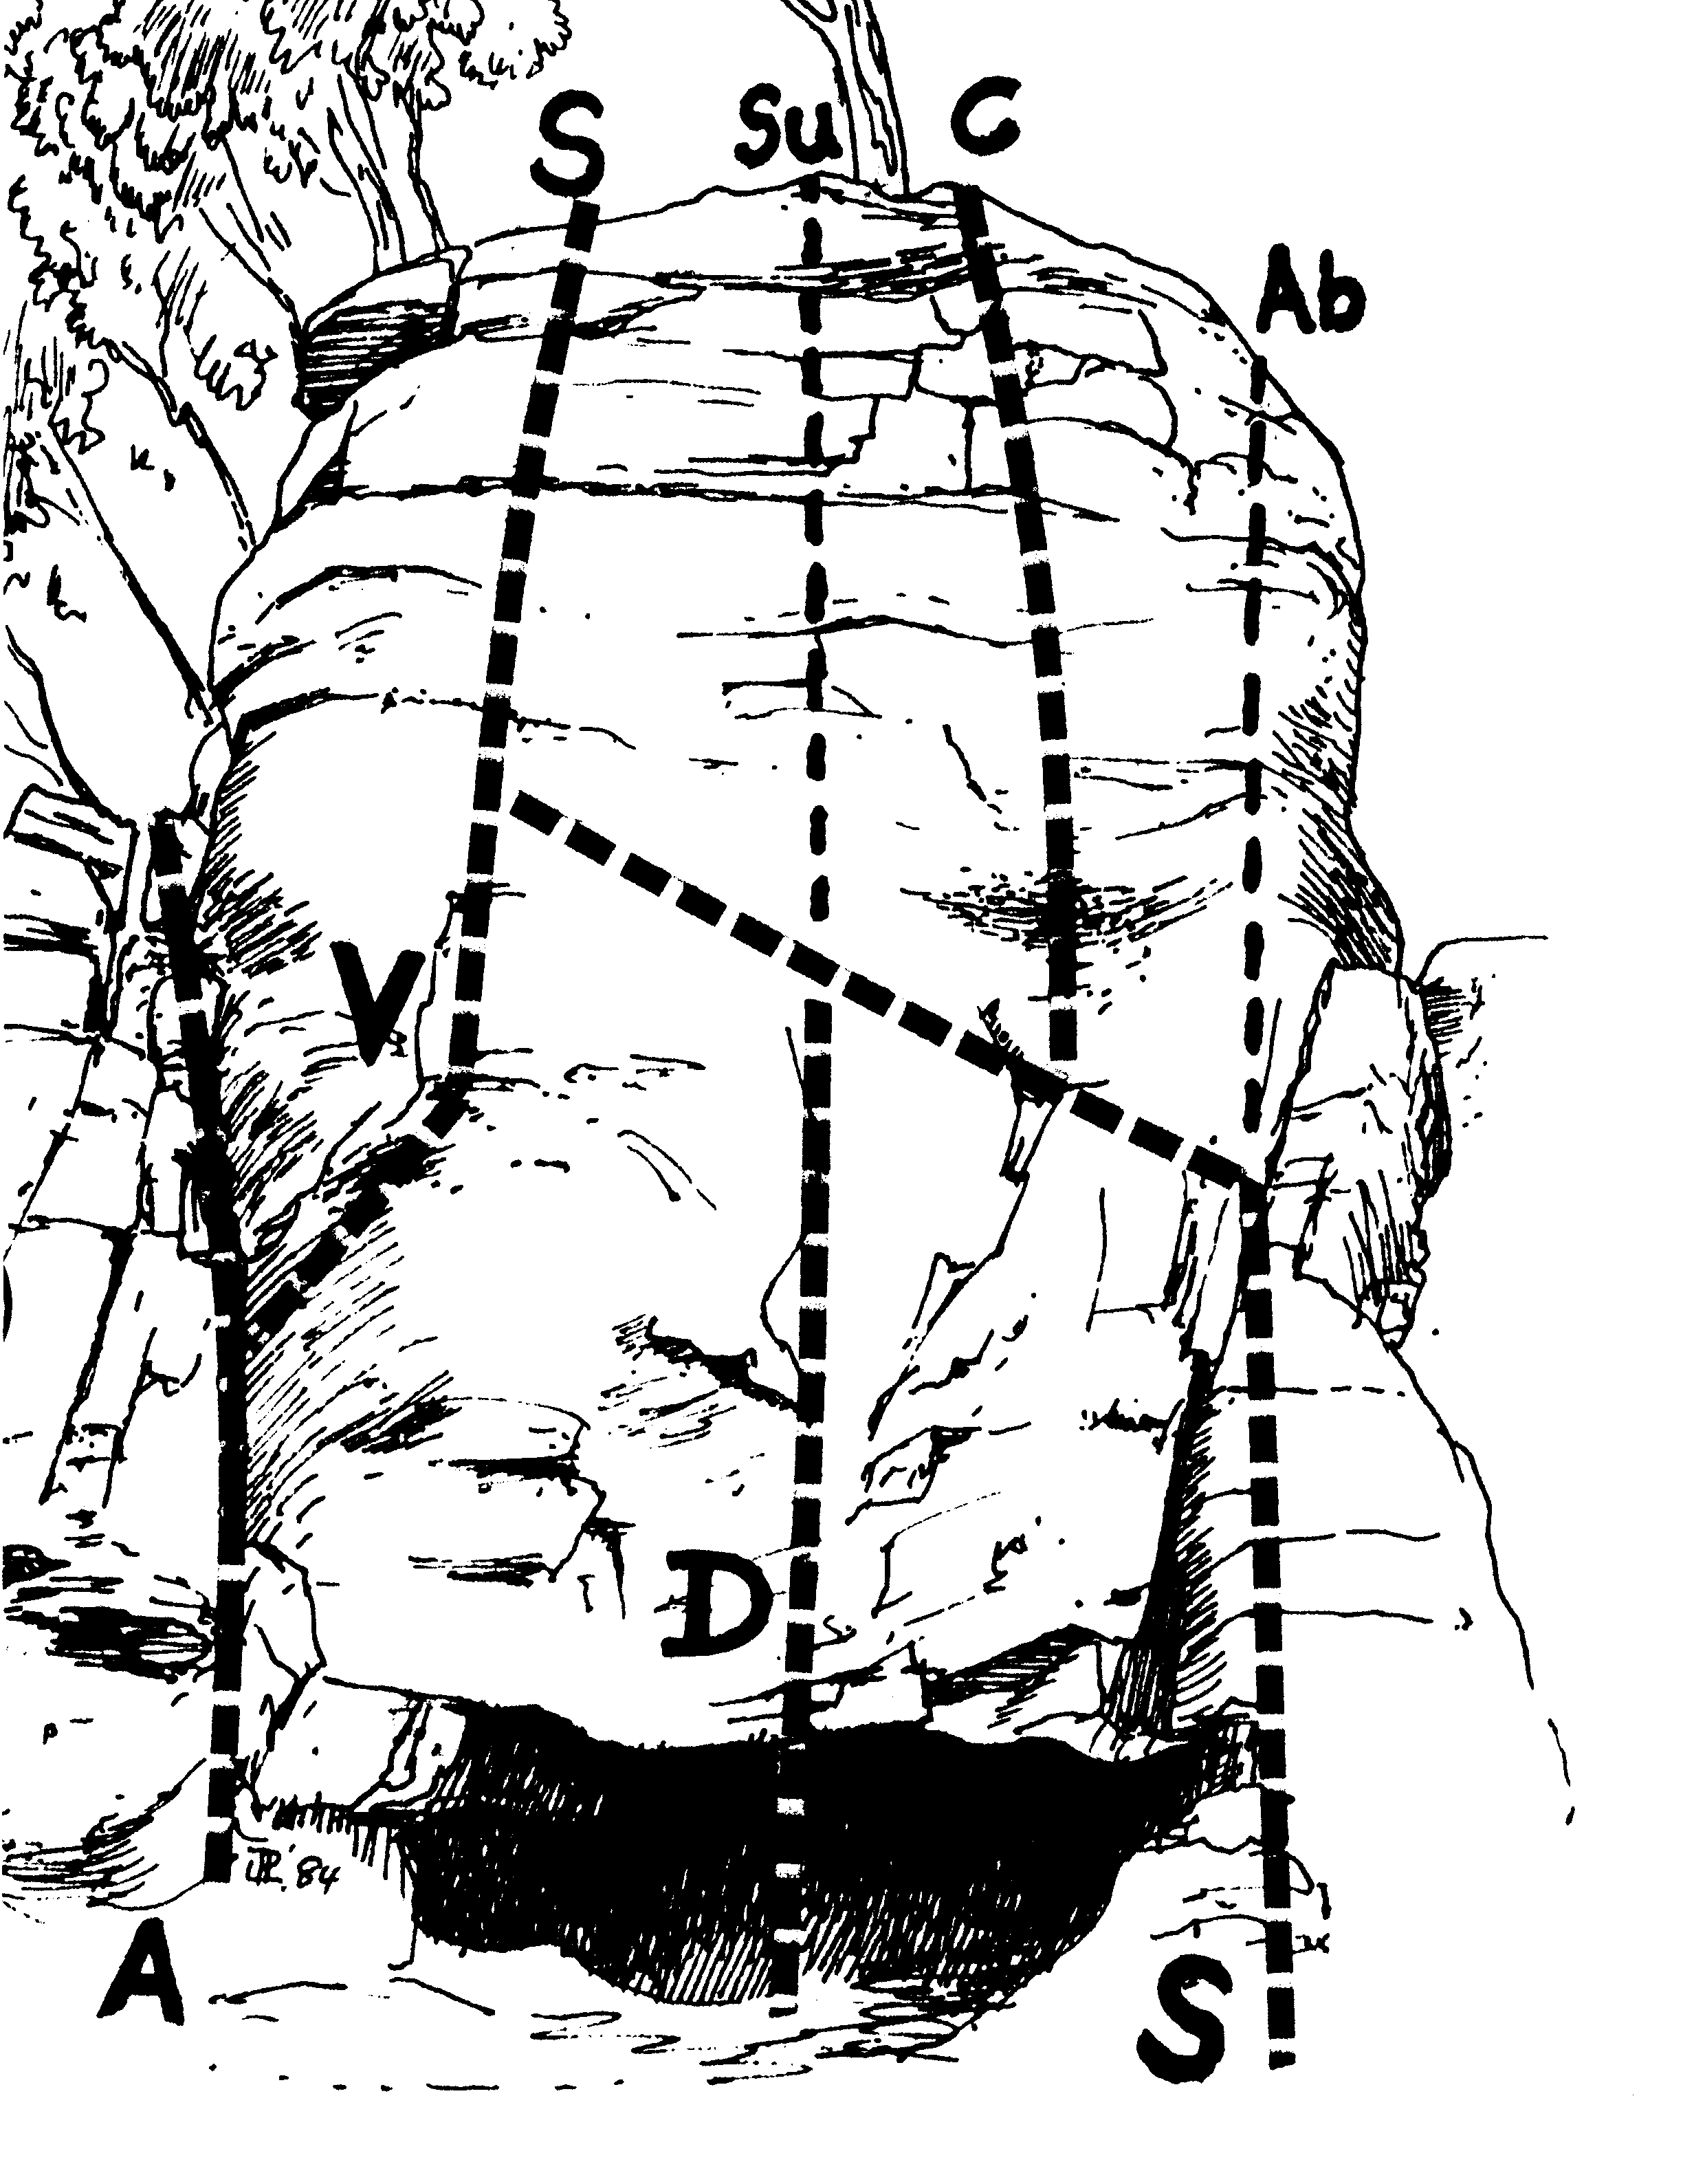
The left-hand crack of the buttress.
You won't even get warmed up on this one! TR C. Baxter, Stranger, 1967.
Start as for Arapiles Crack. Climb up for a couple of metres until a weakness leads up R. Follow this, move R 2m then finish directly up on sloping holds.
Start midway along the face. Climb directly up to meet the traverse of the original line then finish as for that "root".
The best route on the face. Start as for Square Root Direct. Climb up to the traverse, then continue straight up without deviations.
A wandering face climb which finishes just to the right of Arapiles Crack. Start at the parallel grooves on the extreme R of the buttress. Climb up easily to about one-third height. Move diagonally across to the L side of the face, then finish directly.
TR Reg Williams, 1967.
The most difficult route on the face. Climb the initial few metres of Square Root. Rather than traversing way out L move L 1m then continue straight up through the middle of the "blocks".
TR John Moore, 1967.
A steep route which takes in the line just L of the RH arête. Climb the initial 3m of Square Root. Continue up the steep face above, keeping left of the block and arête.
This is the major cleft separating the main part of the buttress from the smaller section to the R. 1967.
Climb up the shattered hand-to-fist crack 5m R of Oblique Gully.
TR Baxter, 1967.
The thin crack-line 10m R of Absurd.
TR Baxter, Stranger, 1967.
The lichen covered wall just R of Una's Lock. Very thin.
TR John Moore, 1967.
Castle Rock
The most substantial piece of rock in the area is Castle Rock. This extends for a good 50m and provides a good scattering of grades - from easy 8's to ego testing 25's. Many of the routes ascend very steep rock, and in the Excalibur area the overhangs are testing for all. The buttresses are directly approached from Shadow Buttress by following the path to the top of the hill and crossing to the other side of the hill where it overlooks Risdon Vale.
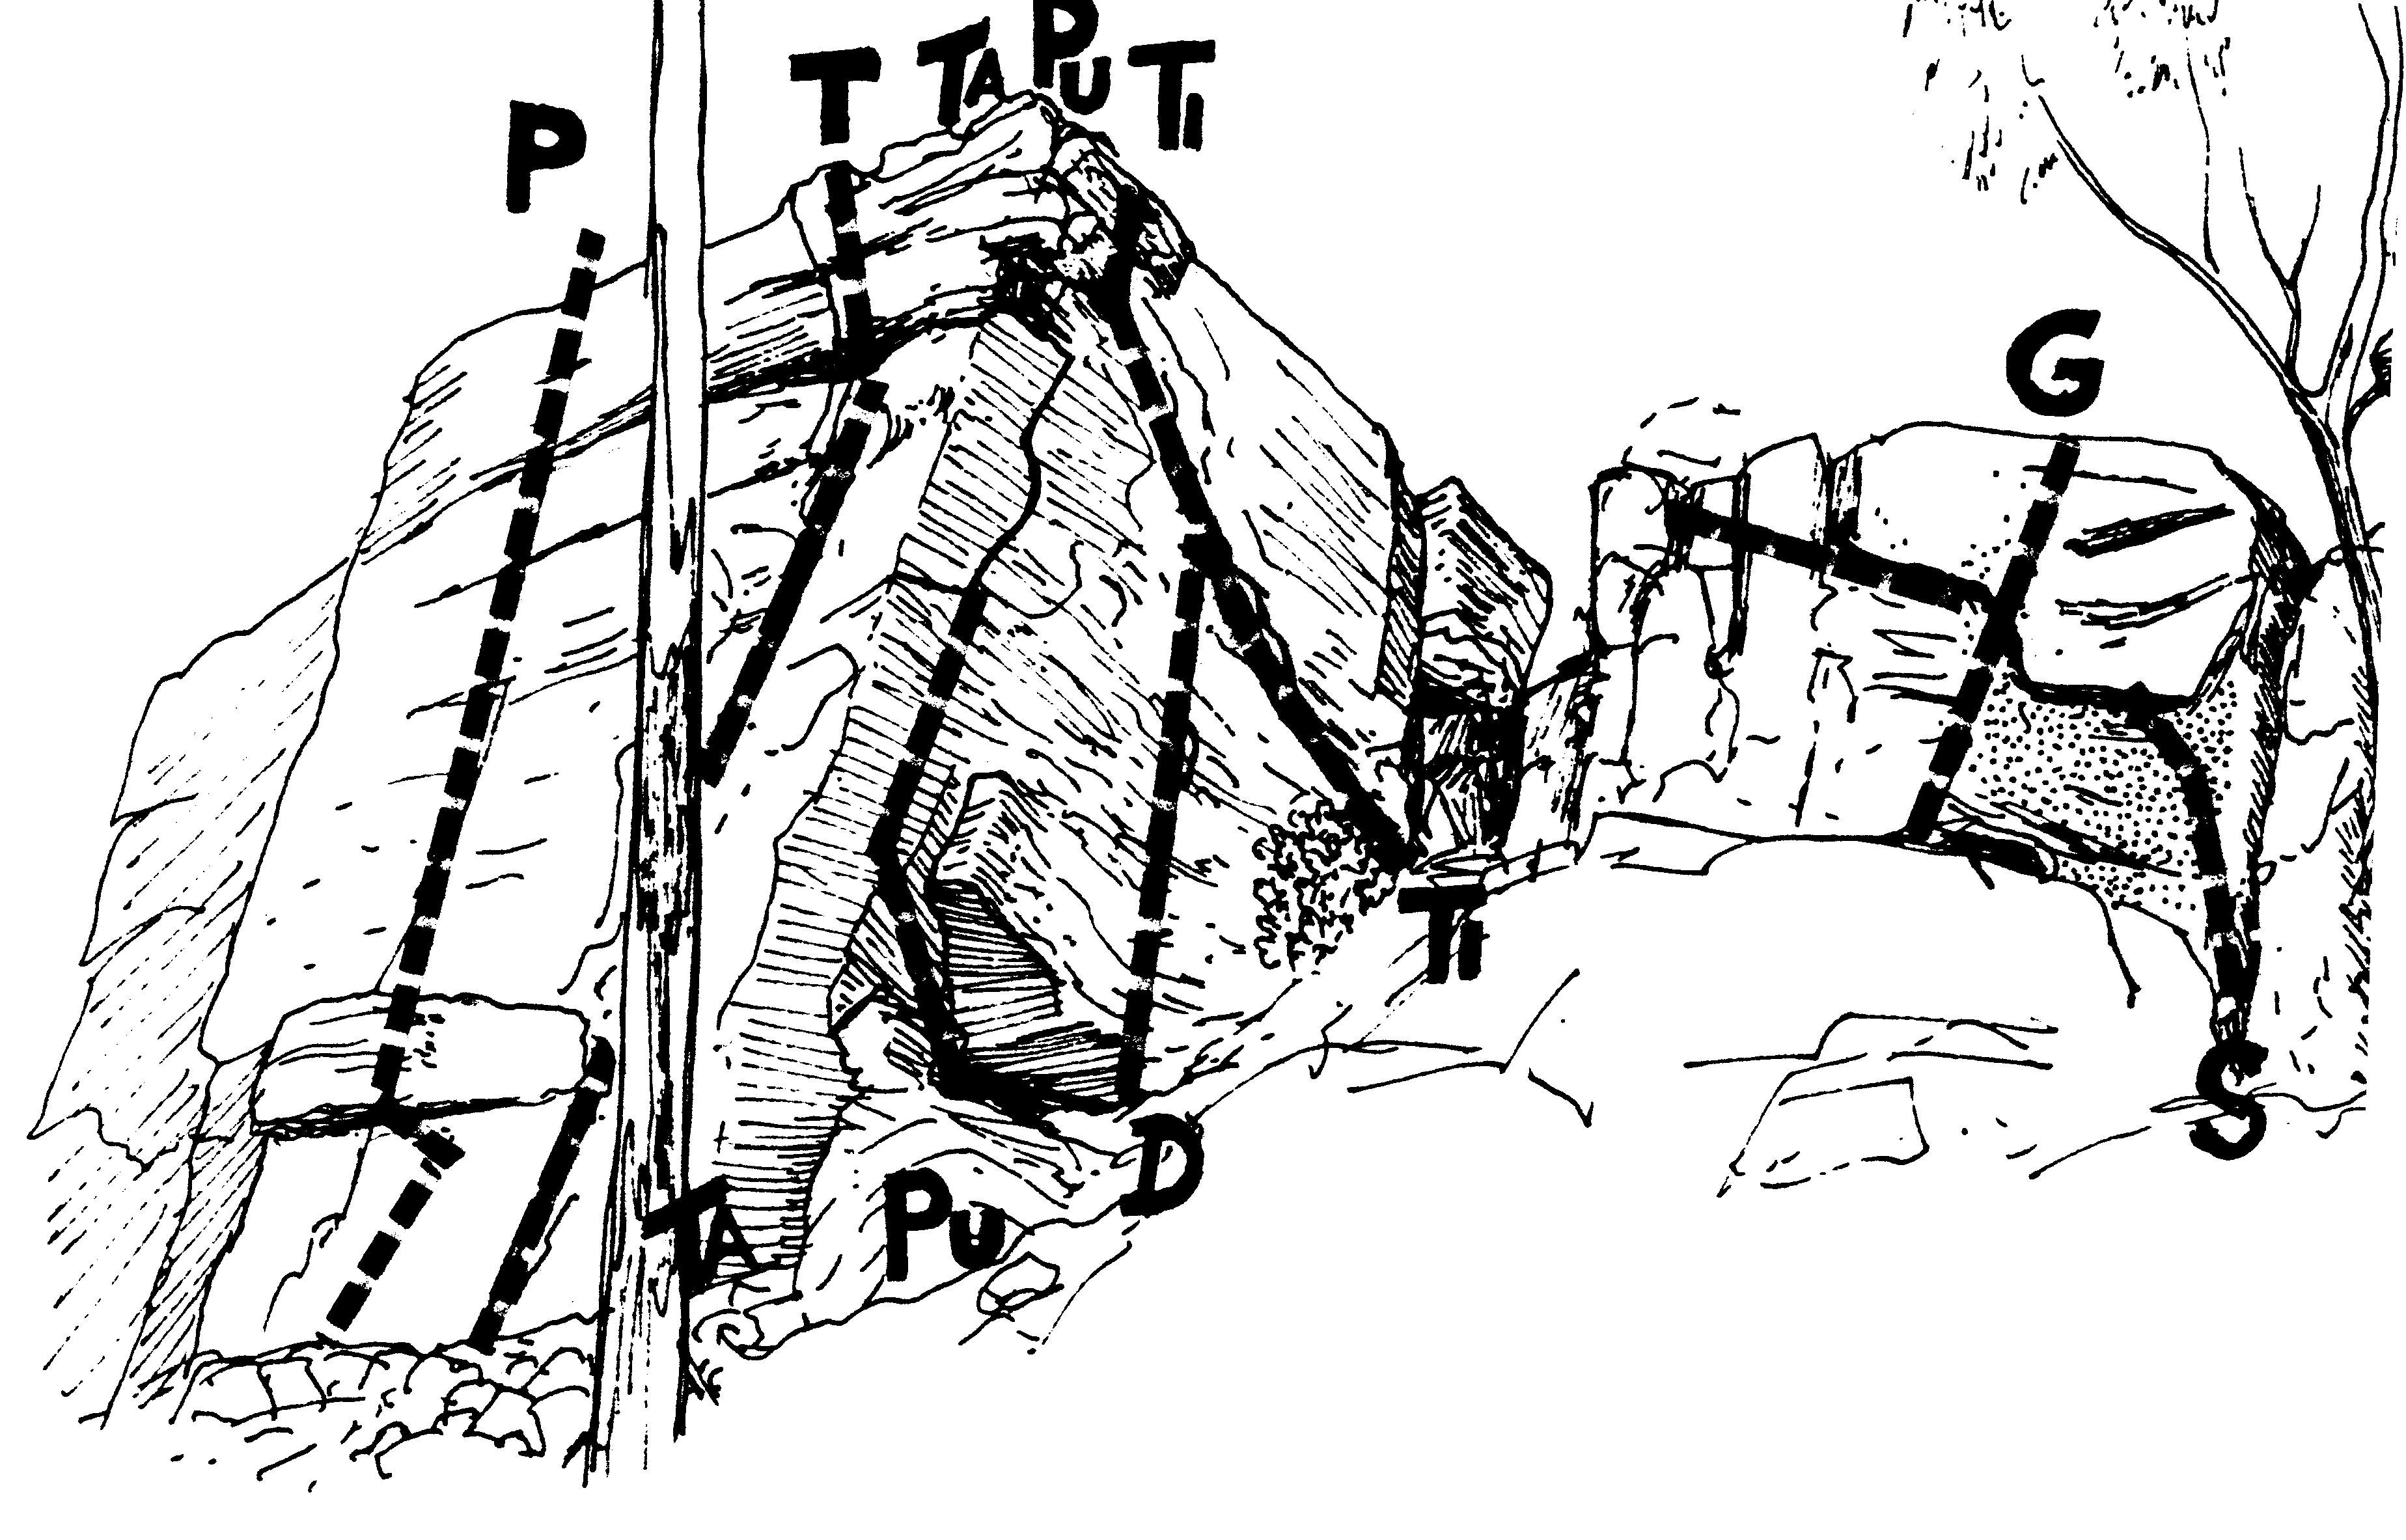
A direct route up less than vertical rock above the tree at the base of the buttress. Start 2m L of Trembles. Surmount the initial scab to a ledge. Move slightly R then continue thinly up to the top. Quite testing for the grade.
TR Reg Williams, 1967.
One of the best of the easy climbs in the area. Climb the crack 3m L of the arête, finishing with some good (crux) moves on steep rock at the top.
A direct route which takes in the arête to the immediate R of the normal route.
A brilliant route up overhanging rock. Although it looks fairly easy, the moves are challenging. Start R of the arête between Trembles and Tiger Wall. Climb up (using the arête for balance) to the finger-crack. Continue up the overhanging face above by utilising the vertical crack as best you can - if you want to practice really shitty finger jams, then this is the climb for you!
Start 2m right of the arête. Climb up a few metres until it is possible to move R into Tiger Wall Direct. Finish as for that line.
A good steep route up the middle of the wall. Start on the block sticking out from the face. Continue straight up (before the "angle of the dangle" gets the better of you).
Start towards the R of the wall at the small bush. Follow the line of jugs and ledges diagonally leftwards across the face. Watch out for the lichen, especially if you're silly enough to attempt a solo of such a meagre route.
1966.
After this route the cliff turns a corner to take on a northerly aspect. The corner provides the best ascent or descent route in the vicinity, although it is also possible to walk down to the left of Palpitations. There is no good access route between this corner and the other westerly end of Castle Wall, sixty metres to the right.
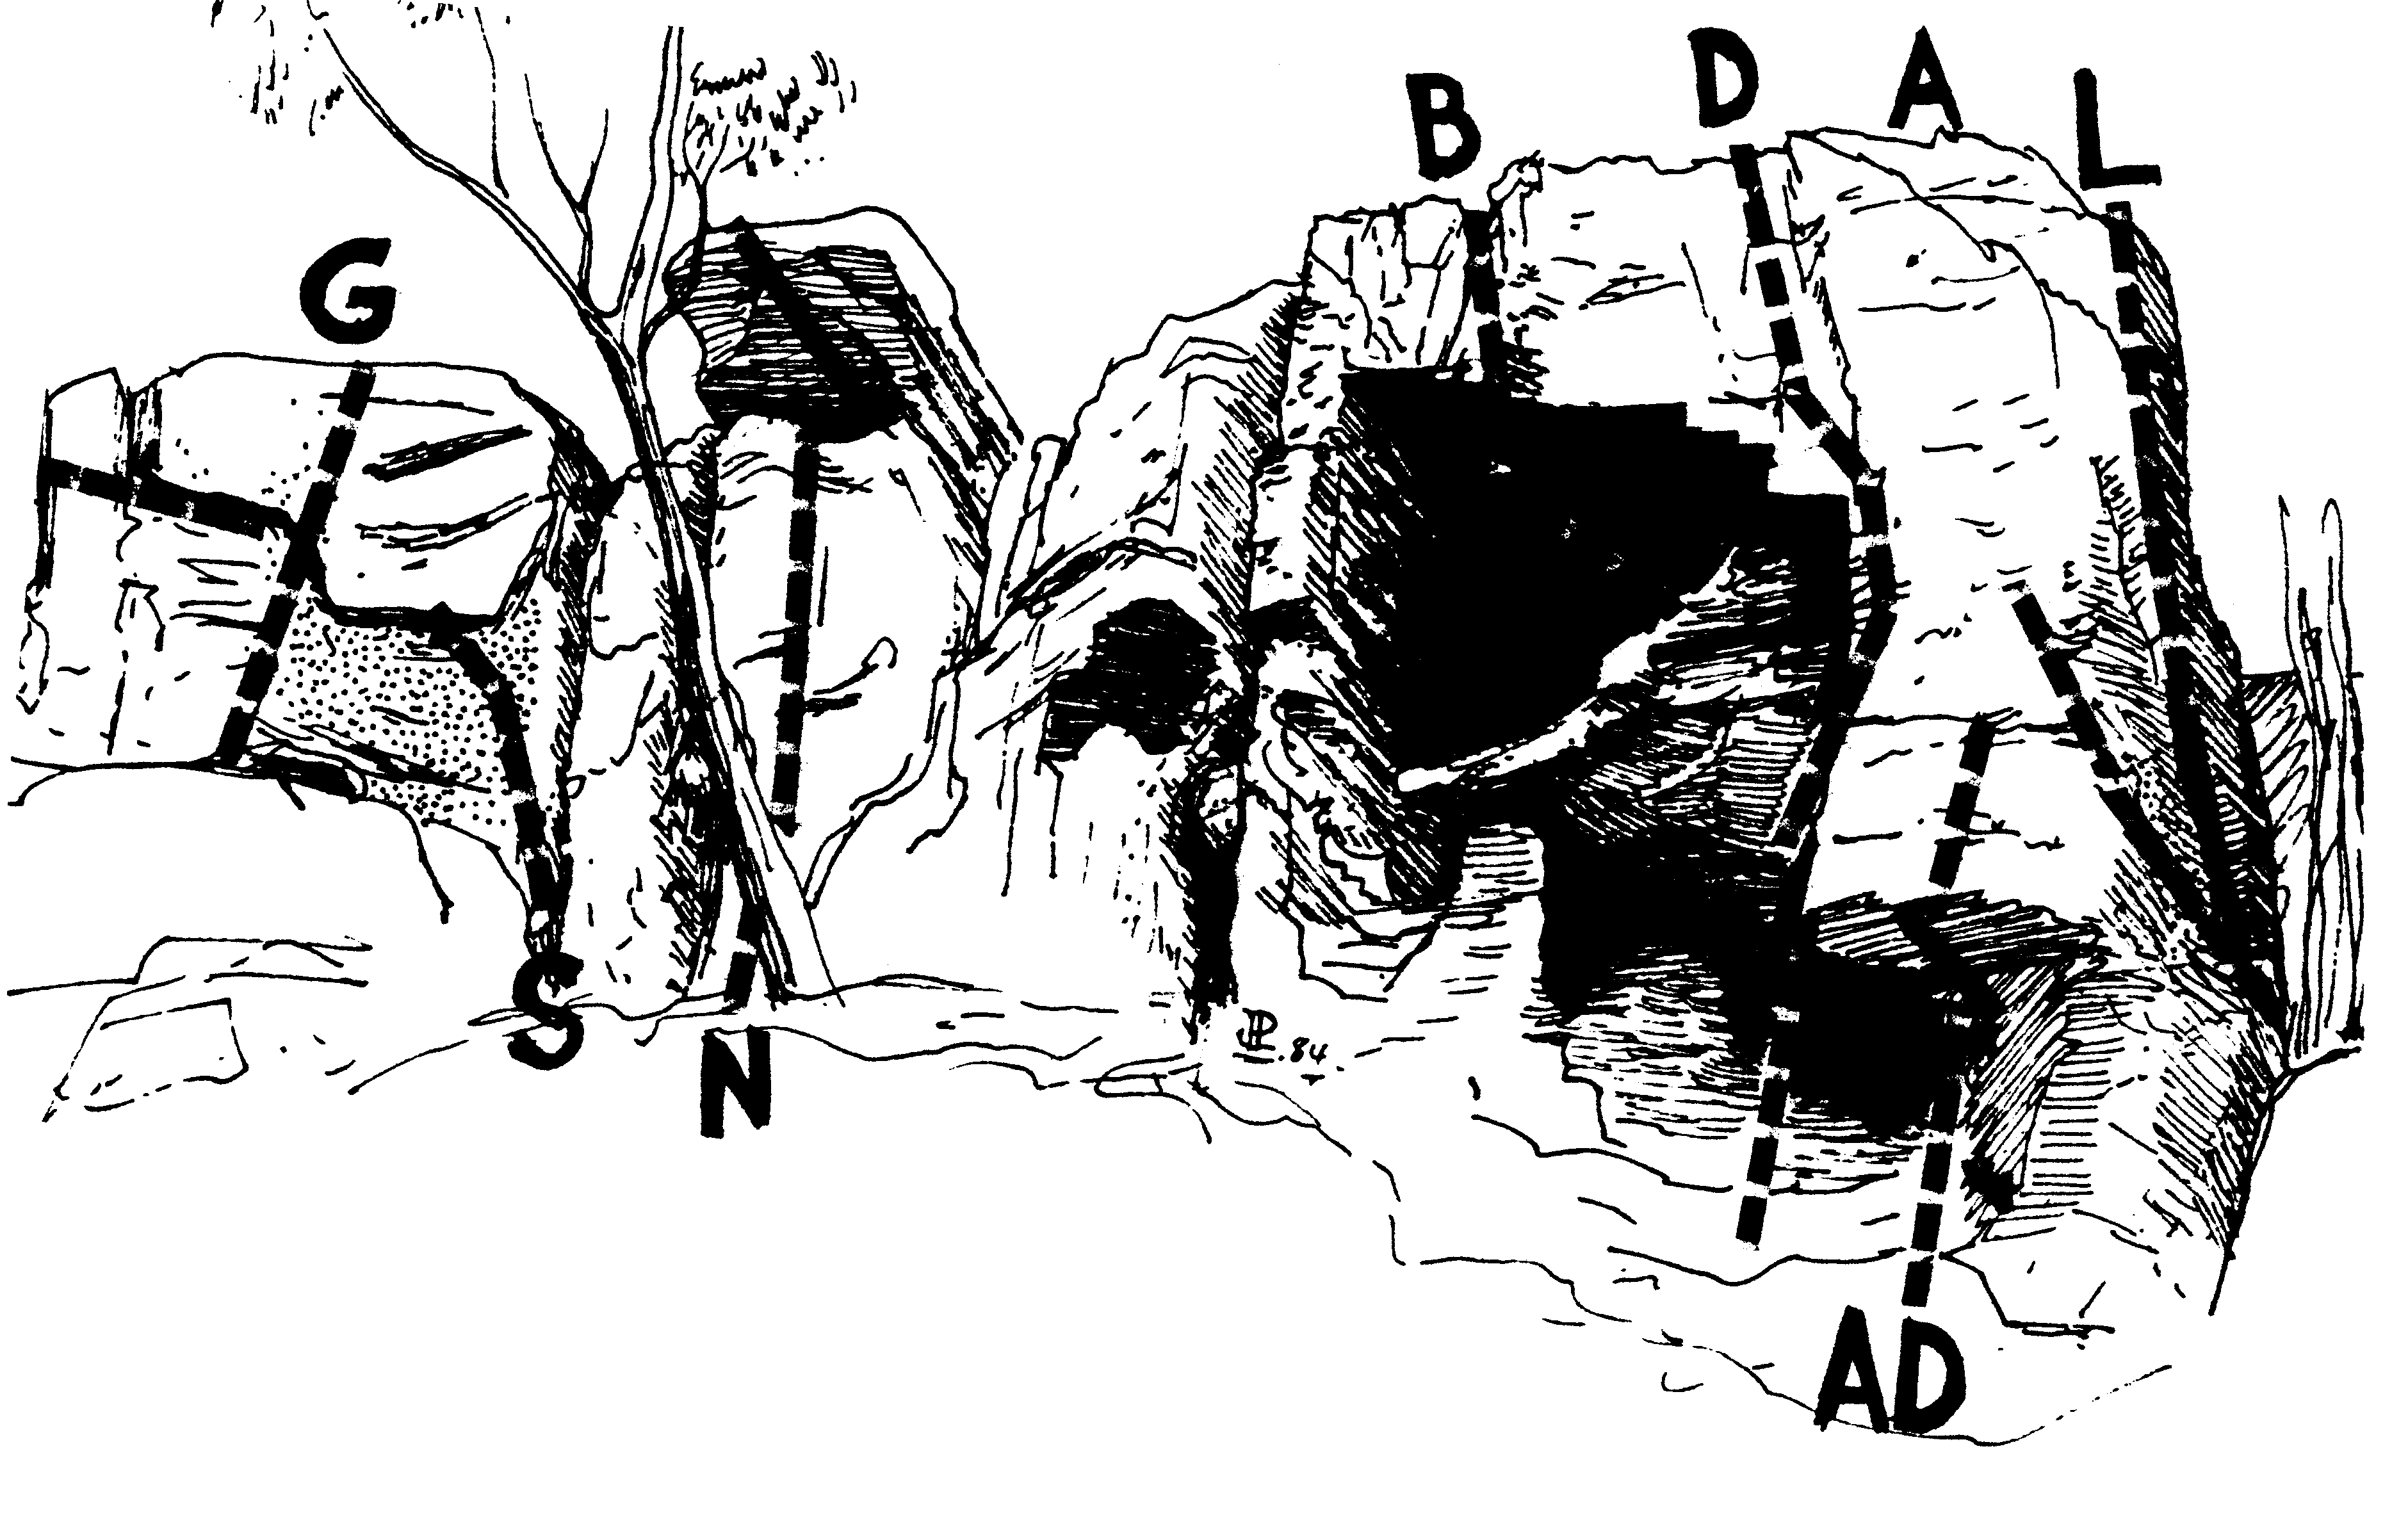
A reachy (read "height dependant") problem up a wall of lichen. Start 5m right of the corner and midway along the face. Gain the horizontal then use this to reach some small holds high up and hence the top.
A good (albeit rather uncommitting) solo, but difficult to top-rope or lead. Start just R of the platform at the base of the Gerry face. Climb up 2m to the start of the horizontal fracture. Follow this leftwards 3m, move up a little, then continue L to finish at the tree. Good fun.
Rumour has it this climb was originally known as Jackson's Nose. Start just above the large tree and below a half-metre roof which sticks out from the otherwise nice looking face. Ascend the wall to the roof, then climb directly up the "nose" to finish. A classic line, though a little too strenuous to be enjoyable at the end of a day.
A mind-blowing problem which starts in the back of the cave 5m right of The Neb. Hang out from the cave to reach the first (creaking) holds just above the lip of the overhang. Hang free on these for the photos, then continue up any way you please.
Another good route. Step out from Belfry onto the sharp RH edge of the arête/cave. Climb up 3m then move R onto the face and the top.
TR Stranger, 1967.
A variant on the original which eliminates the fun initial moves. Start below the bottomless corner. Use the good jugs and acrobatics to gain the edge of the cave, then continue as for the original line.
A classic climb involving a sequence of opening moves which are much more horizontal than vertical. About 2m right of Dingbats Direct is a cave at ground level which is "plastered" with jugs on its roof. This it. Hang off the jugs to gain holds on the vertical face. Swing onto the face (crux) and continue up.
The cliff then turns the corner into Letterbox Wall and adopts a westerly aspect.
Start at the foot of the left extremity of the Letterbox wall. Under-cling out L on the flake to the arete between the two faces. Follow the exposed front of this to the top (a metre or so right of Dingbats).
1966.
Start midway between the corner and the tree to the R. Ascend the face on small holds.
A superb beginners' route! Climb directly up the wall 1.5m left of the corner (Twiglight climb) past a number of letterbox shaped pockets to the top.
The obvious corner to the right of Letterbox. The climb is very seldom done in its own right, but is often used as an ascent/descent route for experienced climbers.
1967.
This climb (also known as Side Salad) starts 8m right of the corner in the cave (which provides excellent amplification for ghetto-blasters if your feel like invading the serenity of the experience). Climb the RH edge of the cave to its top. Move up a bit, then follow the diagonal line of weakness upwards R.
1967.
Start as for the Needle. After leaving the cave, traverse R into the obvious crack of Excalibur Direct. Finish up this.
1967.
A good route, but the direct version is recommended. Start on the extreme R of the cave at ground level. Traverse R 2m into the striking crack, then follow the jugs to the top. Although the jugs are plentiful and huge, the slight overhang makes the crack reasonably strenuous if time is spent exploring its features.
A classic face route up steep rock. Start below the scab of rock, midway between the cave and Excalibur. Ascend the scab, then continue straight up on increasingly thin holds.
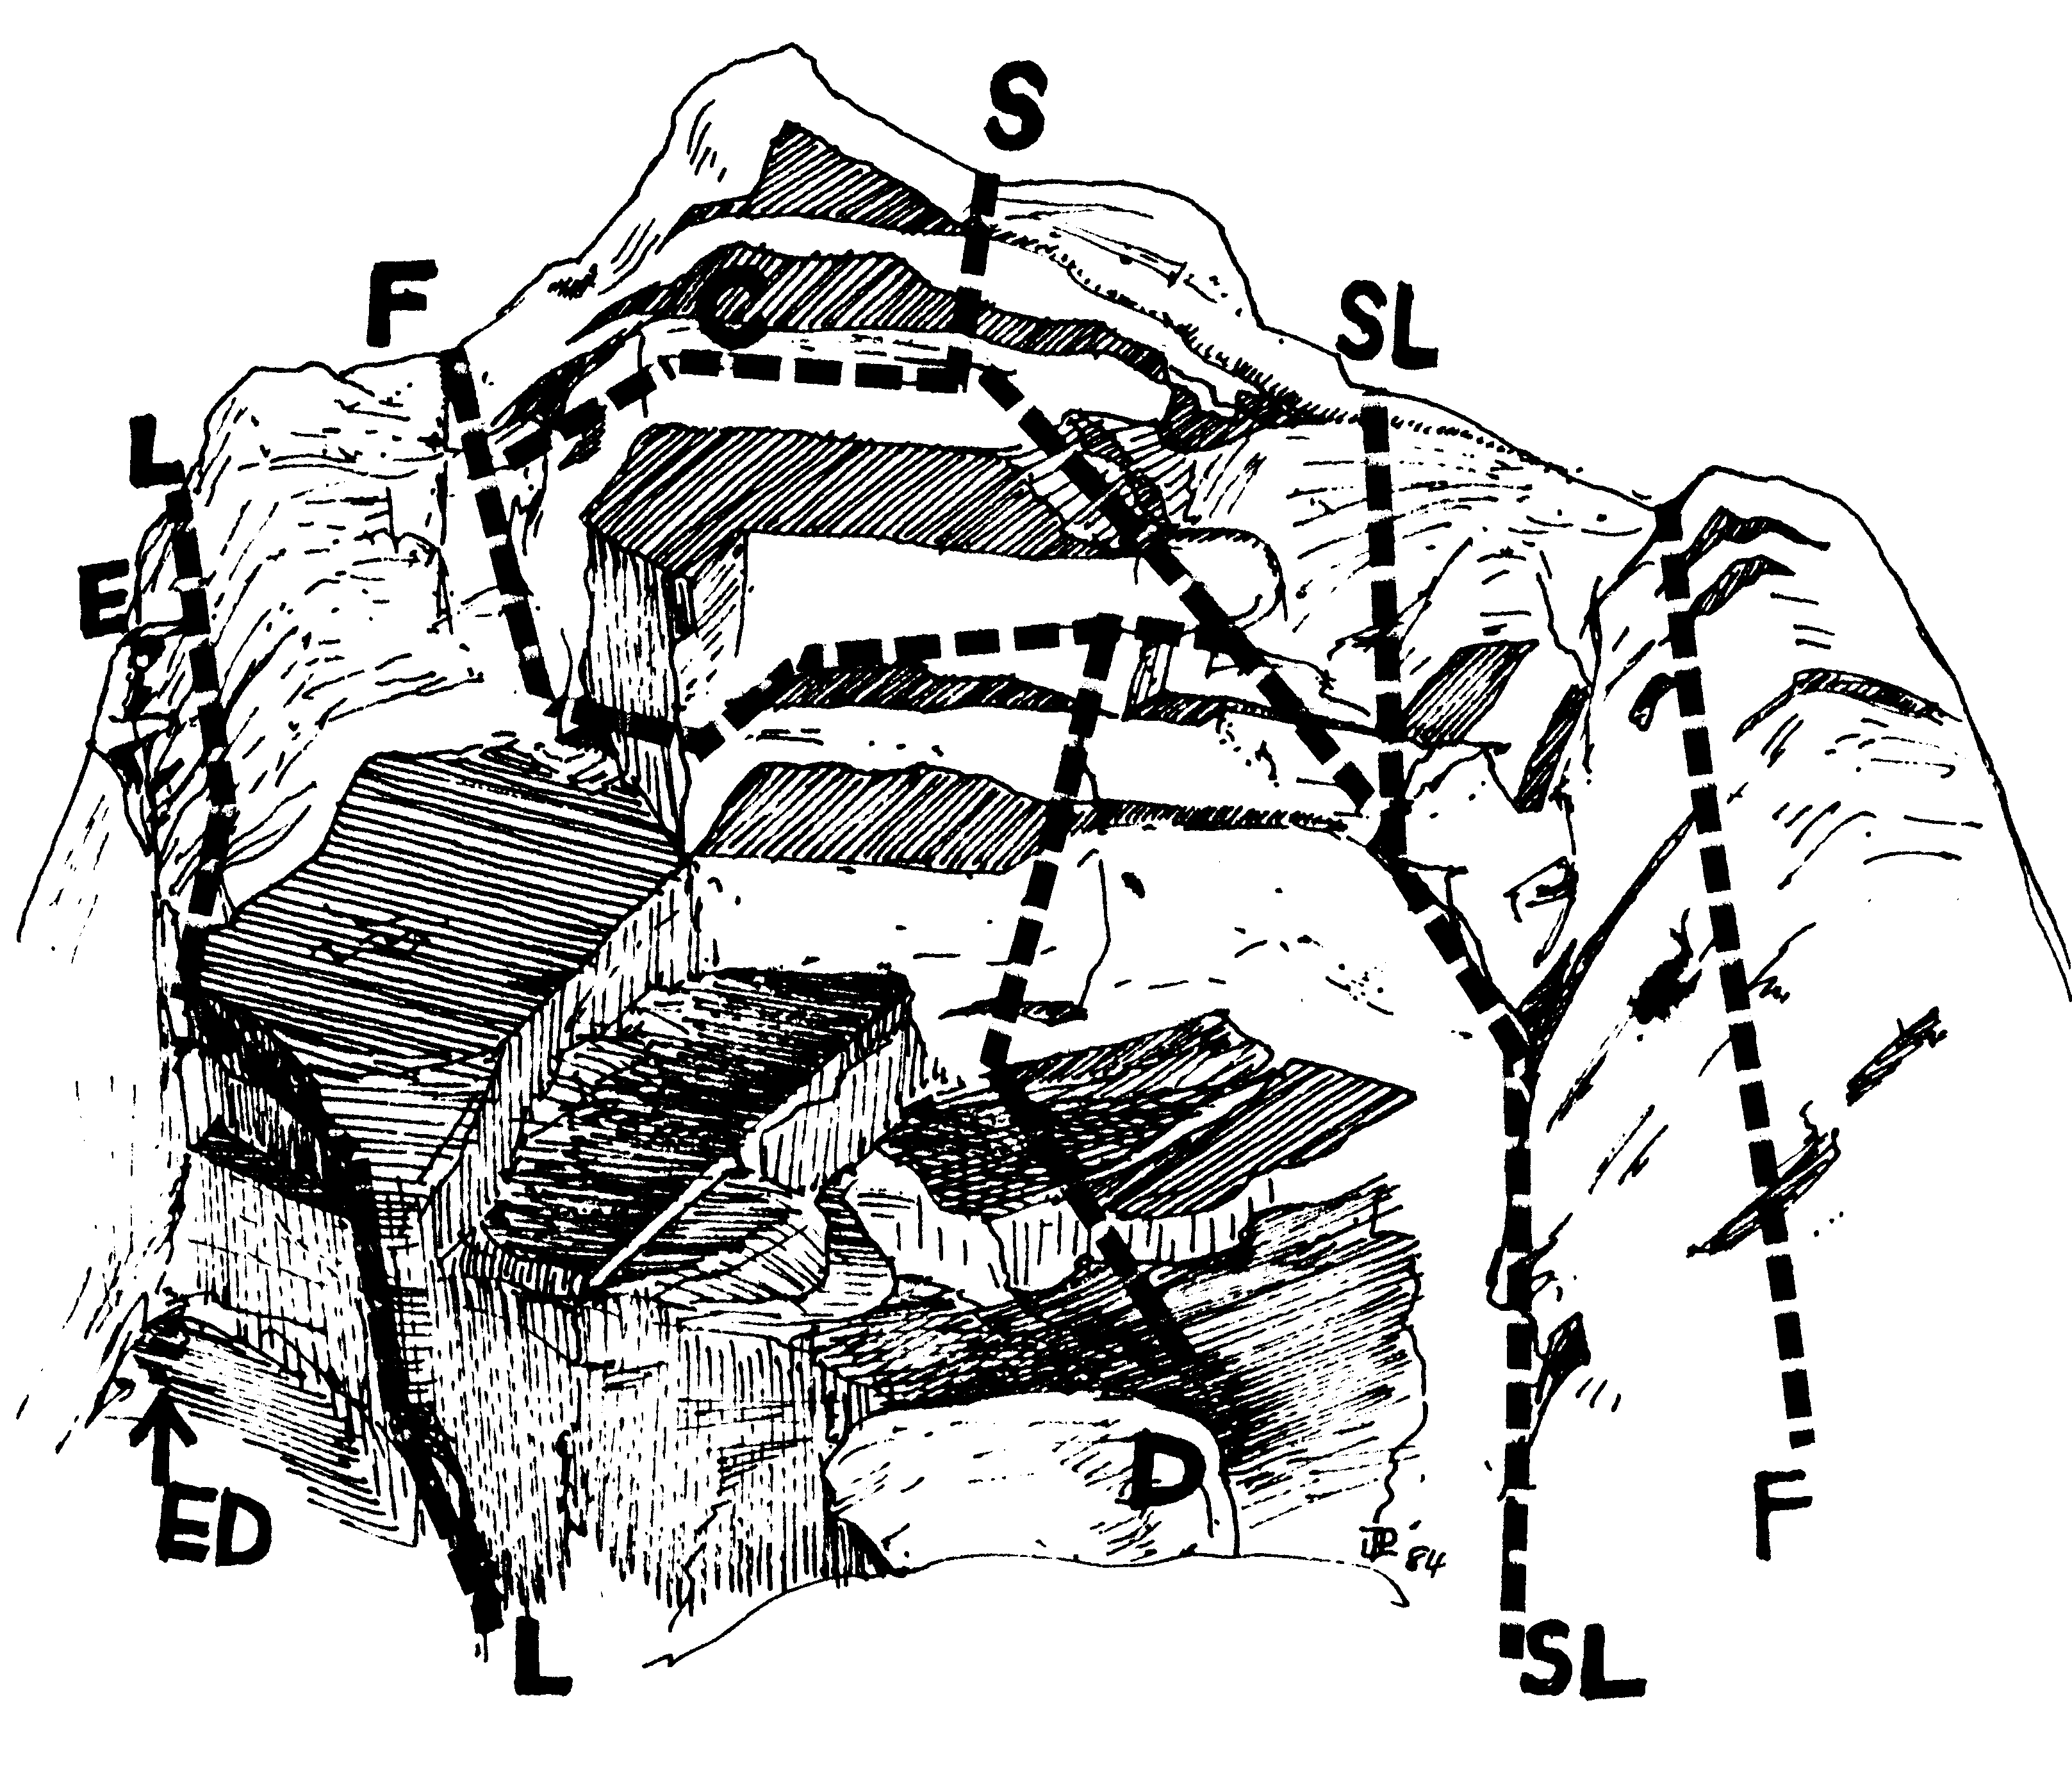
Without doubt this is "the way" to do Excalibur. Start directly below the fist crack. Surmount the bottomless corner, then follow the crack to the top. Strenuous for the grade.
TR Reg Williams, 1967.
A good fun route, especially for spectators watching their comrades peel off the lower section and pendu-plummeting into the tree. Start 2m R of Excalibur Direct, at the back of, and under, the roof. Climb the hand-crack in the corner, then traverse out L along the horizontal. Reach for the lower sections of the Excalibur crack, then move back R over the roof to follow the jugs on the face above.
A delightful route over a series of small roofs above the large cave to the R of Excalibur. Start from the top of the fallen block 5m R of Excalibur Direct (and where "calligraphy" on the block indicates the love locals have for the rock-climbing fraternity). Commence with a RURP in a thin vertical crack at arms length, then peg up the overhangs using convenient cracks.
FA J.Moore, R.Williams, 1967.
Climbs the stepped roof L of Seams.
Grant Rowbottom (TR) Oct 1996.
A great route. Start in the middle of the 4m long block. Reach up for a couple of good hand holds then swing your feet onto the rock. Move upwards to the horizontal crack below the first roof. Continue on with a slight rightwards trend past the second roof, the third roof, and so on. Join Seams just below the top and finish as for that route.
A classic which is more horizontal then vertical - not due of a overhangs, but because it involves 8m of height gain and a 10m traverse. Start in the corner as for Slavery. Climb up 3m, then move L across to a good hand ledge and foot smears. Keep traversing into and through the corner (crux), to finish directly just past the corner. The climb is difficult to top-rope (and even more difficult to lead) but worth the effort. Why bother with bungee-jumping when you have this!
A rather easy but nonetheless inspiring climb which again involves a huge traverse. The climb is identical to Funky Chicken but executes the traverse at a higher level (the feet are where the hands were previously). Another classic not to be missed.
A rather classy little climb up steep rock. Climb the first few metres of Slavery. Move L and upwards 2m past a series of flakes and pockets until below the final roof. Move directly over this (crux) to finish.
A good beginners first day route which is steep. Start in the corner, about 7m right of Excalibur. Climb directly to an under-cling flake. Move L slightly, then straight up to the top.
This climb is rather out of character with the rest of the climbs on the buttress, more of a boulder problem. Start in the middle of the face immediately right of the Slavery corner. Climb up to a ledge at half height, then up thinly to an under-cling finish.
The Managerie
The isolated boulder situated 100m below Castle Walls is known as The Menagerie. There are a couple of boulder problems on it.
Lone Tower
About 200m west from Castle Walls is Lone Tower. It can also be approached from Shadow Buttress. The buttress is characterised by a sloping tree at its base and the half-metre overlap which runs across its length.
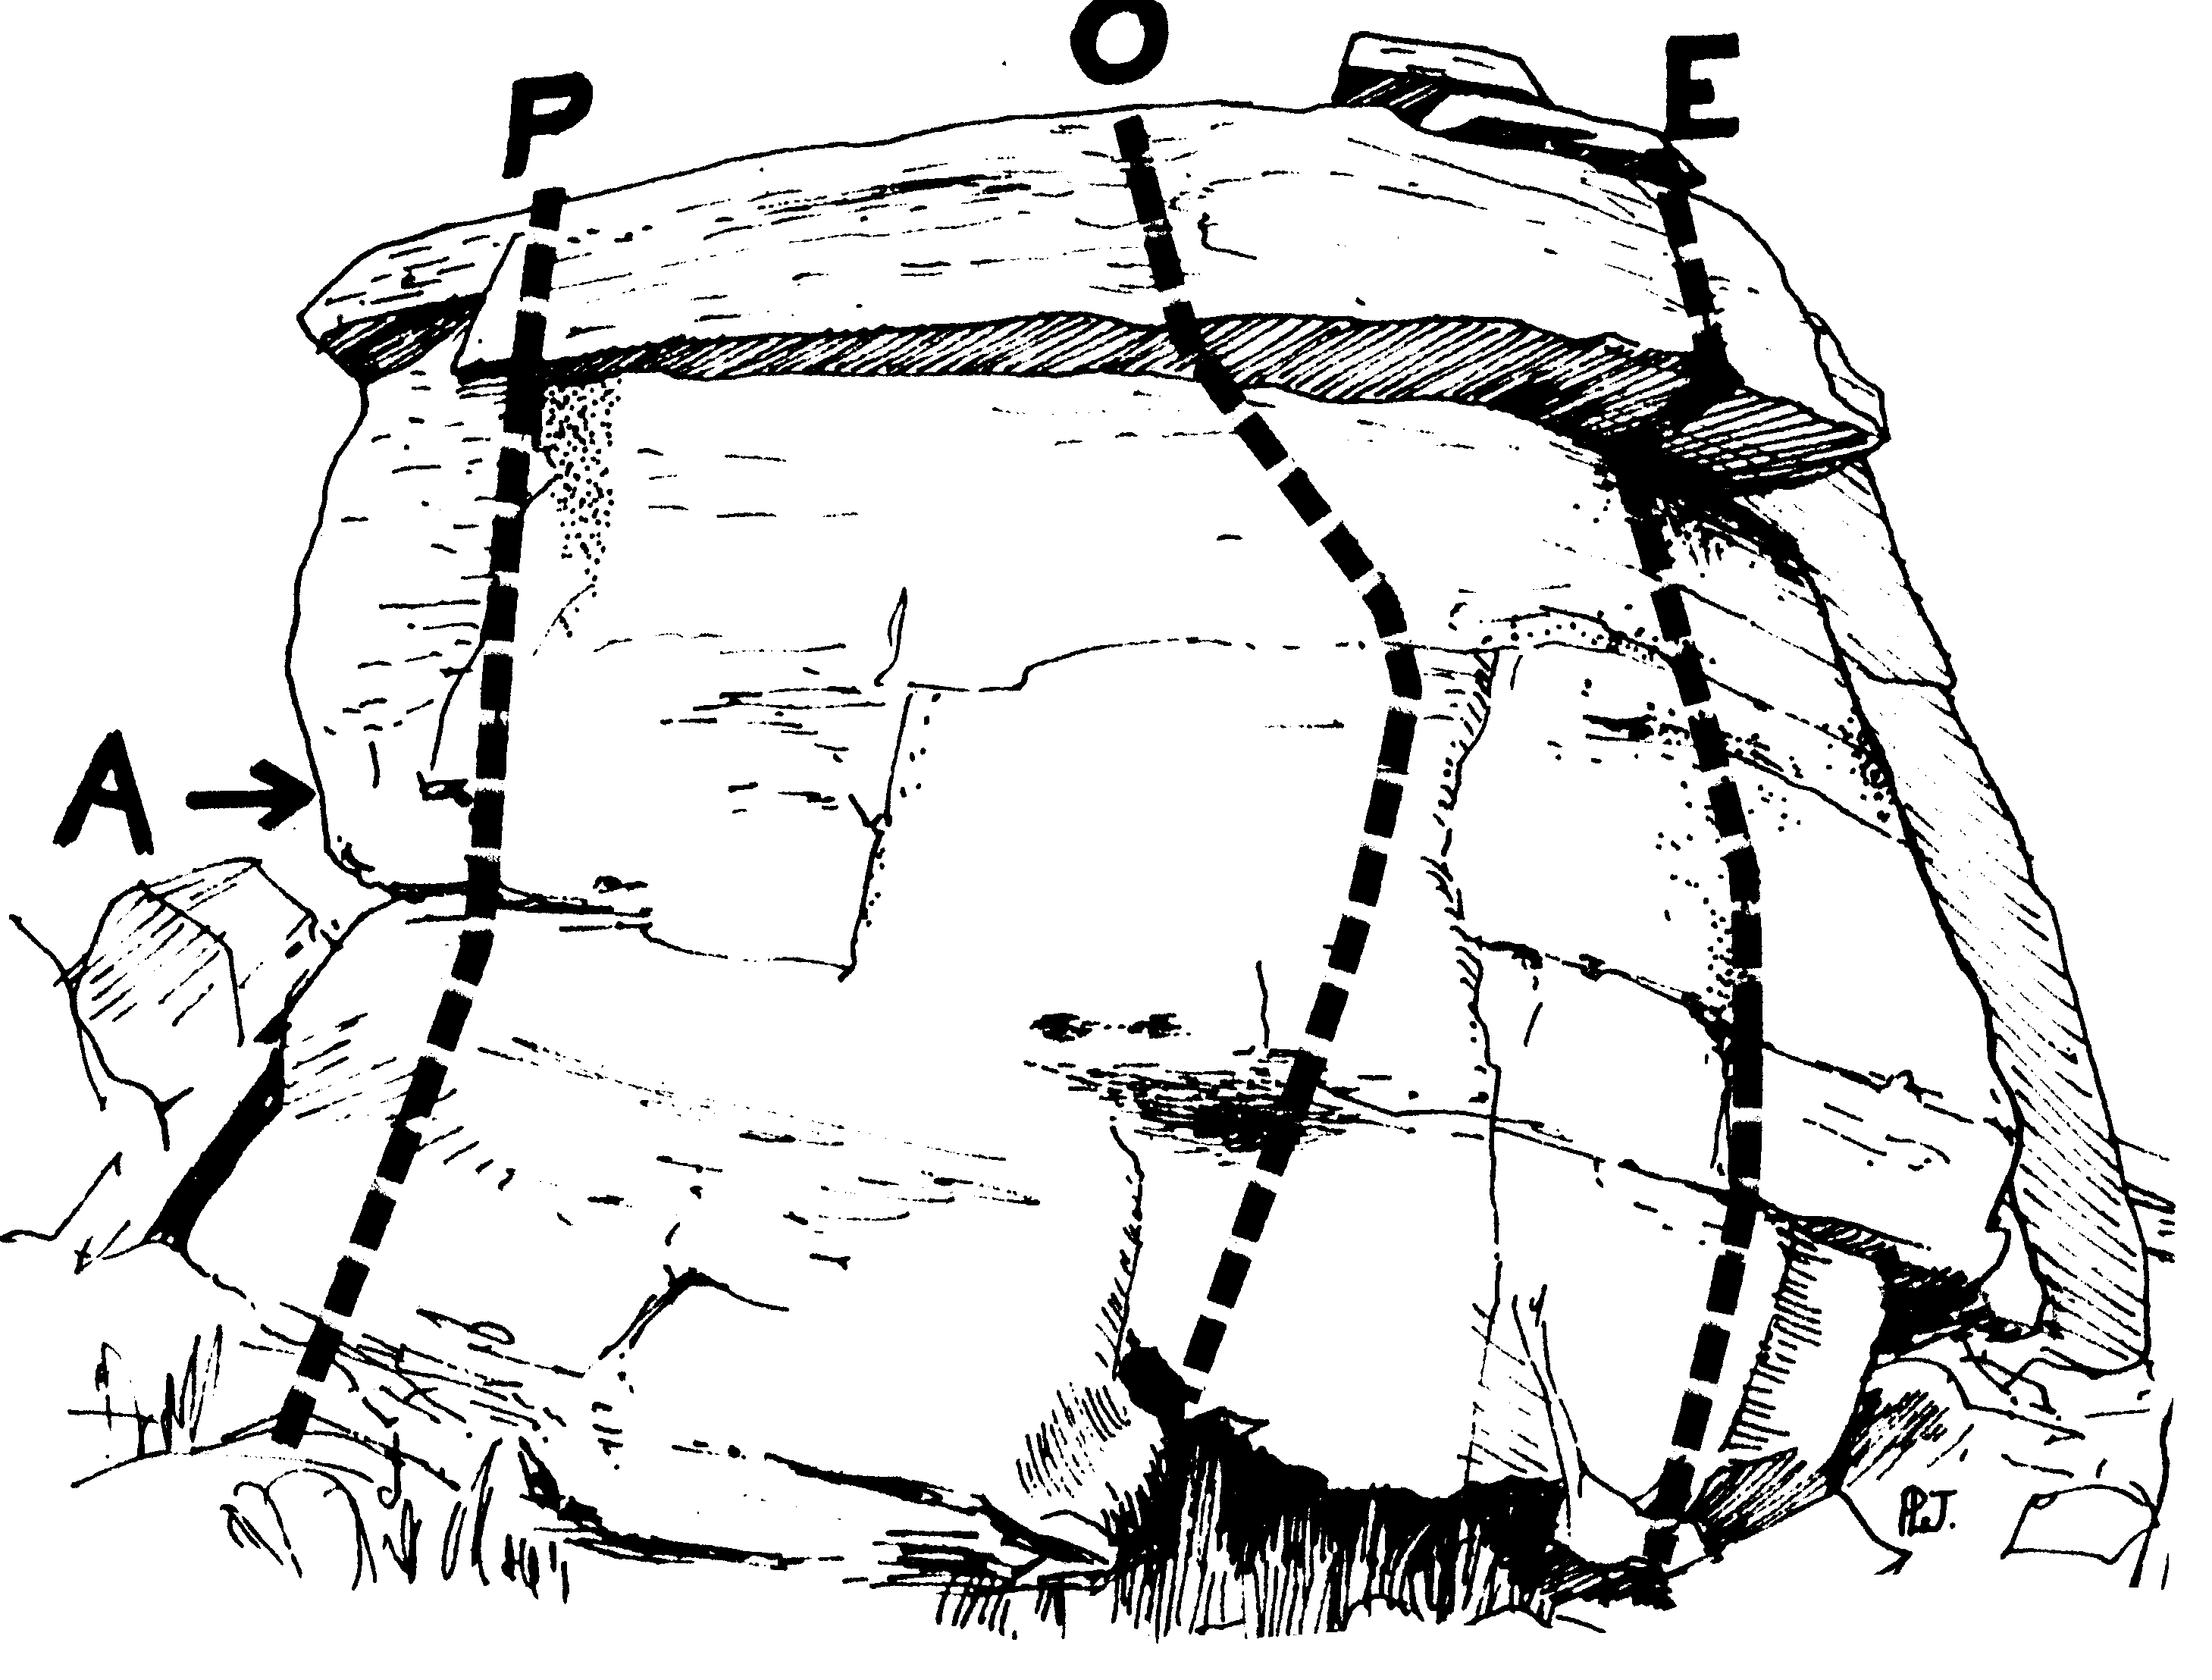
Behind the tower and to it's L is a short, gently sloping wall which is broken by a ledge at half height. Climb it.
Christie, 1967.
To the L of the main face is a short, clay covered gully. Climb the broken crack above this.
Douglas, 1967.
Start on the LH edge of the face 1m R of the arete. Climb up to the sloping ledge, then follow the curving crack to the top.
TR Terry, 1967.
A difficult route up the middle of the face. Climb up to the ledge, then follow the steep crack to the overlap. Trend L past this then straight on to the top.
Towards the RH end of the face and just L of the tree is a series of thin, broken cracks. Move up these and the face to the overlap. Surmount this, then continue up the crack on the L to the top.
1967.
The Bastille
About 300m R of Lone Tower and 100m L of Shadow Buttress is The Bastille. This small face has a few decent routes on it which are worth trying, though they hardly warrant "classic" status. Access to the buttress is easiest by walking around the hill from Shadow Buttress.
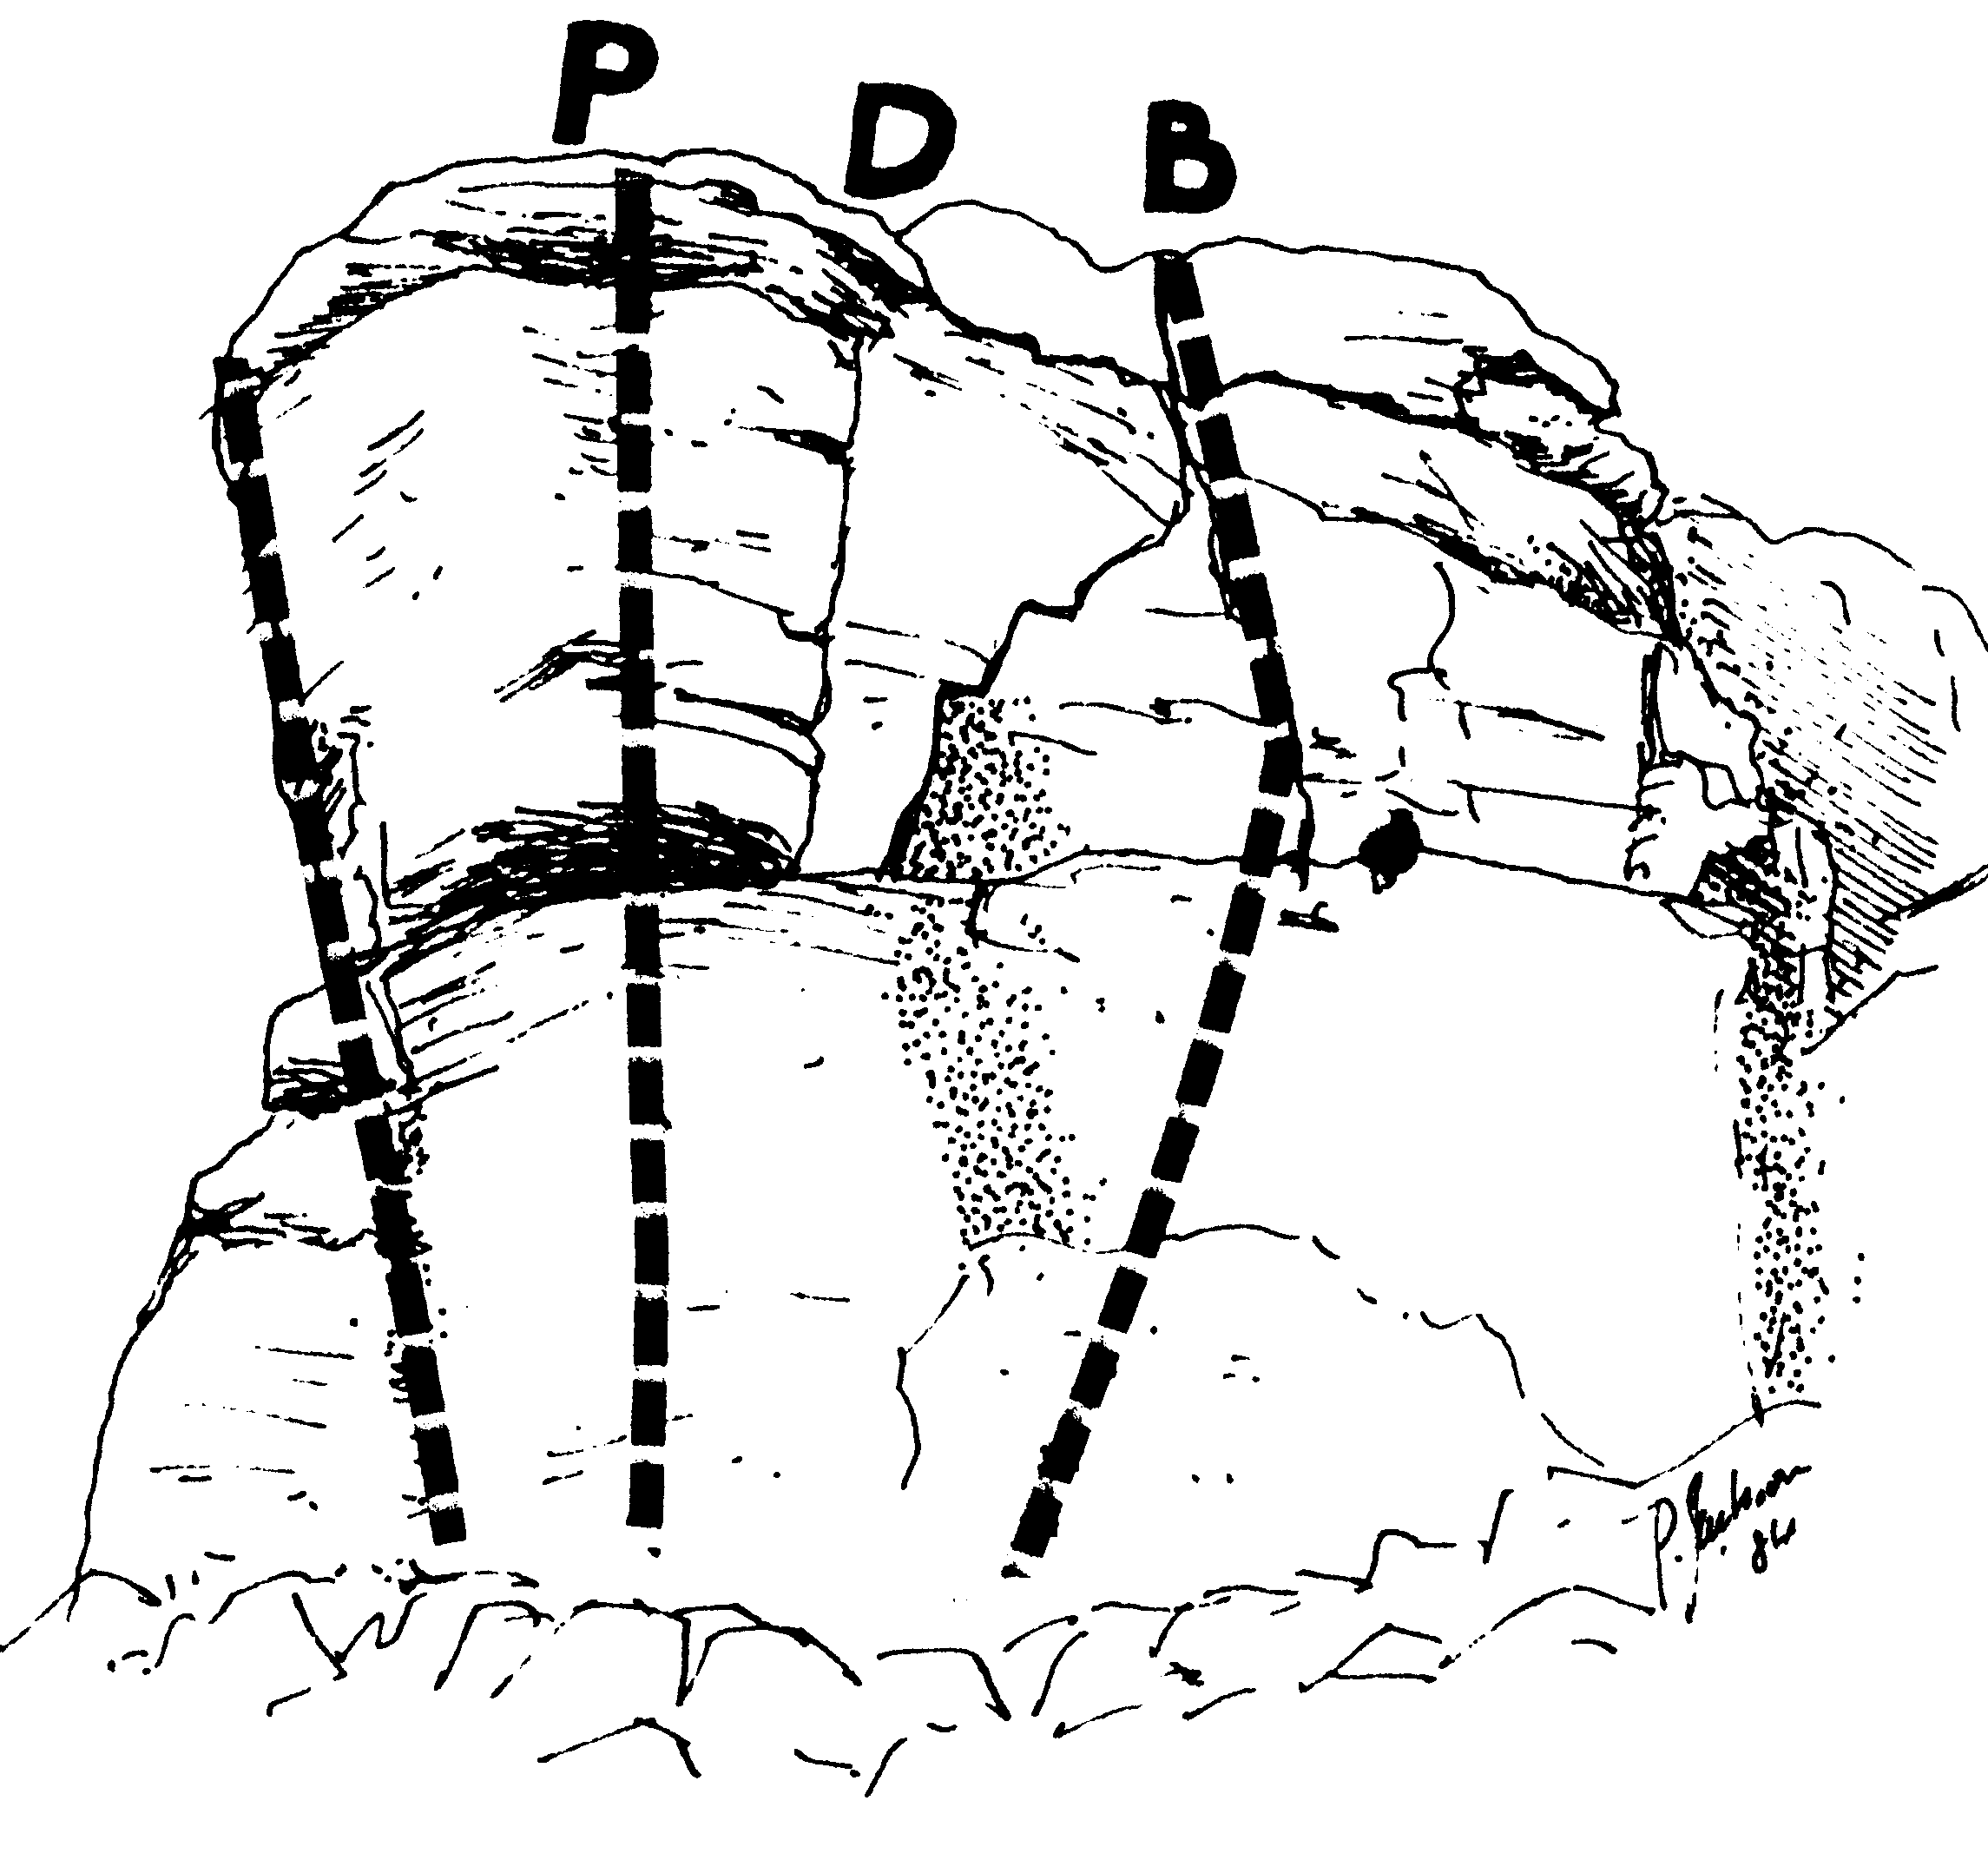
Start on the extreme L of the buttress, on the corner of the main face. Climb the initial blocky section, then ascend the steep face above. Surmounting the top is the crux of the climb.
Start 2m L of Drool. Climb straight up the broken face, and again experience the pleasure of mounting the top.
A good route up steep rock. Start directly below the thin crack bisecting the upper half of the face. Move easily up to the crack, then continue up with either finêssé and balance or a dyno.
Climb up to the start of the leftwards trending crack on the extreme R of the face. Continue up this to the top.
1967.
Shadow Buttress
The other beaut little buttress of the crag is Shadow Buttress which contains several fine lines - Rudolf, Parasite, Donner, Blitzen and Precision Wall to name a few. It also offers relief from the sun on hot summer days. Approach by heading south over the top of the hill from Excalibur area.
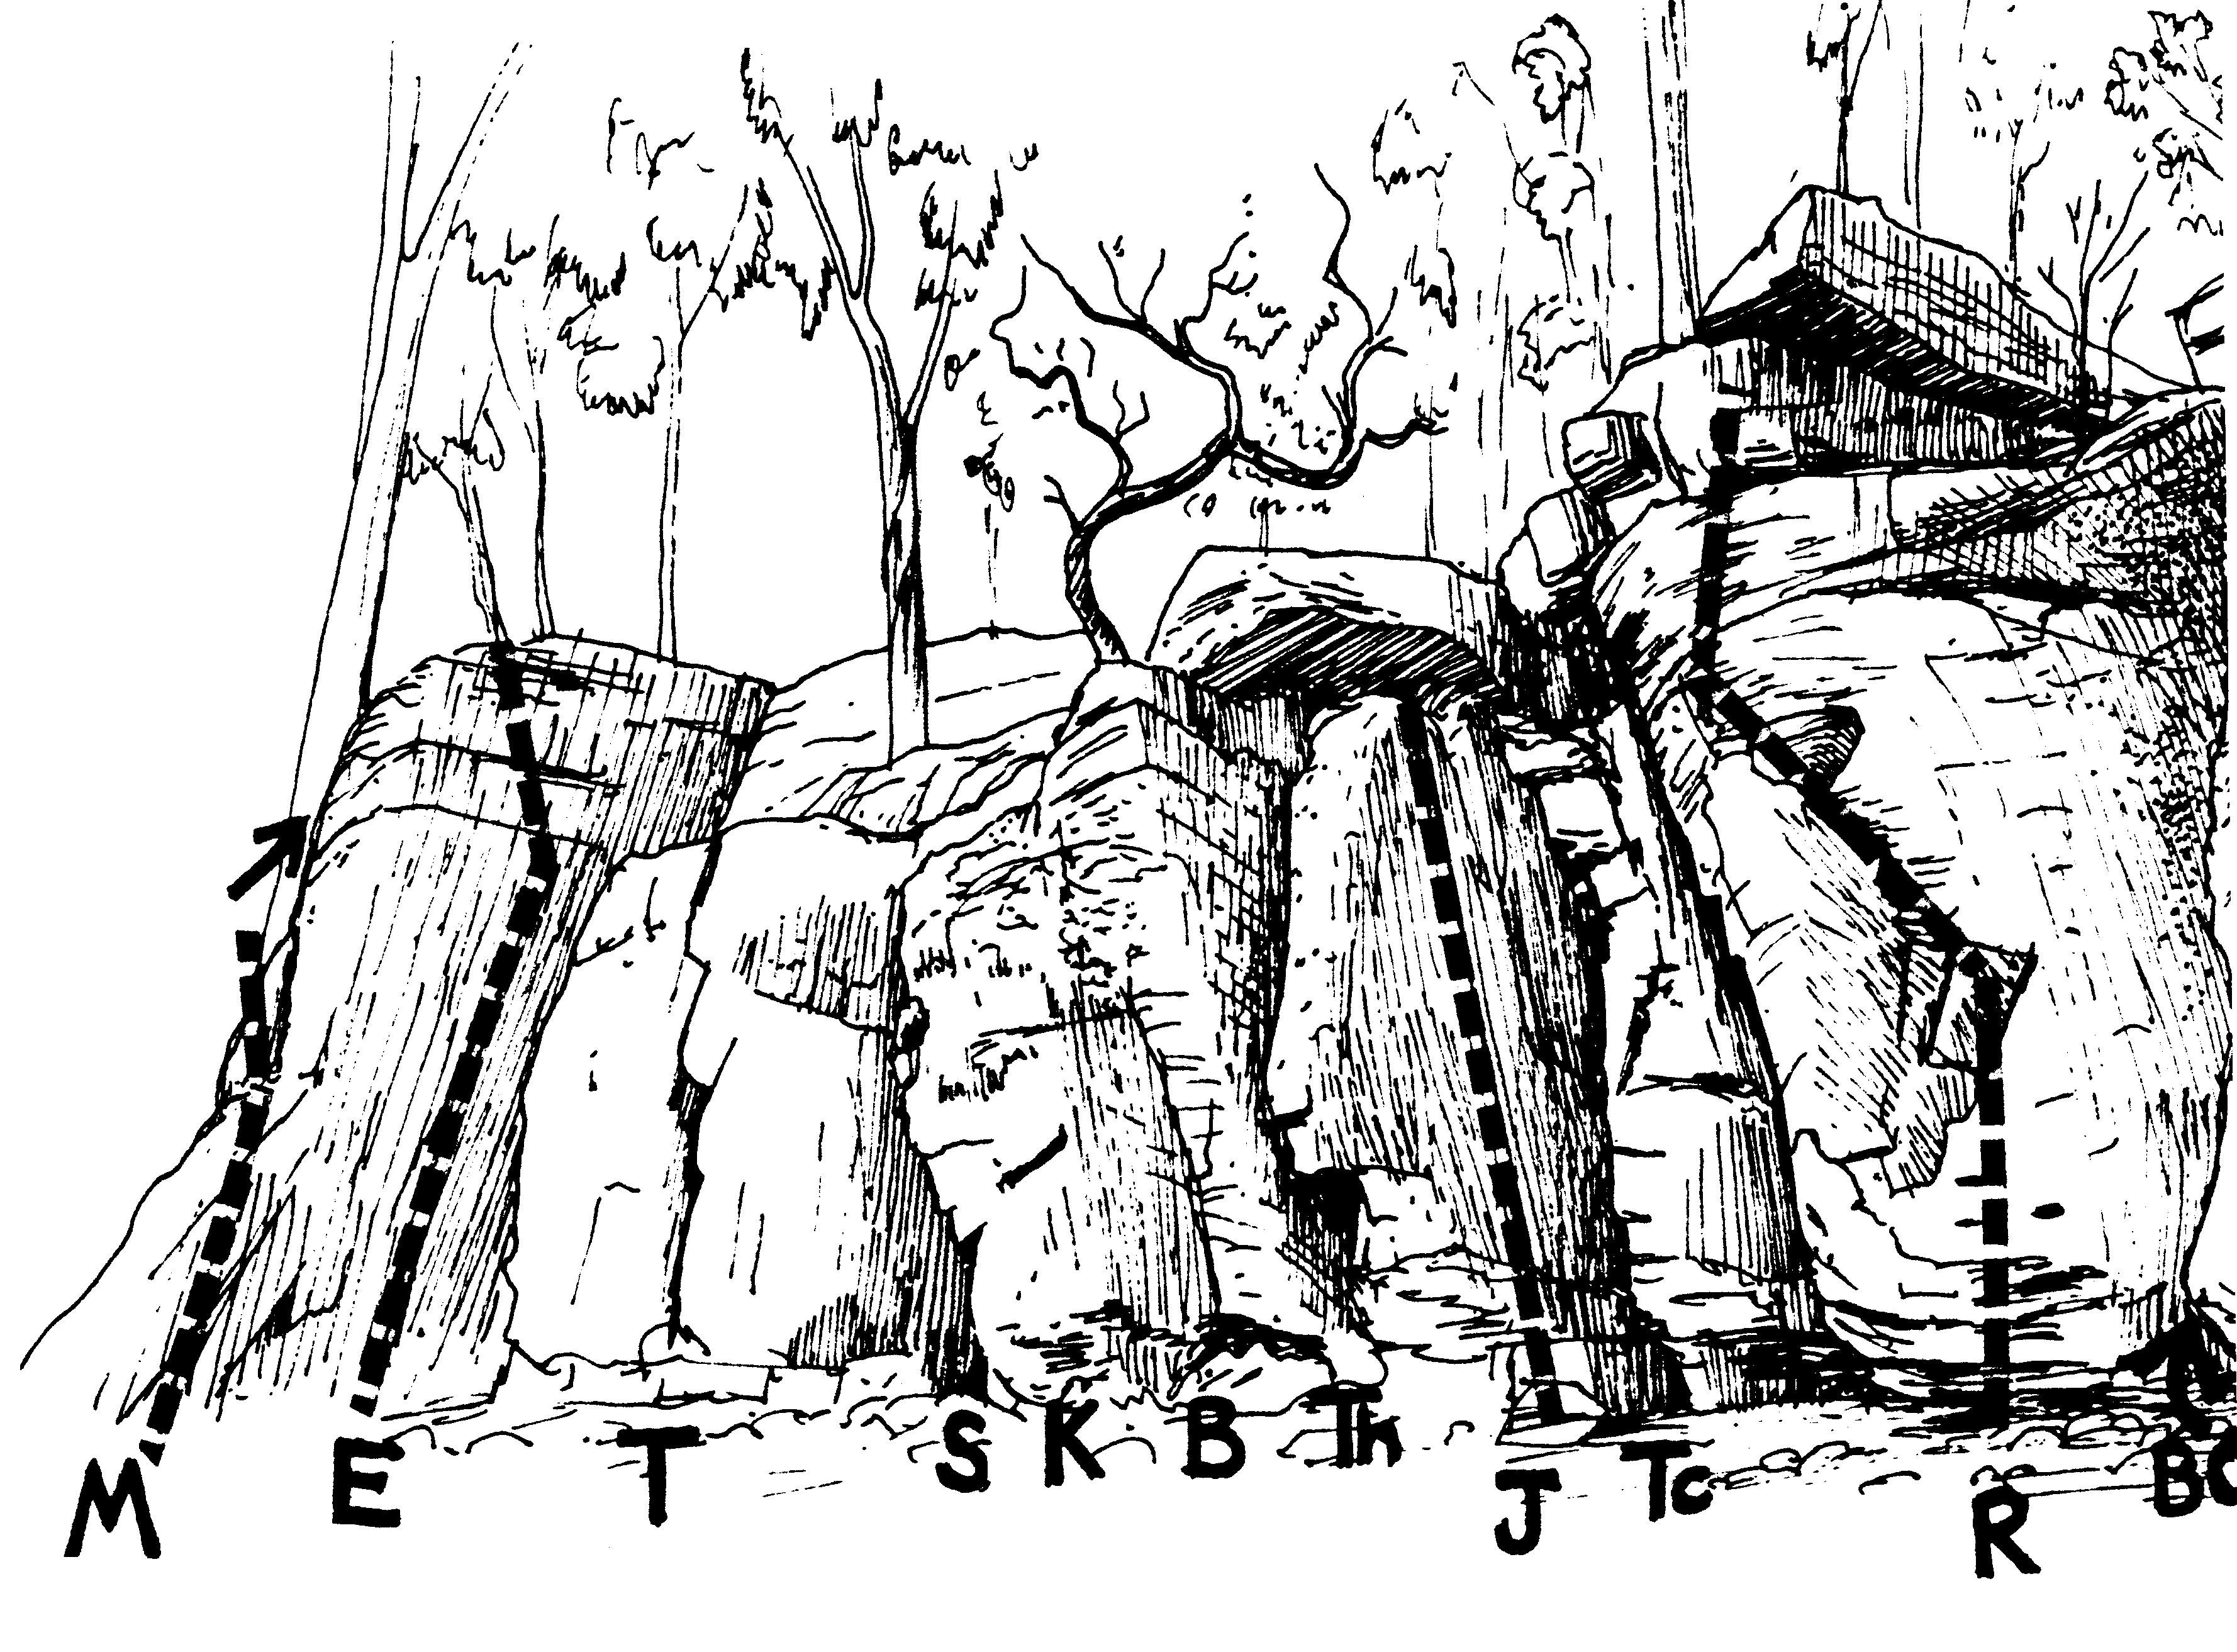
Climb the easy angled face on the L side of the East Wall. The hardest and steepest moves are found at the top.
Quite a tough little route. Climb directly up the front of the first significant buttress on the L.
Oct 1984.
Worthless. Follow the hand-crack up the face. The only difficulty comes in trying to surmount the dirty top.
This climb has as much going for it as its neighbour to the L. Ascend the chimney, moving out from its depths to pass the block at the top.
Start awkwardly on the L of the chimney. Move R across the chimney and ascend the face 1m R of the chimney on small holds.
1967.
Climb the face and thin discontinuous cracks 3m R of the chimney.
Start below the crest a few metres L of Thread belay Cracks. Climb up to the corner crack, then follow this to the top. Pass directly over the block at the top.
TR Douglas, 1967.
Climb directly up the wall to the immediate L of Thread belay Cracks. The climbing is thin but not unduly steep.
Climb up the broken cracks to the immediate L of Rudolf. Finish up the hand-crack through the overhang.
1967.
Start 1m L of the normal route. Ascend the even more overhanging face, with difficulties again at the level of the nose. Strenuous and sustained climbing.
Probably "the" classic of the buttress. Follow the line of jugs up the overhanging line to the loose flake. Move straight up past this (crux) then on to the top.
TR Reg Williams, 1967.
Start 4m R of Rudolf toward the back of the chimney. Climb up for 2m, then move diagonally leftwards across the red rock to finish a couple of metres R of Rudolf.
What a breeze! Climb the obvious chimney the only difficulty is deciding which holds to use!
A good traverse can be made leftwards from the Beginner's Chimney. The first moves across to Rudolf are fairly technical, but not committing. Continue past Jingle and the like, finishing somewhere near the East Wall.
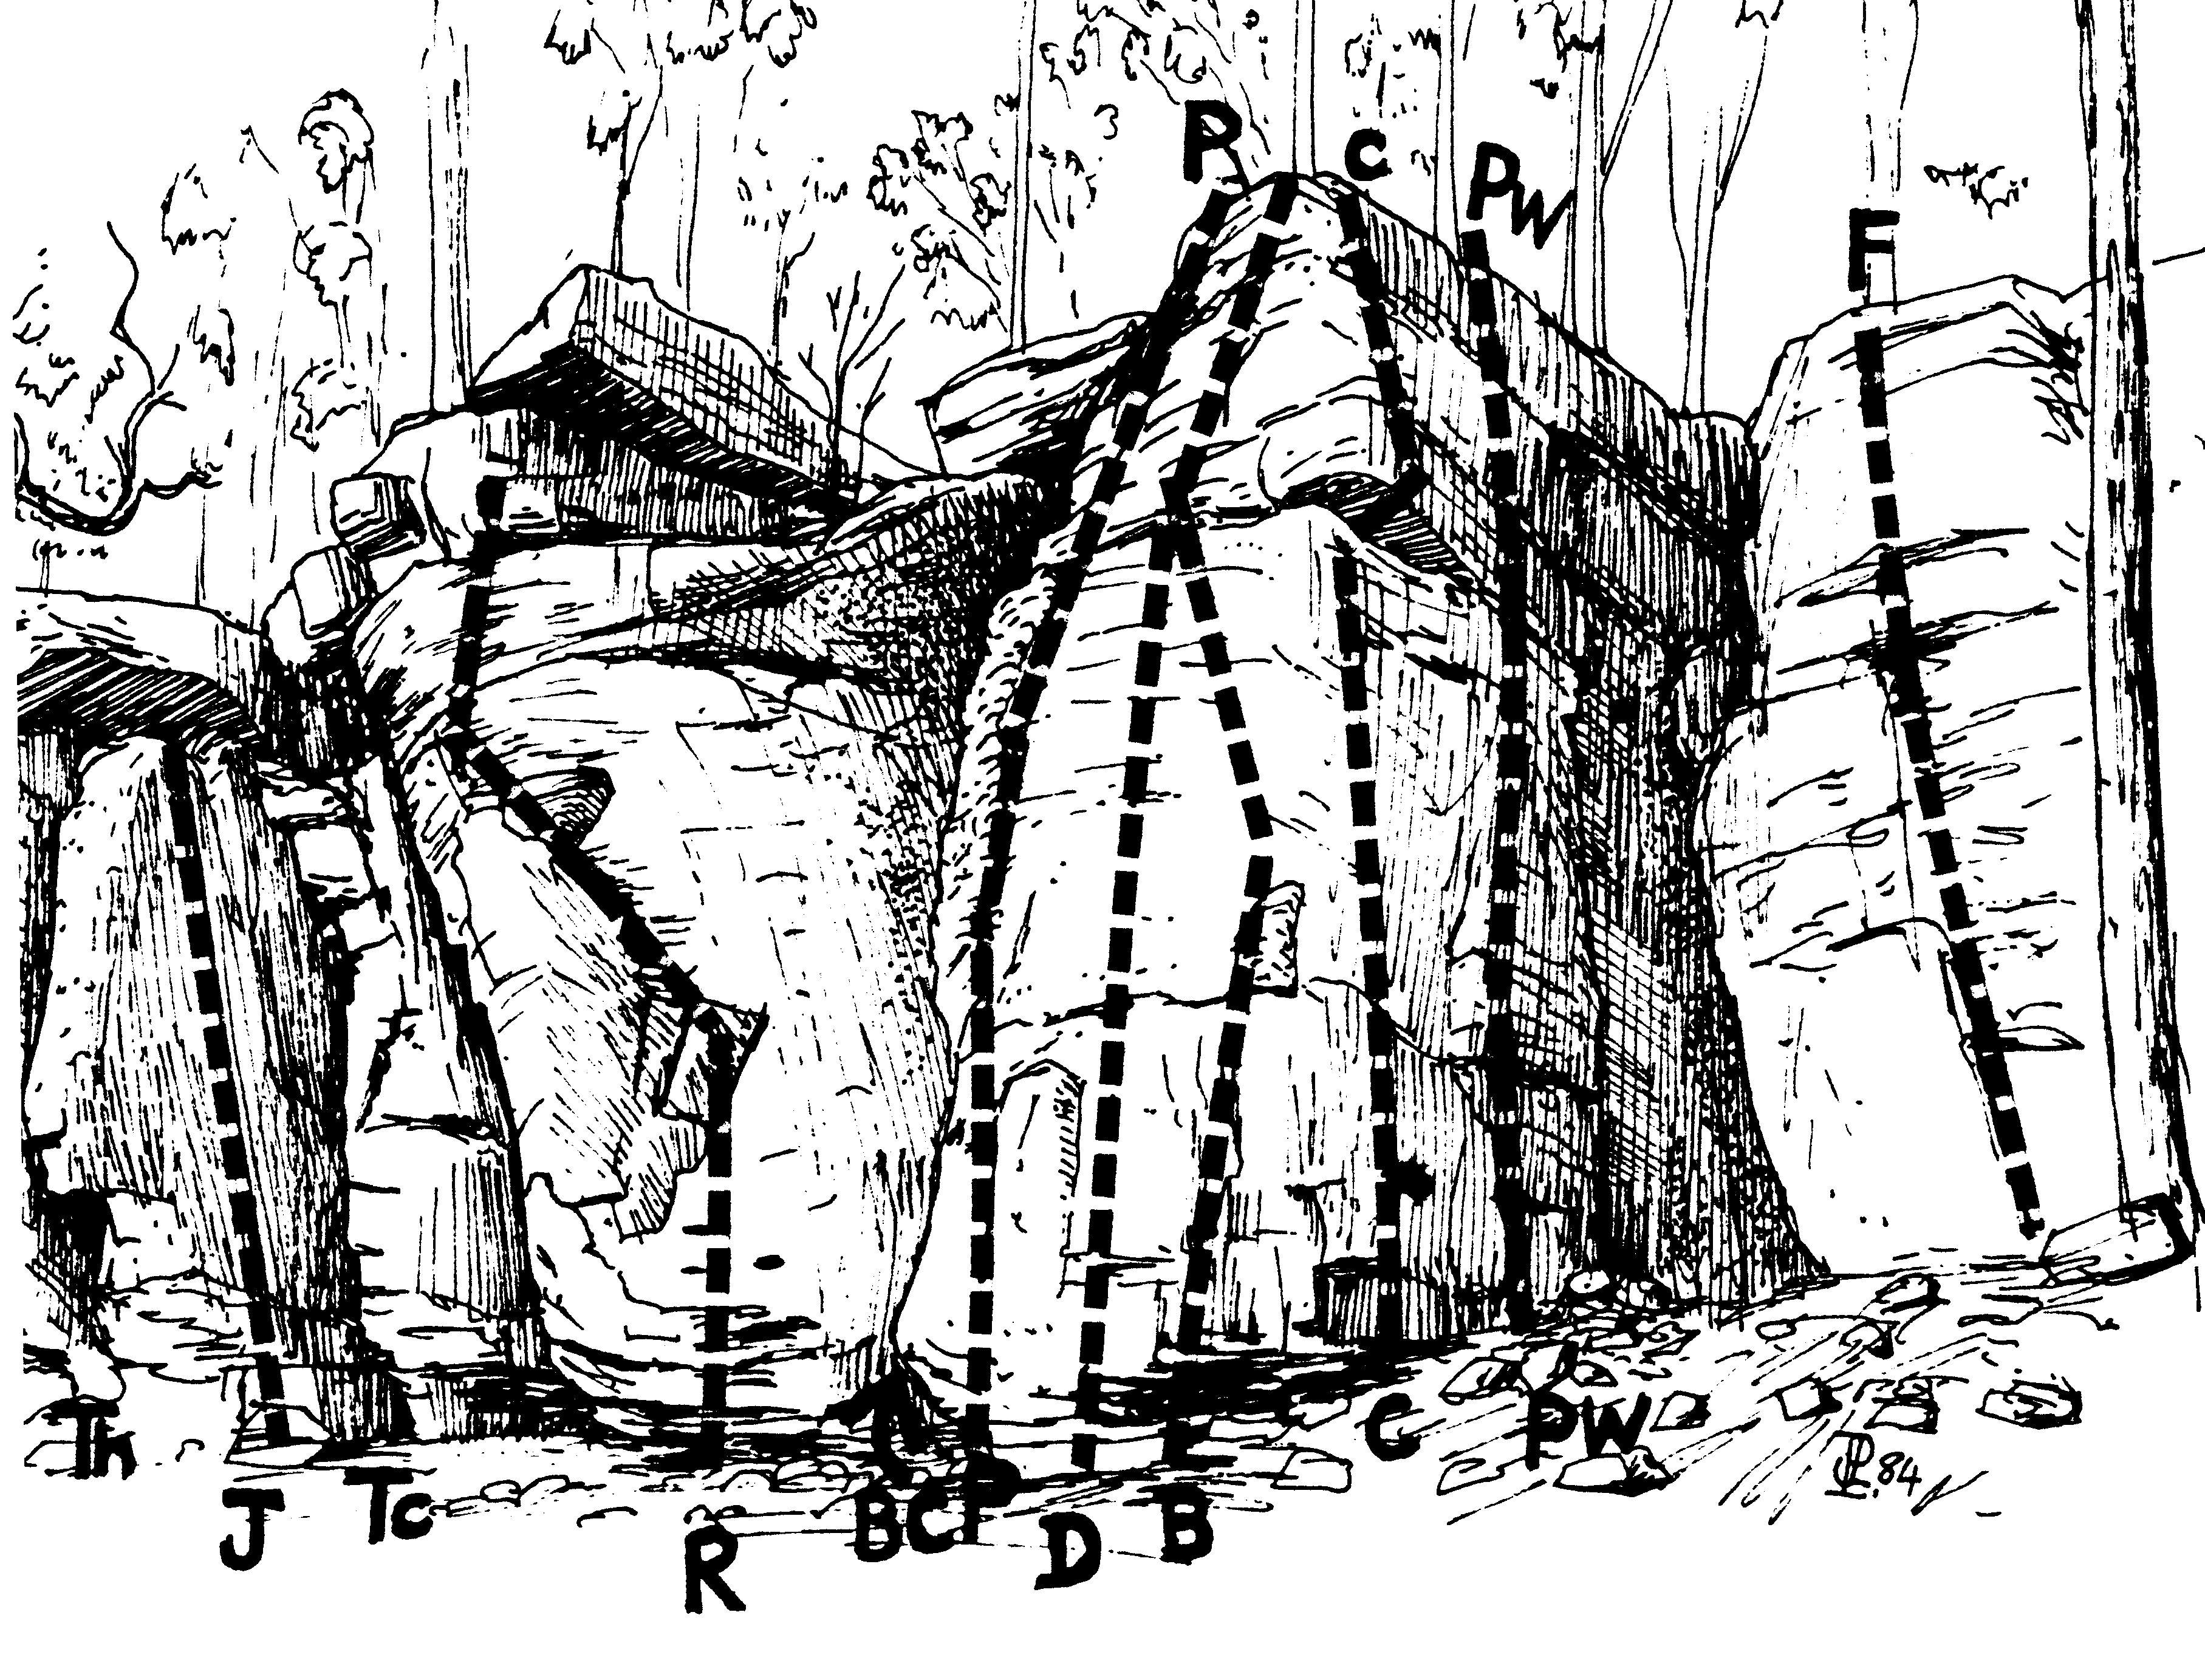
Climb the R wall of the chimney, about 2m left of Parasite. Good value.
A very nice route and, surprisingly, quite leadable. Start below the large flake. Follow this up to the vertical crack, then follow this to the top. Protection is thin but adequate.
TR Mike Douglas, 1966.
Climb the face between Parasite and Blitzen without deviating into either. Very contrived, but nonetheless, when the rope is already set-up for one of the other climbs...why not?
A very nice problem. Holds are a bit sparse, but if you search them out they're always where needed. Climb up the face past the block and to the L of the arete. Pass the overhang at the top on it's L.
This climb, originally graded 17, has now become more difficult due to some holds falling off. Climb directly up to the half metre overhang. Climb straight over it (crux) to finish directly.
Climb the face midway between Collision and the crack. Sustained for its length. Another classic route.
1966.
Climb the crack to the R of the normal route. Beginners often get into some most unusual positions near the top.
Ascend the slab between the crack and the deep cleft on the RH side of the wall. Fairly technical, albeit a bit dirty at the top.
Climb the crack 1m L of the tree. After reaching the ledge near the top, continue on to finish if you're good enough.
Ascend the wall to the R of the Funicular Cracks and 1m R of the tree.
1967.
Omega Rocks
The Omega Rocks are located to the R of Shadow Buttress. At present, lichen has encroached on the climbs due to lack of traffic, but the efforts of a few climbers would soon change this. The rocks are fairly small, but still offer some worthwhile climbing up thin faces and over some good overhangs. They are definitely worth a look when the novelty of the classics wear off.
A short and pleasant enough little problem on the second buttress from the L. Climb up the corner to the roof. Pass to the R of this and finish.
1967.
A fairly technical problem 2m R of Hibernation. Climb up the thin crack to the hollow scoop at two-thirds height. Continue on easily to the top.
1967.